Ever since I first saw a nighttime timelapse video, I was hooked, and in the last 10 years I’ve made dozens of timelapse clips.
So now I decided to show you the whole timelapse photography workflow from camera settings to post-production.
You will see that it’s a lot easier to create timelapse videos than you may think.
Don’t have time to read the whole article? You can watch the video below, and you can also download a copy of my Timelapse Photography Checklist PDF.
This is the exact same checklist I run through before making any timelapse video.
↓Click here to download it for free↓
Let’s dive into it!
What is a timelapse video?
A timelapse video can be any kind of video that shows reality sped up.
For example, this was my first timelapse compilation, and most of what you see is 75-150x faster than real life:
Therefore the easiest way to make a timelapse video is to the record a normal video, and then speed it up in any video editing software like Adobe premiere pro.
Many people do it this way, because it’s super fast.
But…
This technique works fine during the day, but you cannot use this method at night where long shutter speeds are required.
Also, you want to take advantage of the huge dynamic range and resolution of the RAW photos.
So that’s why I prefer time-lapse photography…
What is timelapse photography?
Here we shoot individual photos at certain intervals and then we merge these photos into a video in post-production.
Basically we are shooting a video frame by frame as individual photos.
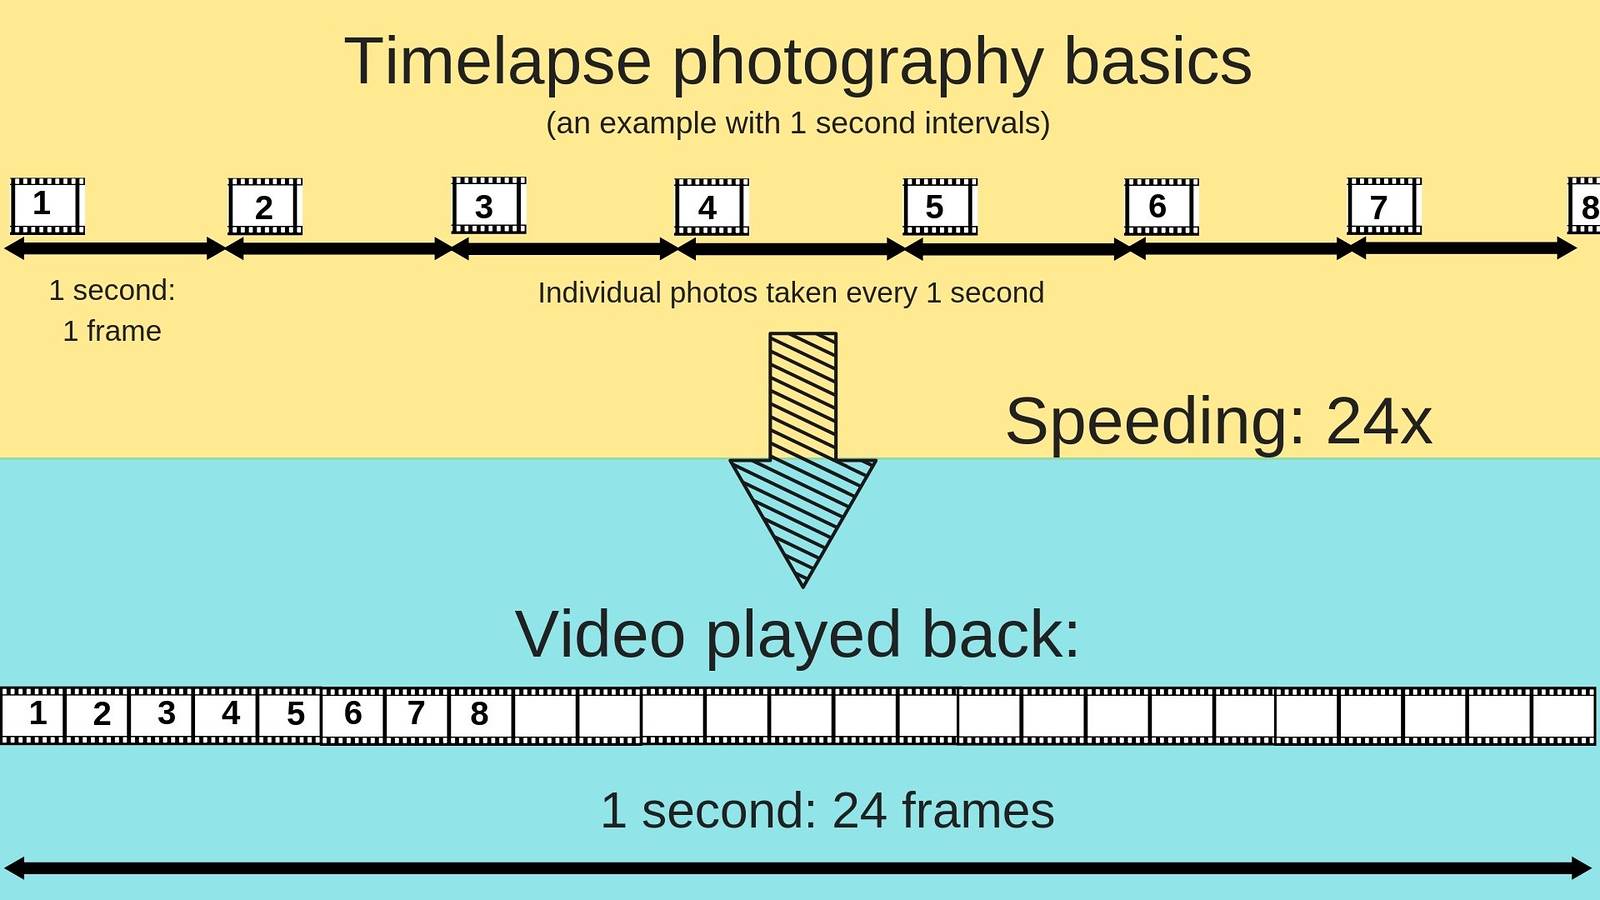
For example, here I took photos every 2 seconds:
Just like any other video or movie, this one contains 24 frames every second. Meaning that it shows reality 48 times faster than real life.
This also means that if you want to have a 10 second long timelapse video, you need to take at least 240 frames.
10 seconds of timelapse video → 240 photos
What you’ll need for a timelapse video?
- camera capable of shooting in Manual mode
- tripod (the sturdier, the better)
- intervalometer (or the camera does not have a timelapse program)
- memory cards with lots of free storage space
- fully charged battery
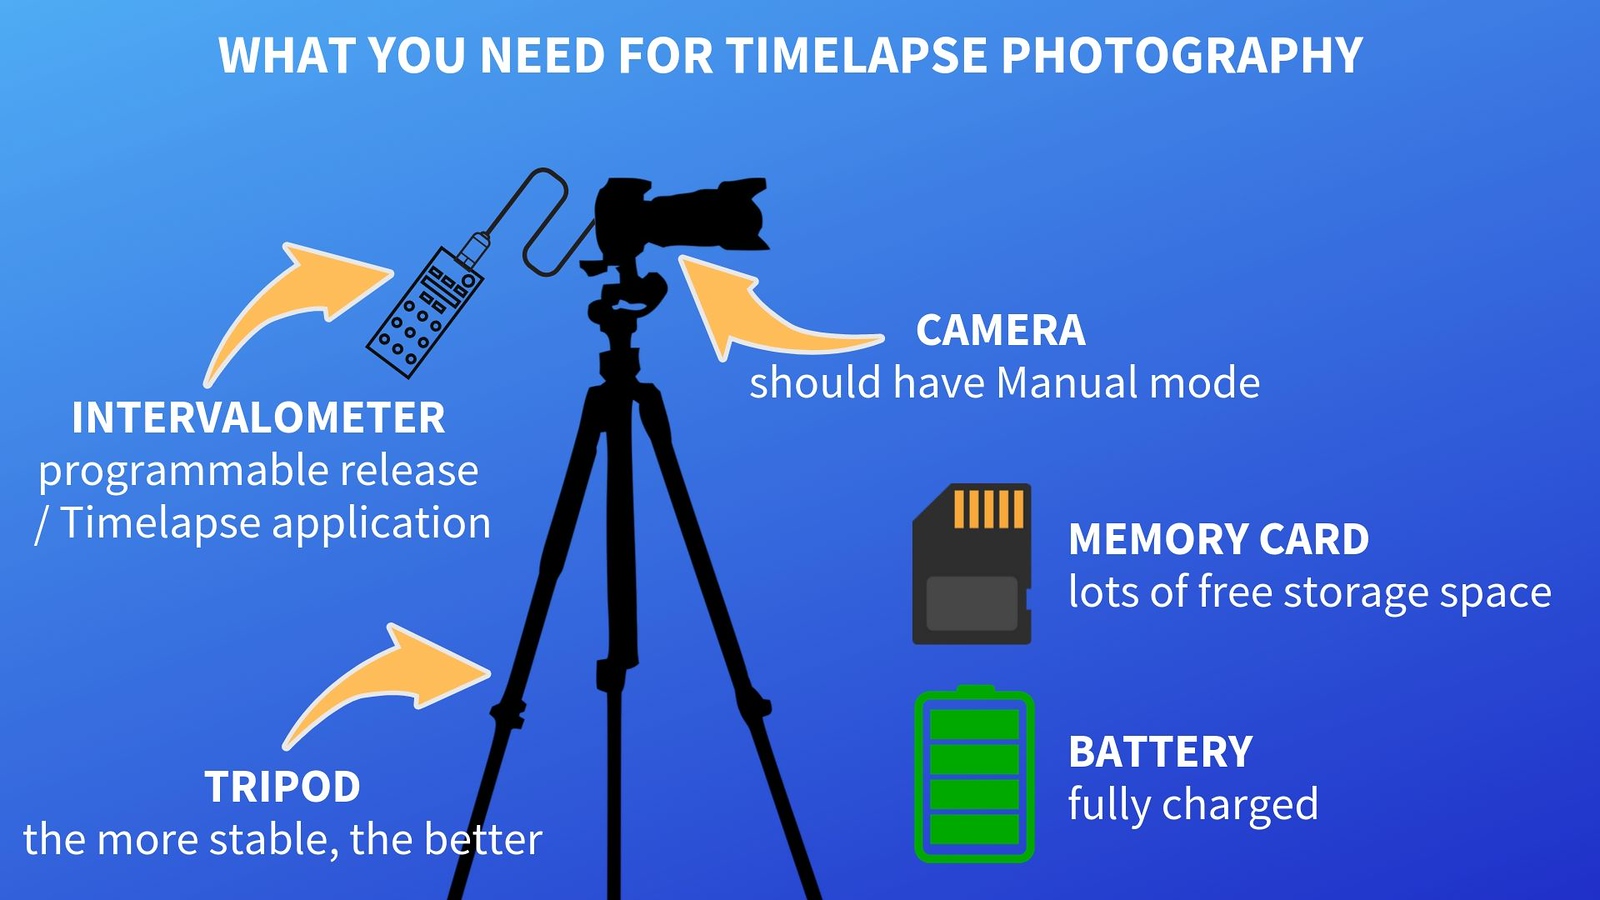
The good thing about timelapse photography is that you do NOT need to have expensive gear!
Even an old DSLR will do a perfect job for daytime timelapses.
In fact, most of my timelapse works were shot on old DSLRs like the Canon 1000D and 550D.
What are the best subjects for timelapse photography?
Basically anything that involves moving parts:
- all different kinds of clouds,
- traffic, especially boats
- crowds,
- growing plants,
- and of course the starry sky with the Milky Way
Look how great the boat traffic looks in the city of Budapest:
If the lighting conditions are constant for example, in sunshine, or at night, setting the camera for timelapse photography is really simple!
This is what I’m going to show you in this article step-by-step.
Here’s an overview summary of the camera setup for timelapse videos:
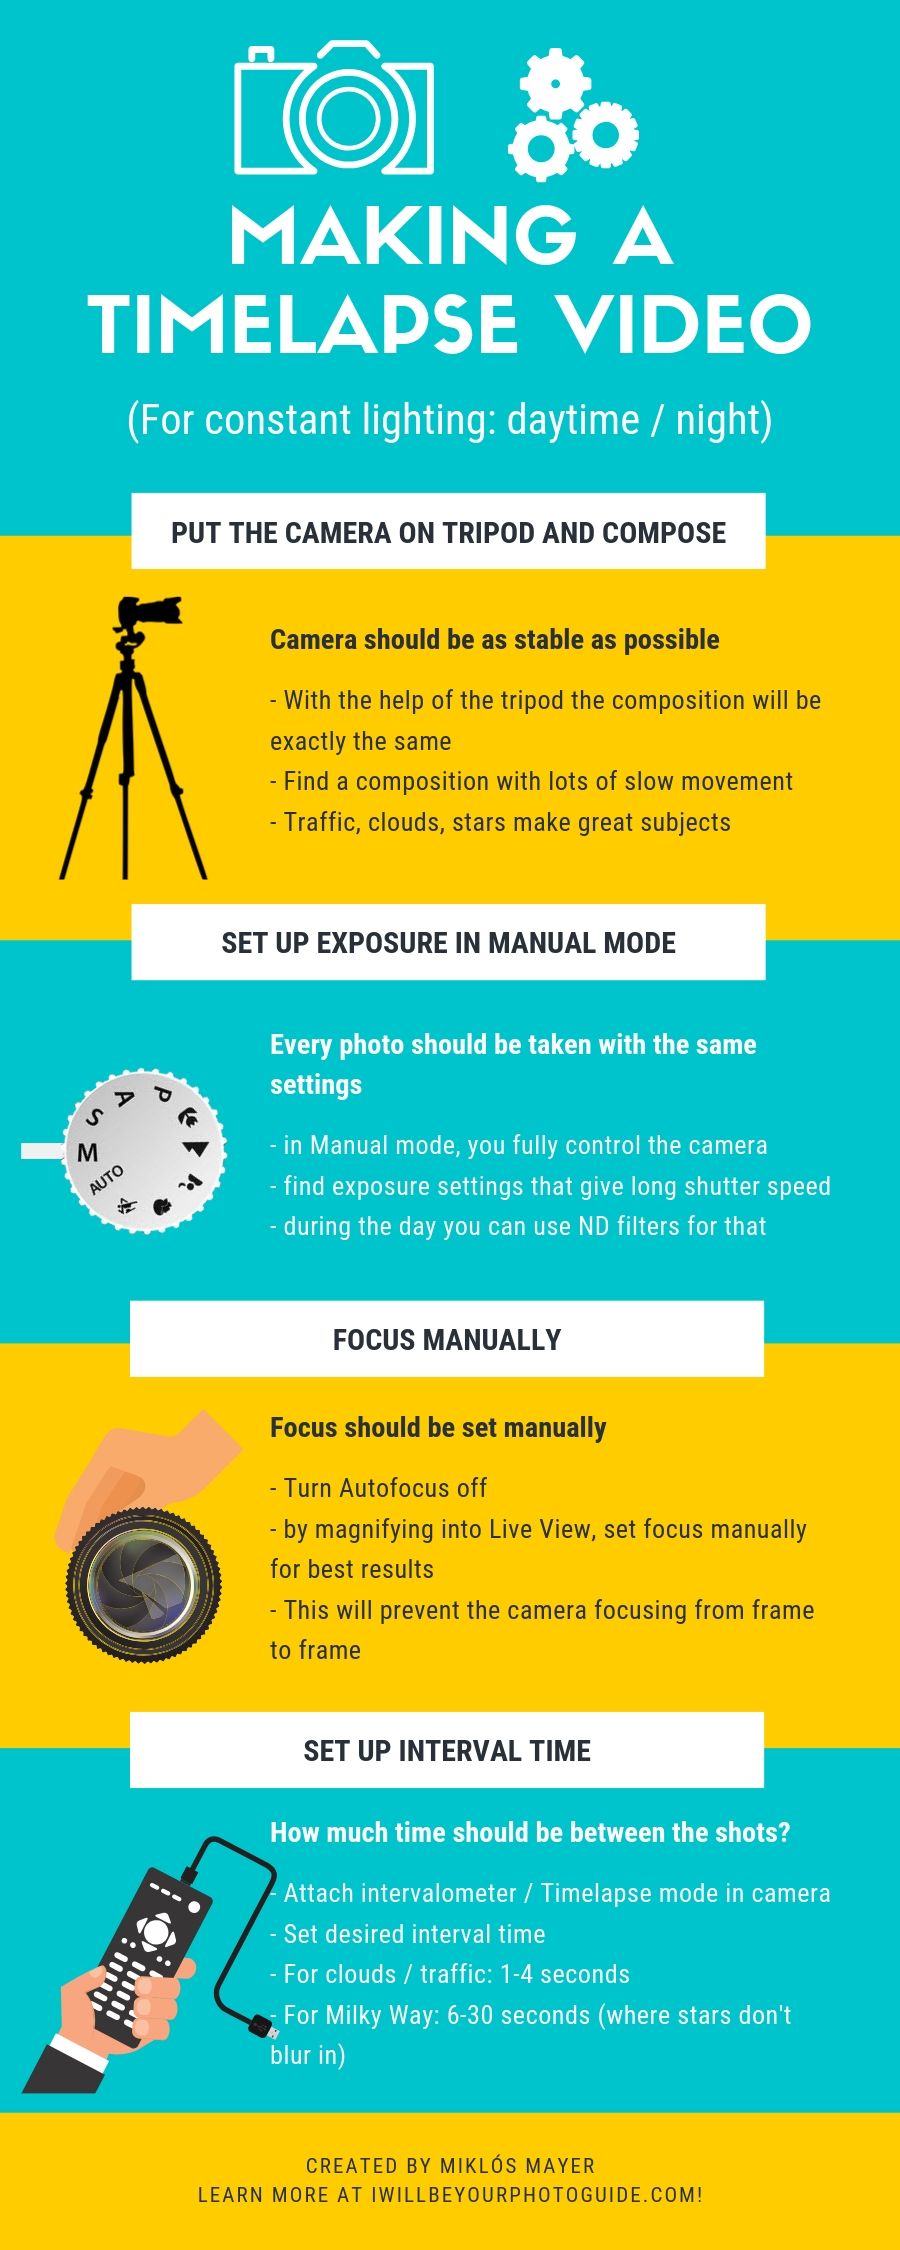
Putting the camera onto a tripod
The basic idea here is that we want the camera to take the exact same frames.
So you first have to put your camera on a tripod, and the tripod should be as sturdy and stable as possible to prevent any shake.
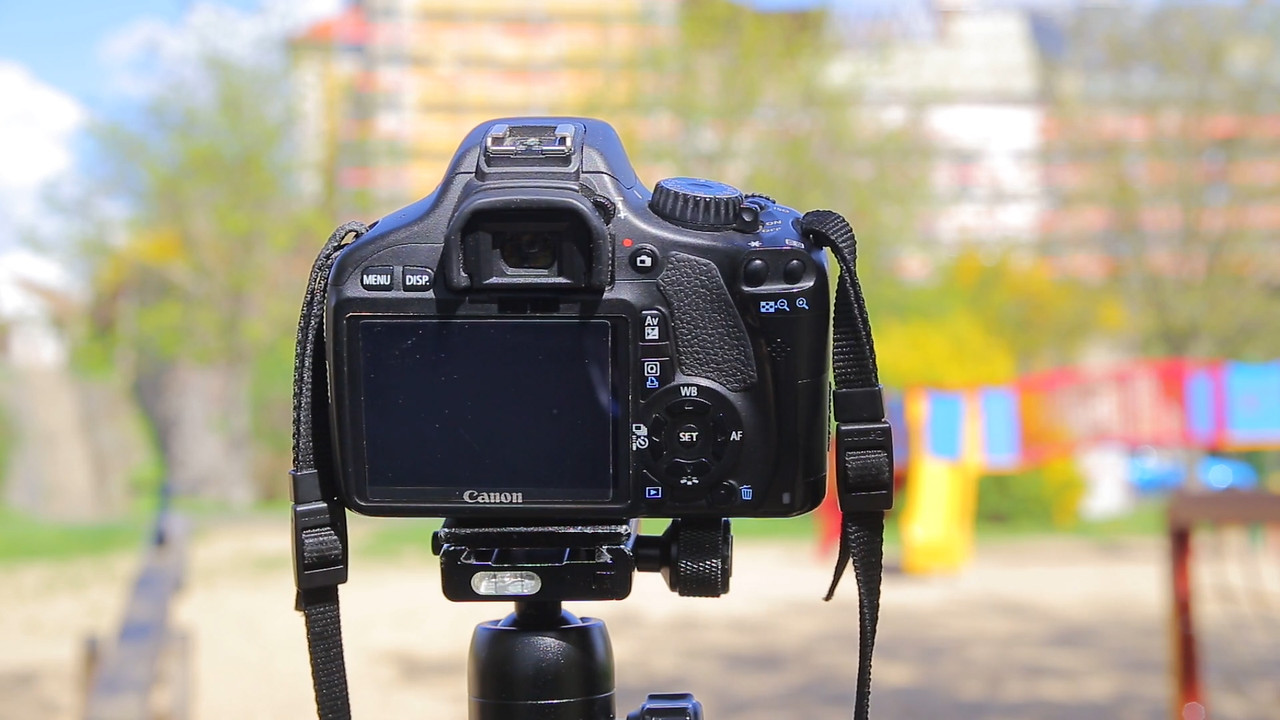
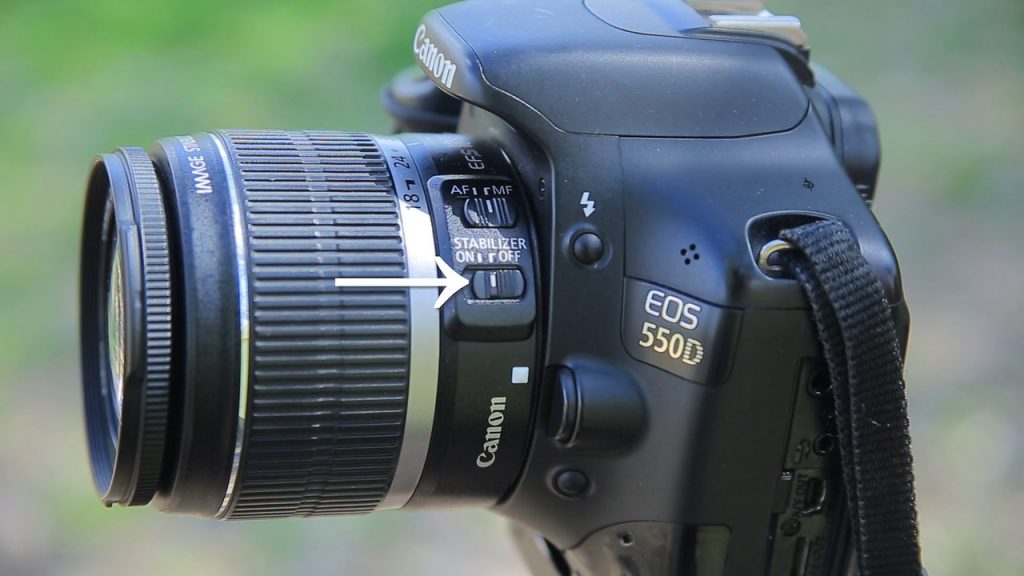
Also, it’s best to turn off the image stabilization OFF on the lens (or in the camera Menu).
Often the stabilization will work on a tripod as well, and it will actually make the photo blurry. So it’s best to turn it always OFF when shooting on a tripod.
Picking a good composition for a timelapse (and what to avoid)
When composing it’s worth to keep in my mind that the cameras normally take photos with a 3:2 aspect ratio, whereas videos have a slightly more “panoramic” aspect ratio, like 16:9 or even 2.35:1.
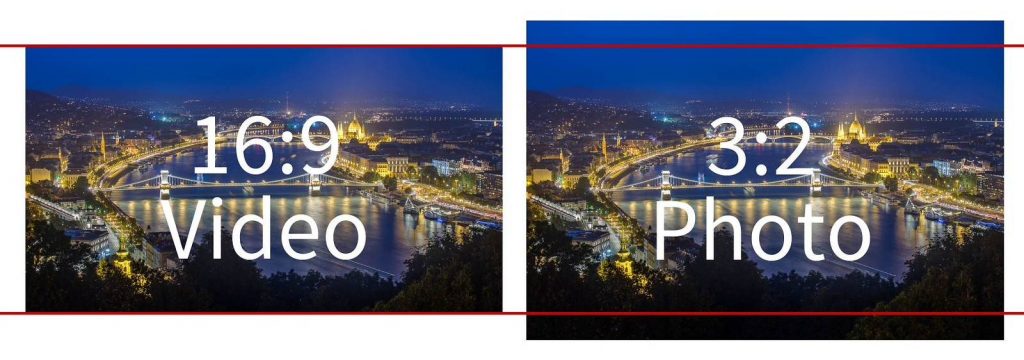
I recommend to have a compositions where you not only have the moving parts, but you have some non-moving parts like the landscape, or buildings.
This way, the movement will be more emphasized.
Also, keep in mind that whatever moves fastest will attract the most attention on the final video.
For example, here I did a timelapse of the lunar eclipse over Budapest. I bet you that if I hadn’t told you about the Moon, you would have never looked at it, because the boat traffic on the Danube steals the show.
Useful read: timelapse photographer Enrique Pacheco shares 10 tips for better timelapses
Camera setup for timelapse photography
So, after finding a good composition, you want your shots to be taken with exactly the same settings.
The two different workflow to choose from
In terms of shooting and processing, timelapse-photography can be split into two categories:
The first category is when the light is constant, so it’s not changing much – for example during the day, or at night.
This is the part I’ll be dealing with in thus article.
The second category is when the light is changing, for example, at sunset or sunrise. In this case everything gets a bit more complicated, so I’ll cover this in another article.
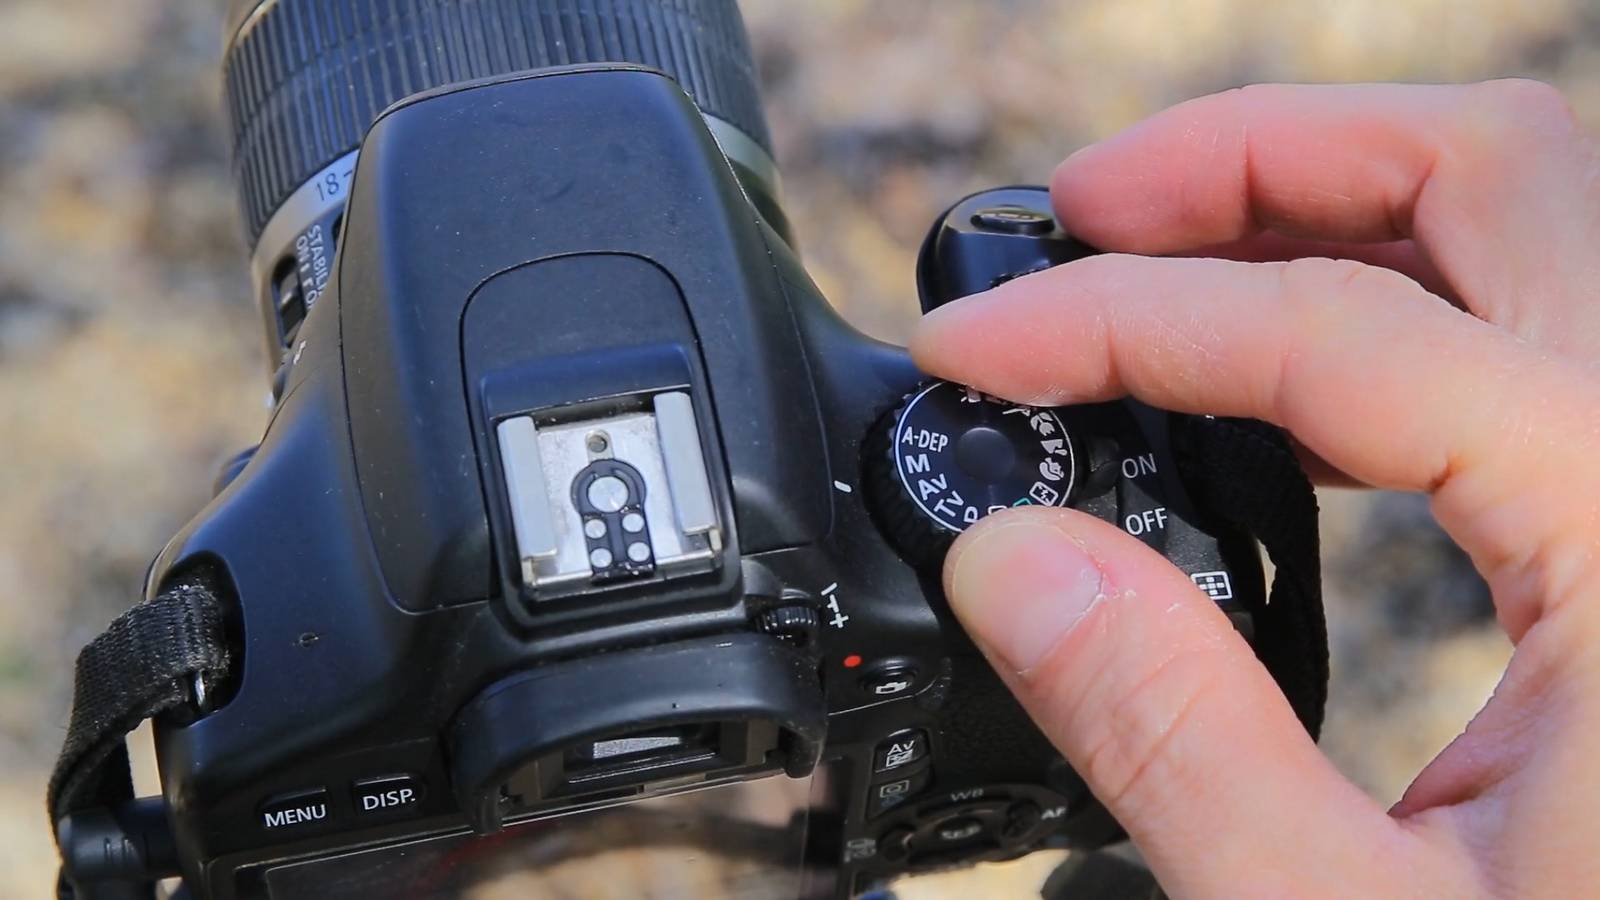
Set the camera into Manual mode
As you want your frames to be taken with the exact same settings, without the camera deciding anything, let’s switch the camera into manual mode.
Before I go on, let me tell you that I’ve put together a checklist PDF that you can download freely and take it with you.
In this checklist I run through the whole timelapse photography setup. As there will be hundreds of photos after you finish, it’s best to have all the small details in place before the start 🙂
↓ Click here to download it for free↓
If you want to have the best quality, go for RAW file format, but in evenly lit daytime scenes, shooting in JPG will be fine as well.
Then compose and set the basic exposure. Personally, I like to do this through the Live View mode if I’m shooting with a DSLR.
Summary – Manual mode
– In Manual mode you can control the shutter speed / aperture independently,
– Every frame will be shot with the exact same setting
Pay attention to shutter speed (aka drag the shutter)
Now let’s stop here for a minute.
Because this is where it gets different to normal photography.
In timelapse photography you always want to have slow shutter speeds.
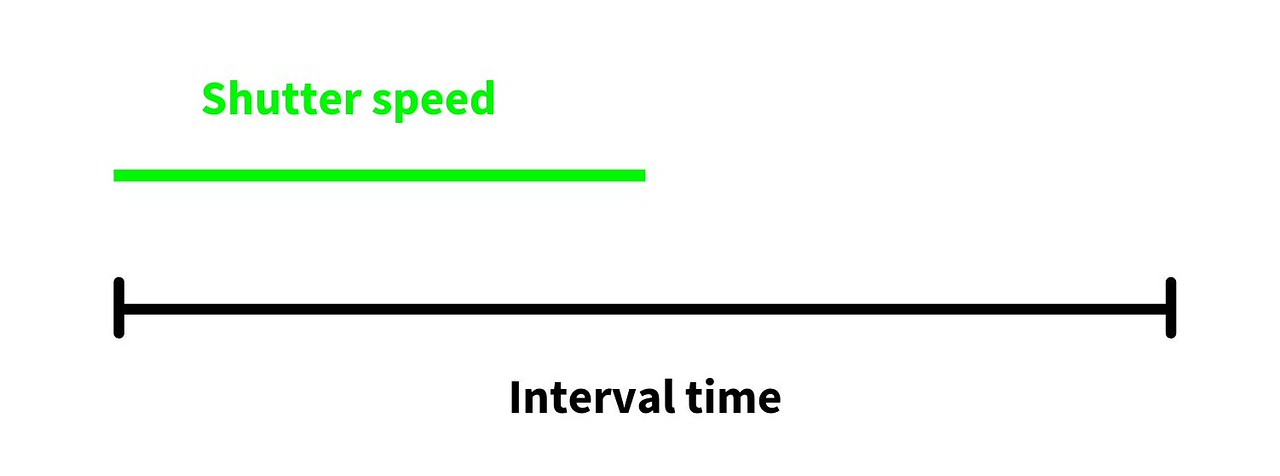
Ideally the exposure time should be at least a quarter of the interval time or even longer.
For example, when having 1 second as interval, the ideal shutter speed is around 1/2 second.
This is especially true when shooting randomly moving subjects like people or traffic.
Why?
Because the longer shutter speed captures motion, which makes a smooth transition from frame to frame. This results in a more smoothly flowing video.
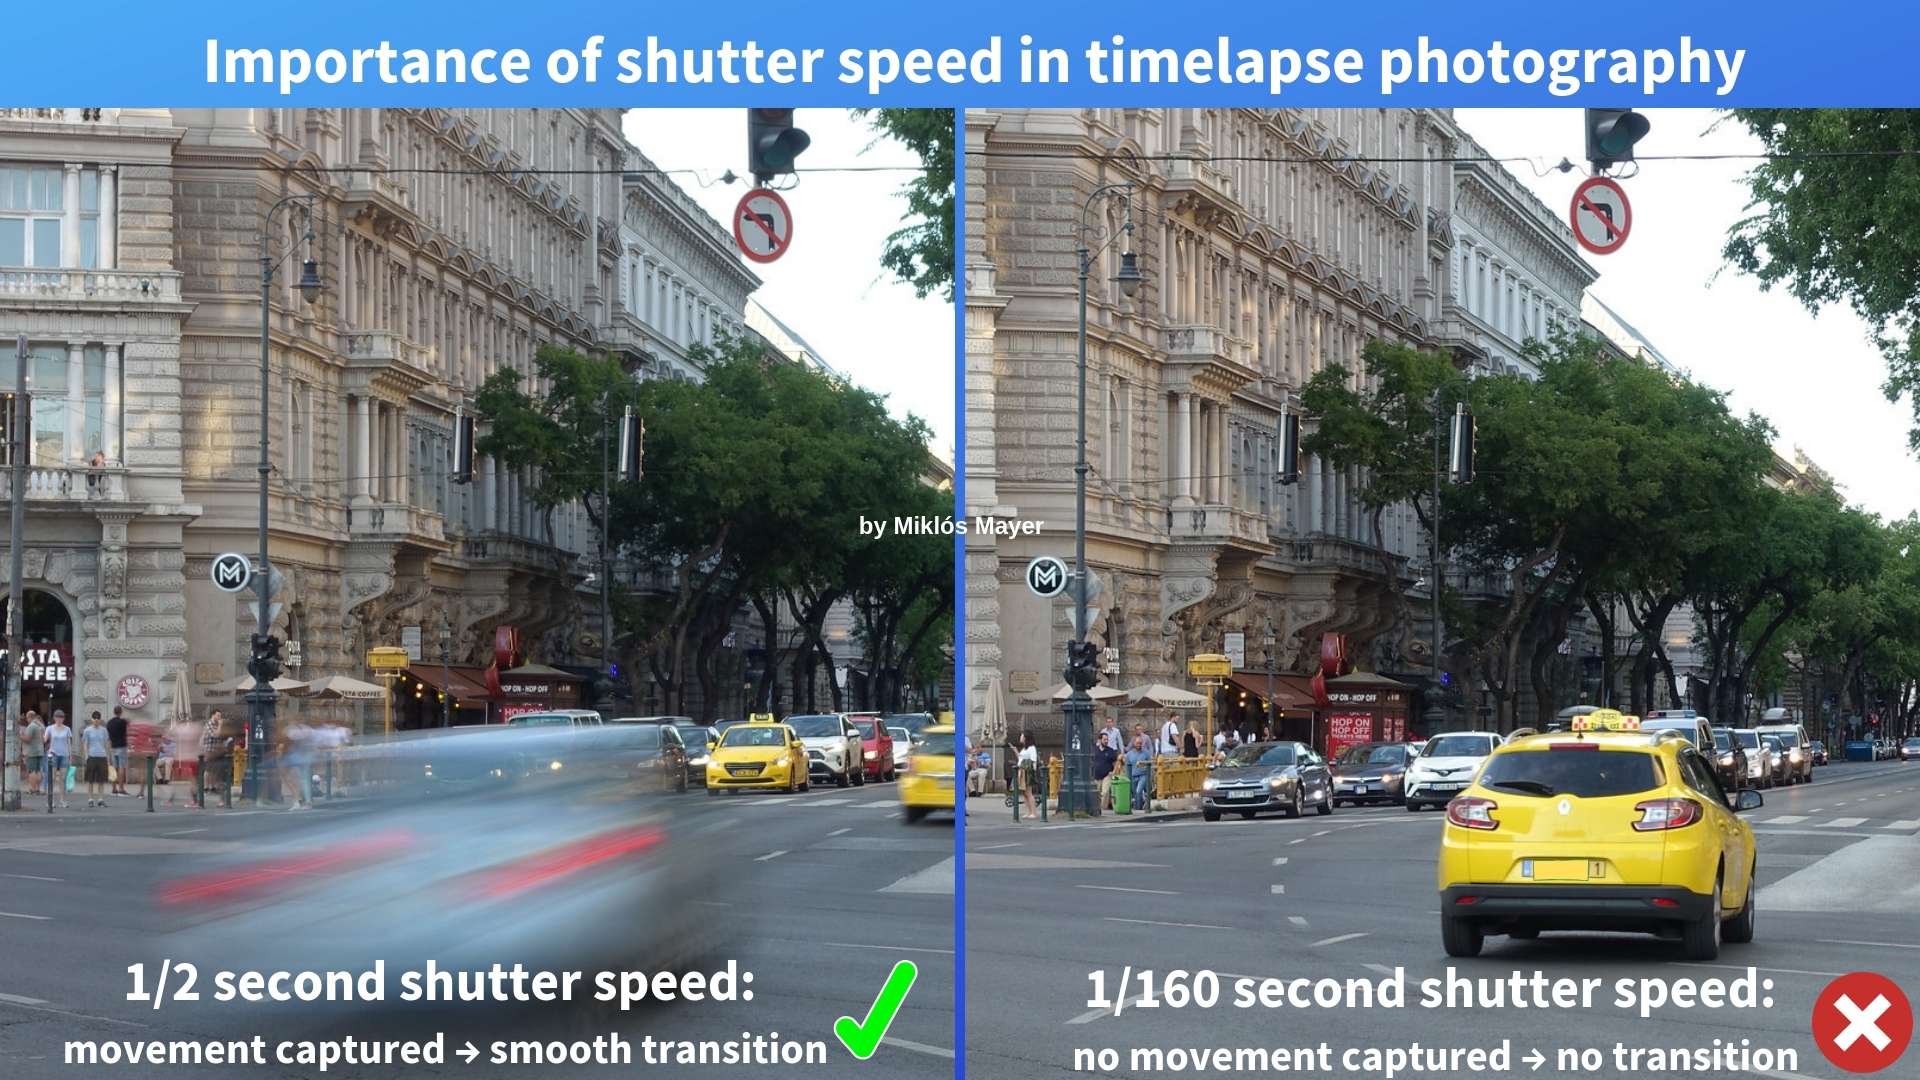
In the video below I compared two timelapses.
For the first one I was exposing in every second with a half-second long shutter speed (the ideal setup). So the timespan of every frame covers half of what happened.
But in the second part, I had the same 1 second interval, but the shutter speed was pretty fast, one hundred and sixtieth of a second.
That means I captured just a fraction of what happened.
You can see the motion was not captured and there is no transition of movement from frame to frame.
Therefore the video looks jittery and it’s not pleasant to watch at all.
Have a look for yourself:
So the bottom line is that you should use as long exposure times as possible.
This is what they call “drag the shutter“. It means that you should shutter speeds that are around the same length as the interval time.
Or it’s also referred to as having a high “shutter angle”.
Shutter angle is an expression coming from the film age.
In the film cameras there used to be a shutter with a half-circle shape.
This served as the mirror as well. So the cinematographer could see the picture meanwhile recording.
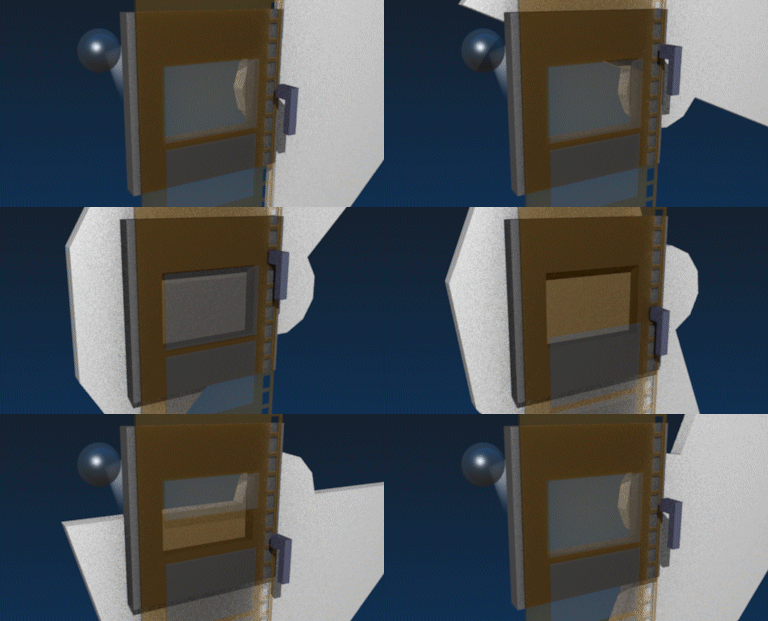
With this, a the video that was recorded at 24 frames per second, the shutter speed for each frame was 1/48 second.
So a shutter angle of 180 degrees means half as long shutter speed as the interval.
While a shutter angle of 360 degrees means that the exposure time is as long as the interval.
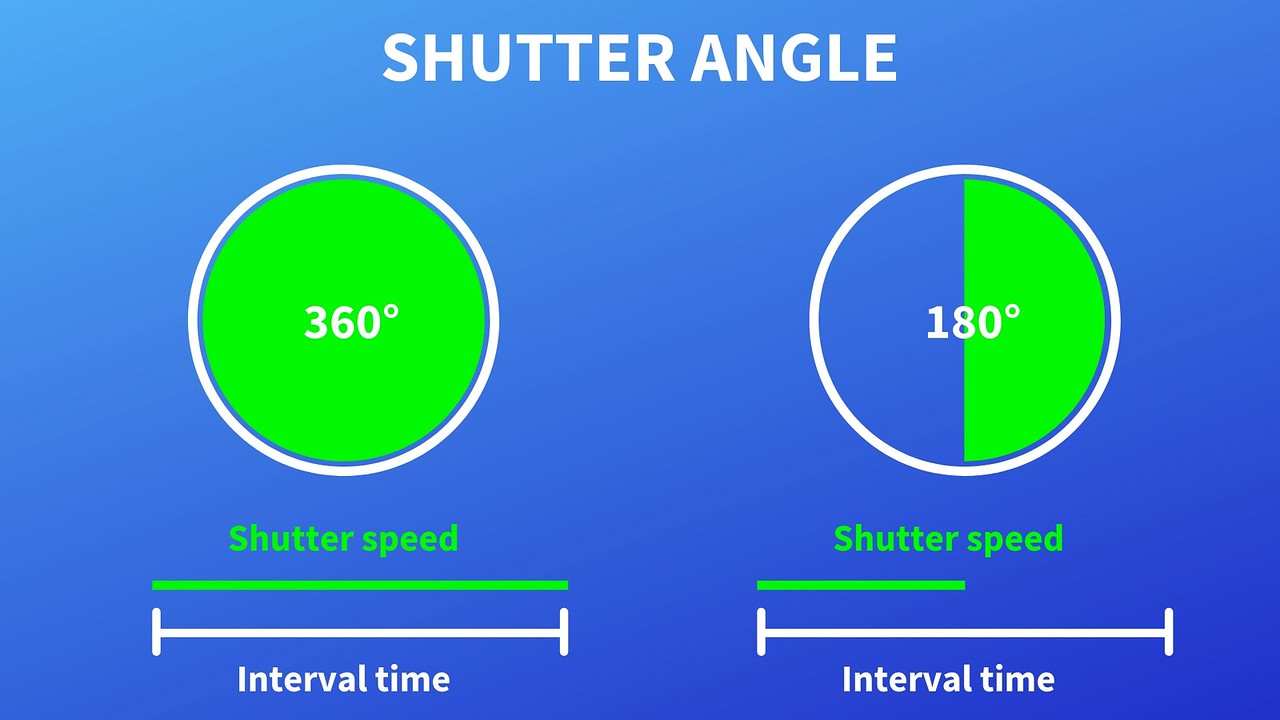
Basically the interval time equals a full circle, and you “project” the shutter speed proportionally for that.
That’s why it’s often useful to use ND filters, especially during the day.
Neutral density – ND – filters are like sunglasses for the lens: they block most of the light out and therefore make the shutter speed longer.
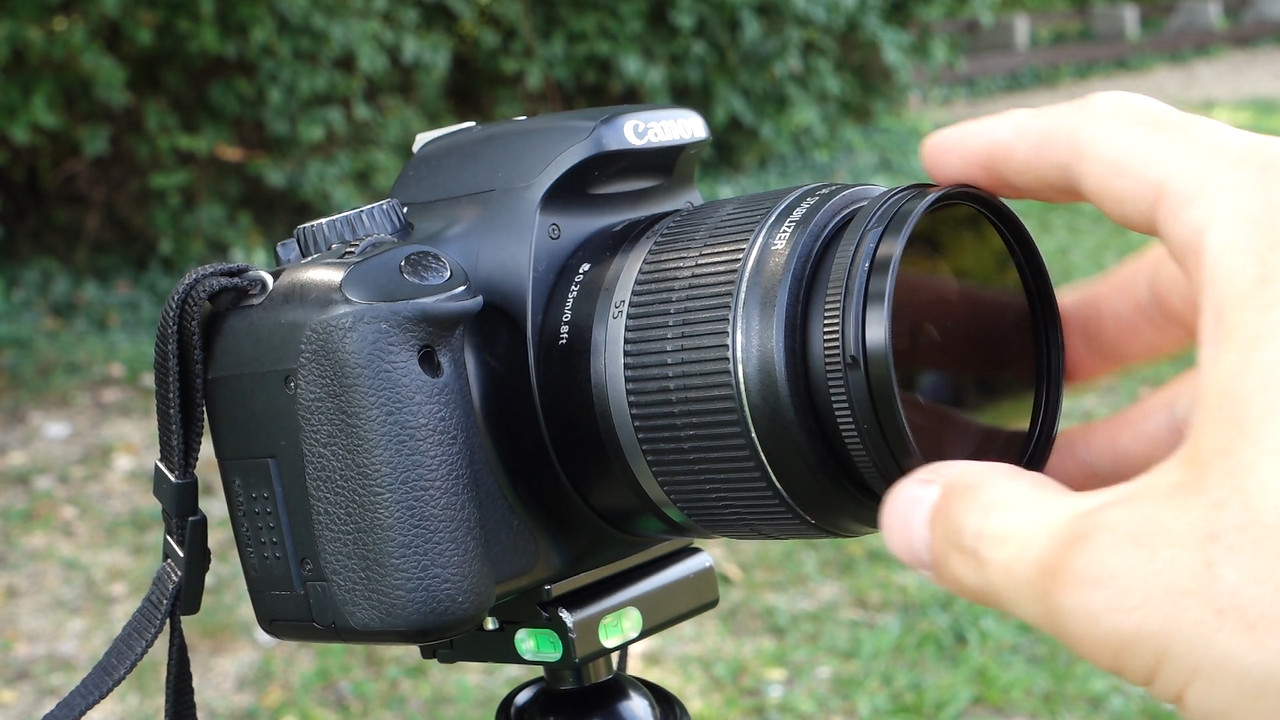
In some compact cameras, like in the Sony RX 100 series, an ND filter is already built in.
However, dragging the shutter is not life or death
Dragging the shutter is only important when there are randomly moving subjects like people.
If your subject is the clouds, and they are not moving fast, then you don’t necessarily have to use very long shutter speeds.
I’ve created dozens of daytime timelapse videos of clouds without an ND filter, and they look pretty good…
For example, this one was in broad daylight, with super short exposure time, with almost zero degree shutter angle.
But because the clouds have a constant-speed movement, the video looks alright:
Okay, let’s jump back to camera settings!
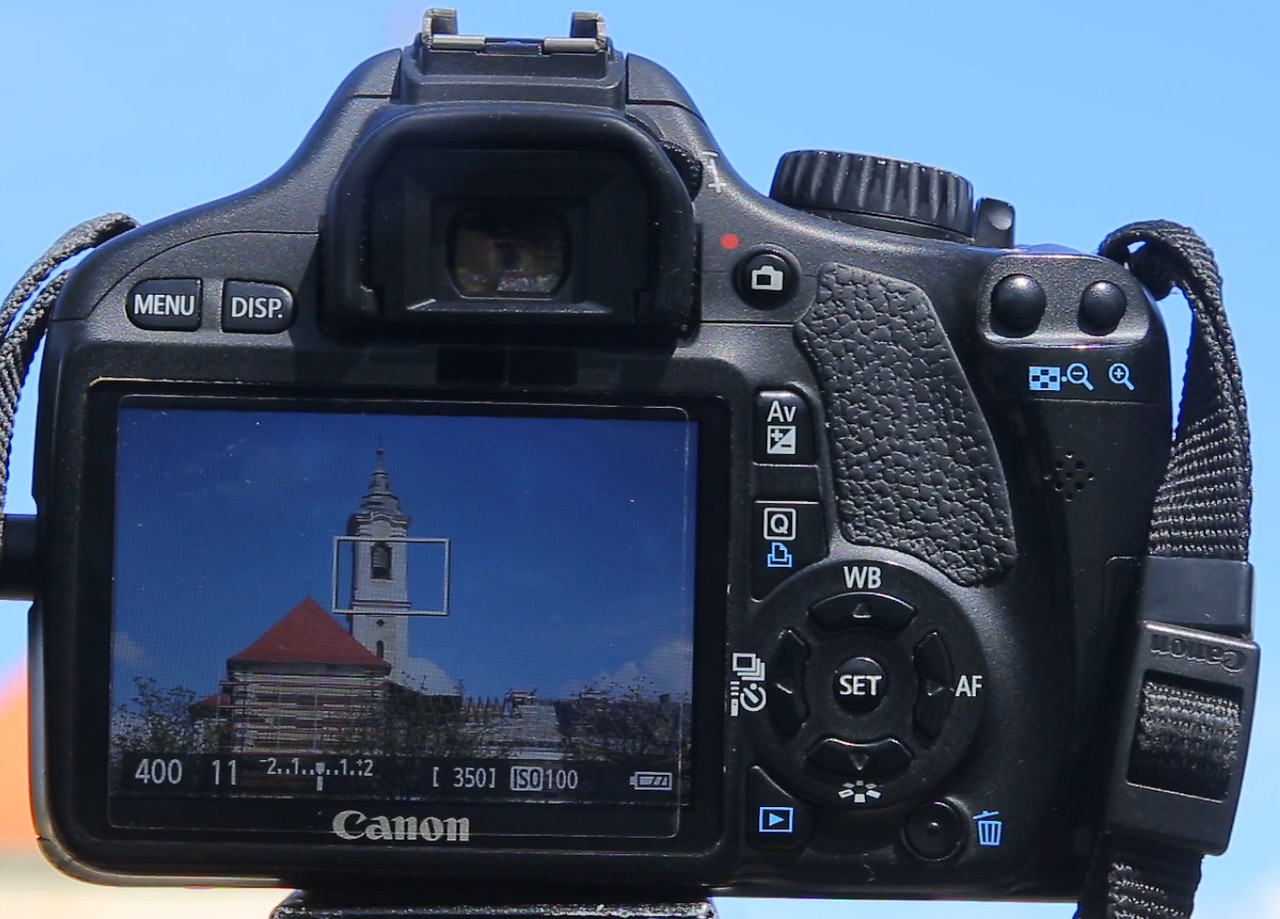
During the day, I first always set the ISO to ISO 100, then the aperture around f/11-16 to make longer shutter speed. If necessary, I put an ND filter on.
So for example, when shooting clouds, having such a setup will be just fine:
Go for manual focus
Now that you have the basic exposure, you should go into manual focus mode as you don’t want the camera to use autofocus unnecessarily from frame to frame.
I already covered manual focusing in a separate YouTube video:
Basically you should always do the manual focusing with the help of the magnified Live View.
This way you can make 100% sure that all your shots will be in focus, and that the camera’s autofocus will not ruin everything.
Take a test shot and check
Then take a test shot to make sure the photo is well exposed and sharp. I always magnify into the picture to check all the details (sharpness + exposure).
If all good, then I attach the intervalometer and set the interval time.
Setting up the intervalometer for timelapse work
A few word about this device called intervalometer.
Nowadays almost all cameras have a built-in timelapse program, that can replace this intervalometer. I will cover these programs later on in this article.
But if you have an older camera, then you will need to use an intervalometer.
Basically these are remote release cables that can be custom programmed.
You can buy branded intervalometers, like the Canon version, but it’s a lot cheaper to buy these Chinese ones with the same features, for a fraction of the price.
Sorry, Canon…
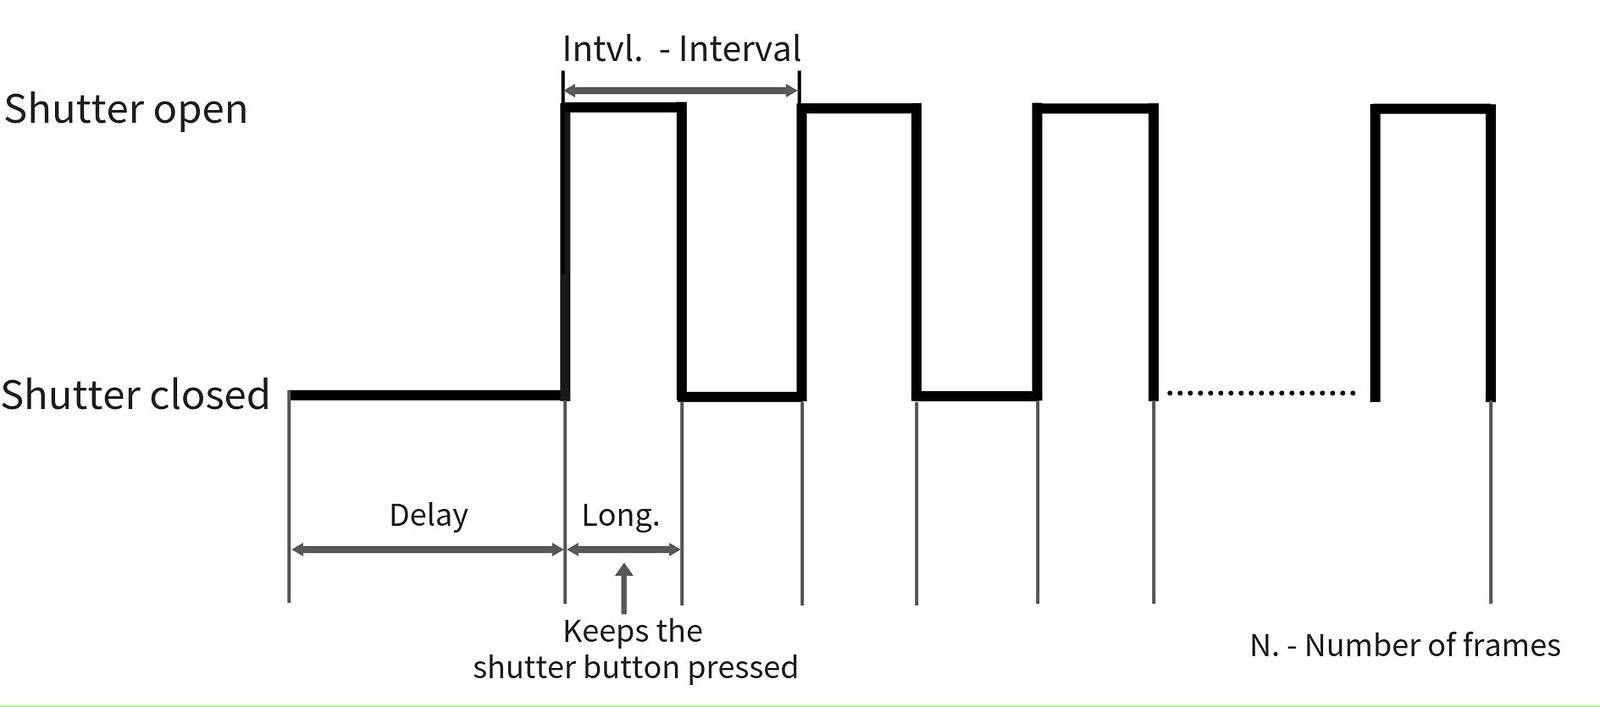
On most intervalometers there are five settings:
- Delay – waits this much before start of the program. Set to 0.
- Long – “presses down” the shutter button for this long. Set to 0.
- Interval – the interval time. This is what we need. Set this to the desired interval
- N – number of frames. Can be from 0 to 999 or indefinite (-).
- Sound – turn it off, for the sake of your sanity 🙂
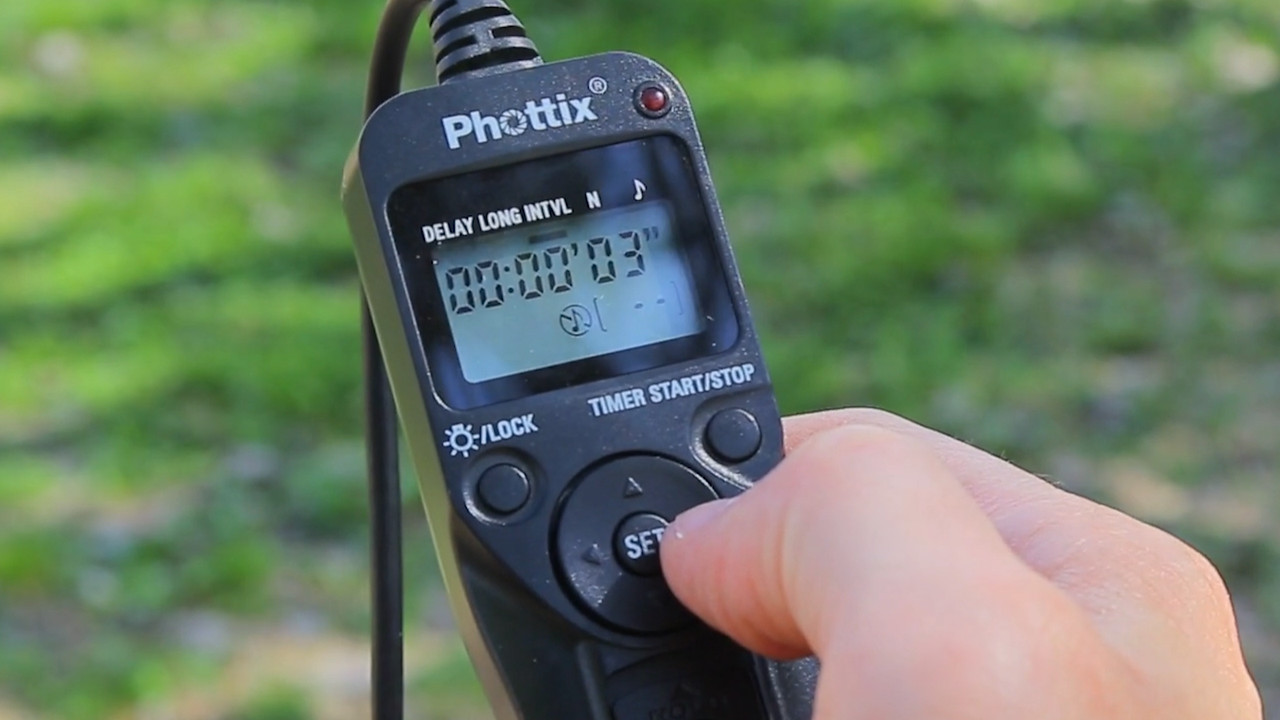
So for example, here’s how it should look if you’re doing a timelapse with 3 seconds intervals:
- Delay: 0
- Long: 0
- INTVL: 00:00:03
- N: –
- Sound: off
Overview of an in-camera timelapse program (Sony RX-100 III)
If your camera has a built-in timelapse program, then it probably has the same settings as my Sony RX-100 M3 that I’m showing here.
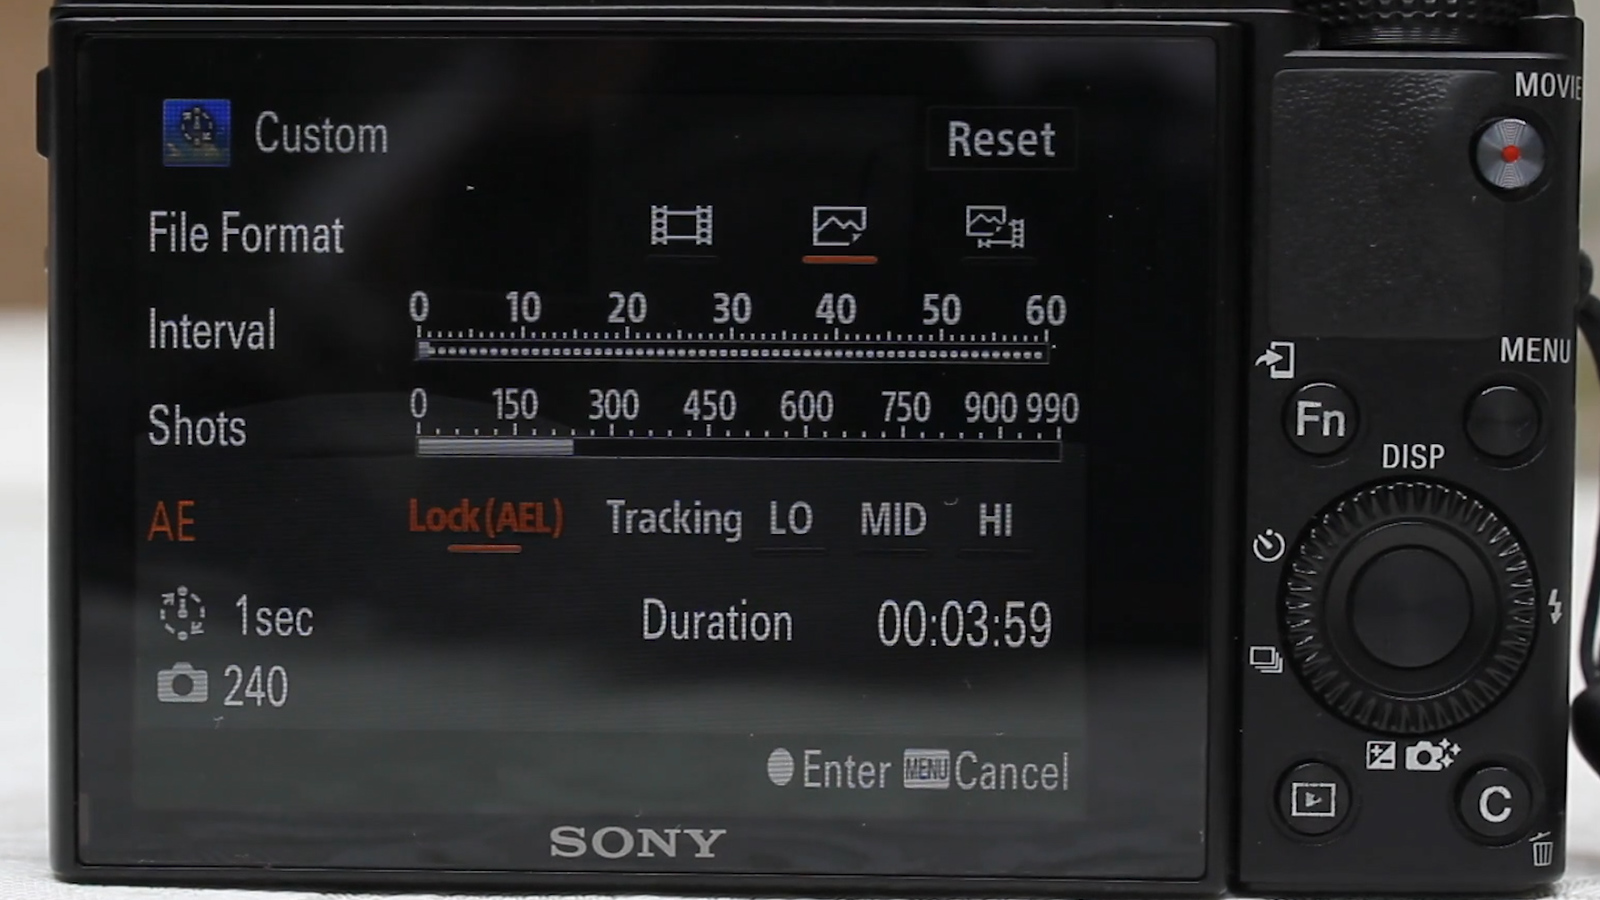
In the file format you can select if you just want a video made by the camera, or only the photos, or photos plus the video.
Then you can set the interval time and the number of shots.
Then you can pick if you want to use a constant exposure, or if you want the camera to track the changes of brightness. The sensitivity of the tracking can be set in 3 different settings.
If you’re taking a timelapse during the day, or at night, you can simply set this to Lock.
Basically, it’s going be to constant exposure settings all the time.
What’s a good interval time for timelapse photography?
The interval time has the biggest impact on the final footage.
This is the timespan from the beginning of a frame to the beginning of next frame.
A shorter interval time means that the timelapse video will be slower.
Whereas a long interval time means faster timelapse videos.
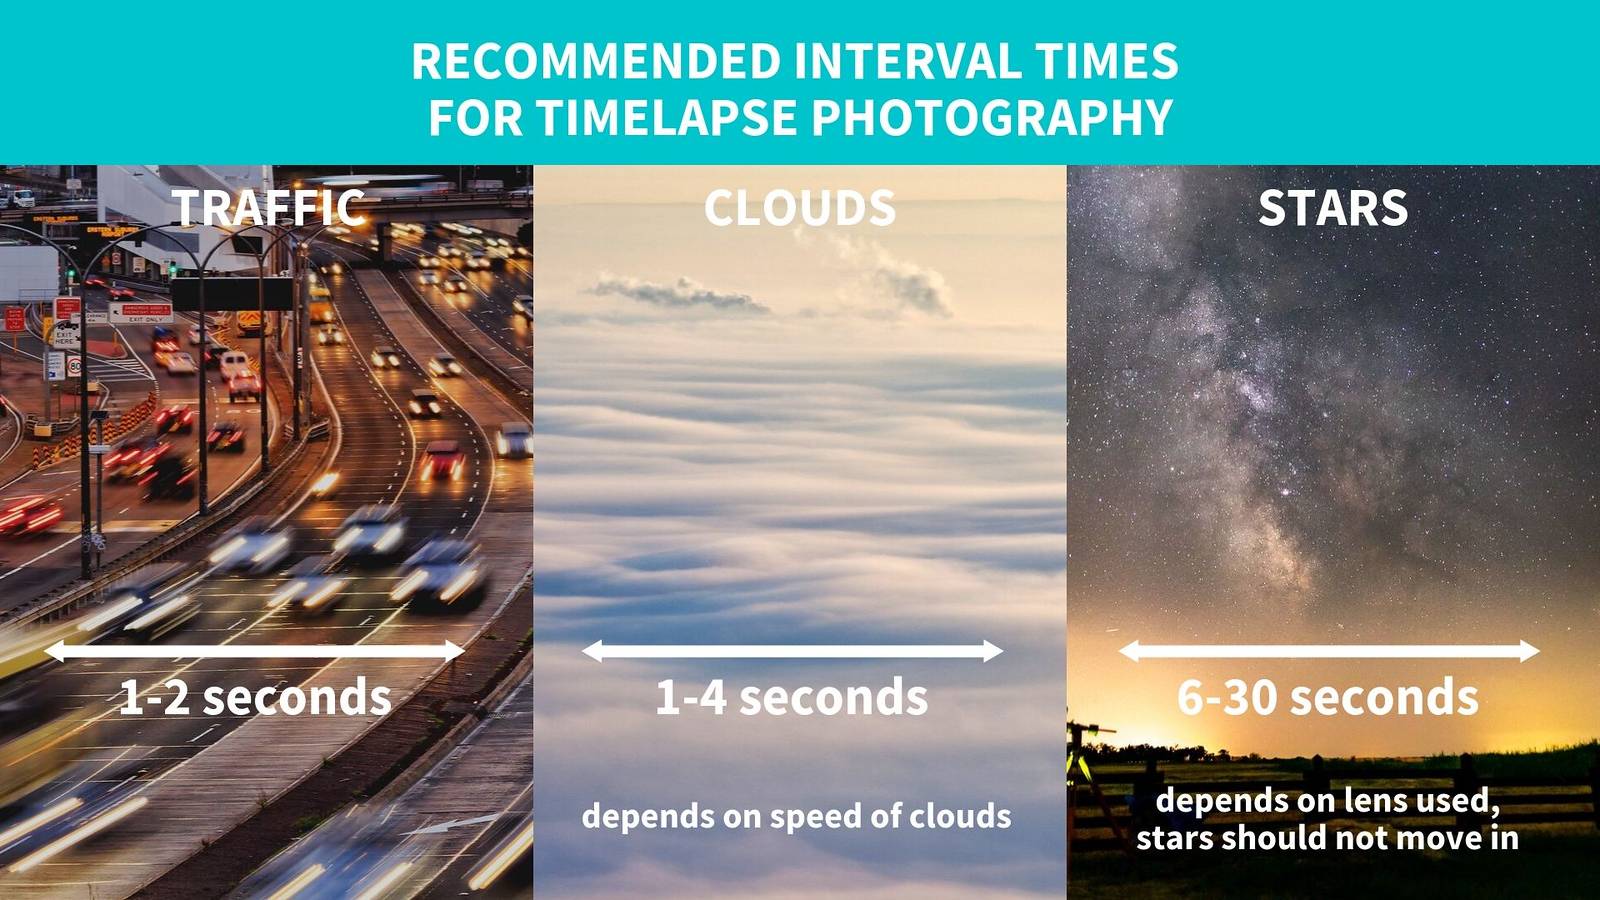
Personally, I like smoothly flowing videos, I prefer to use intervals between 1 to 4 seconds for clouds.
Using a short interval time is also beneficial, because later you can always speed up the footage, but you can never slow it down without losing quality.
Look how this video looks that I’ve slowed down 4x in Premiere Pro.
Although I used the best quality for frame interpolation, the footage looks un-naturalistic (at least to my taste):
Plus, with shorter interval time you’ll need less shooting time to acquire the desired number of photos.
Recommended timelapse photography interval / exposure times for different scenes
Start the timelapse program
Now everything is ready:
- camera is on a tripod,
- image stabilizer turned off,
- exposure is properly set,
- focus is set manually,
- intervalometer attached
So now you just simply have to start the program!
On the intervalometers, it’s the Start/Stop button.
A very useful tip (I often forget this): start a timer, so you will know later how many frames you already had.
Also, it’s better to take more frames than what you think is necessary. I recommend to take at least 300 frames, but 400-500 is even better. It will be easier work with when cutting together videos.
Once I think I have enough frames, I just stop the program.
Timelapse photography settings summary
- Put the camera on a tripod
- Pick a composition that has slow movements in it
- Set camera to Manual mode
- Pick an ISO and aperture that will give you longer shutter speeds
- If necessary, use ND filter
- Set manual focus and focus that way
- Take a test shot
- Attach intervalometer
- Set interval time
- Start the program
- Stop after desired number of frames (at least 240)
Here’s an infographics summary of the whole timelapse photography camera setup:

If you are taking a timelapse video of the night sky / Milky Way, I recommend to read my star photography guide here (plus there’s timelapse section there as well).
Post processing photos for timelapse video: Adobe Lightroom + Premiere Pro
After this you will have hundreds of photos so it’s time to post process them on the computer!
In most cases, you can really make a lot more out of your footage if you edit properly.
Tips for organizing the photos
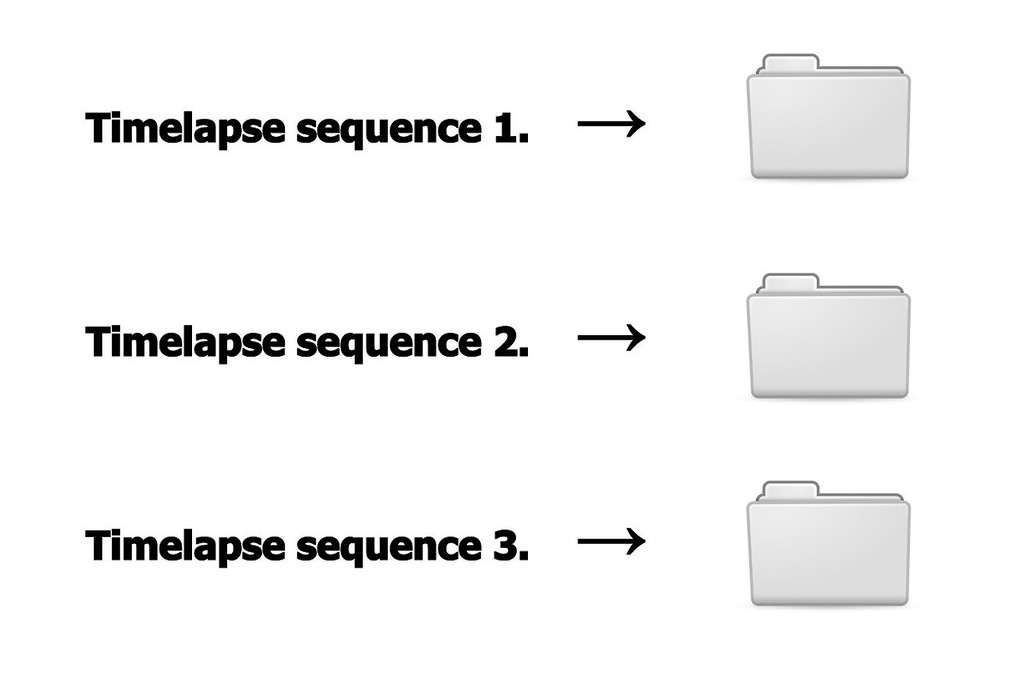
First, it’s best to separate the photos of every timelapse sequence into separate folders.
Editing the RAW photo sequence in Adobe Lightroom
Importing into Adobe Lightroom
I’m going to first show the Adobe Lightroom workflow to process the RAW photos, and have the edited JPG photos as a sequence of shots.
After this, there are several ways to merge the photos into a timelapse video. See this later.
Upon importing the photos in Lightroom, it’s easiest to apply some presets.
Usually I go for Sharpen-Medium in the Apply During Import tab.
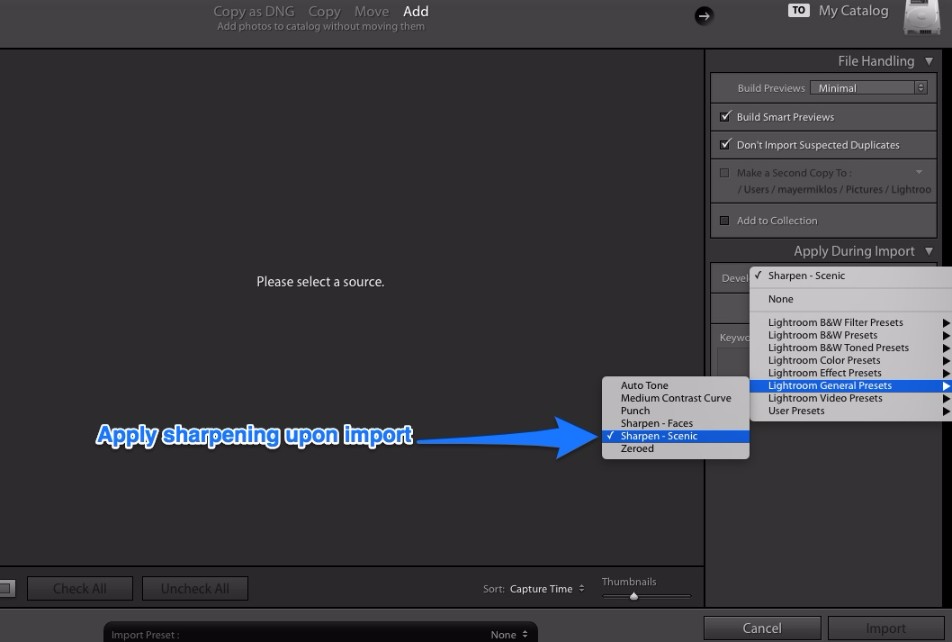
This is necessary, because RAW photos are not sharpened inherently.
After the import is done, select one of the frames, usually around the middle of the sequence, and edit that to taste in the Develop module.
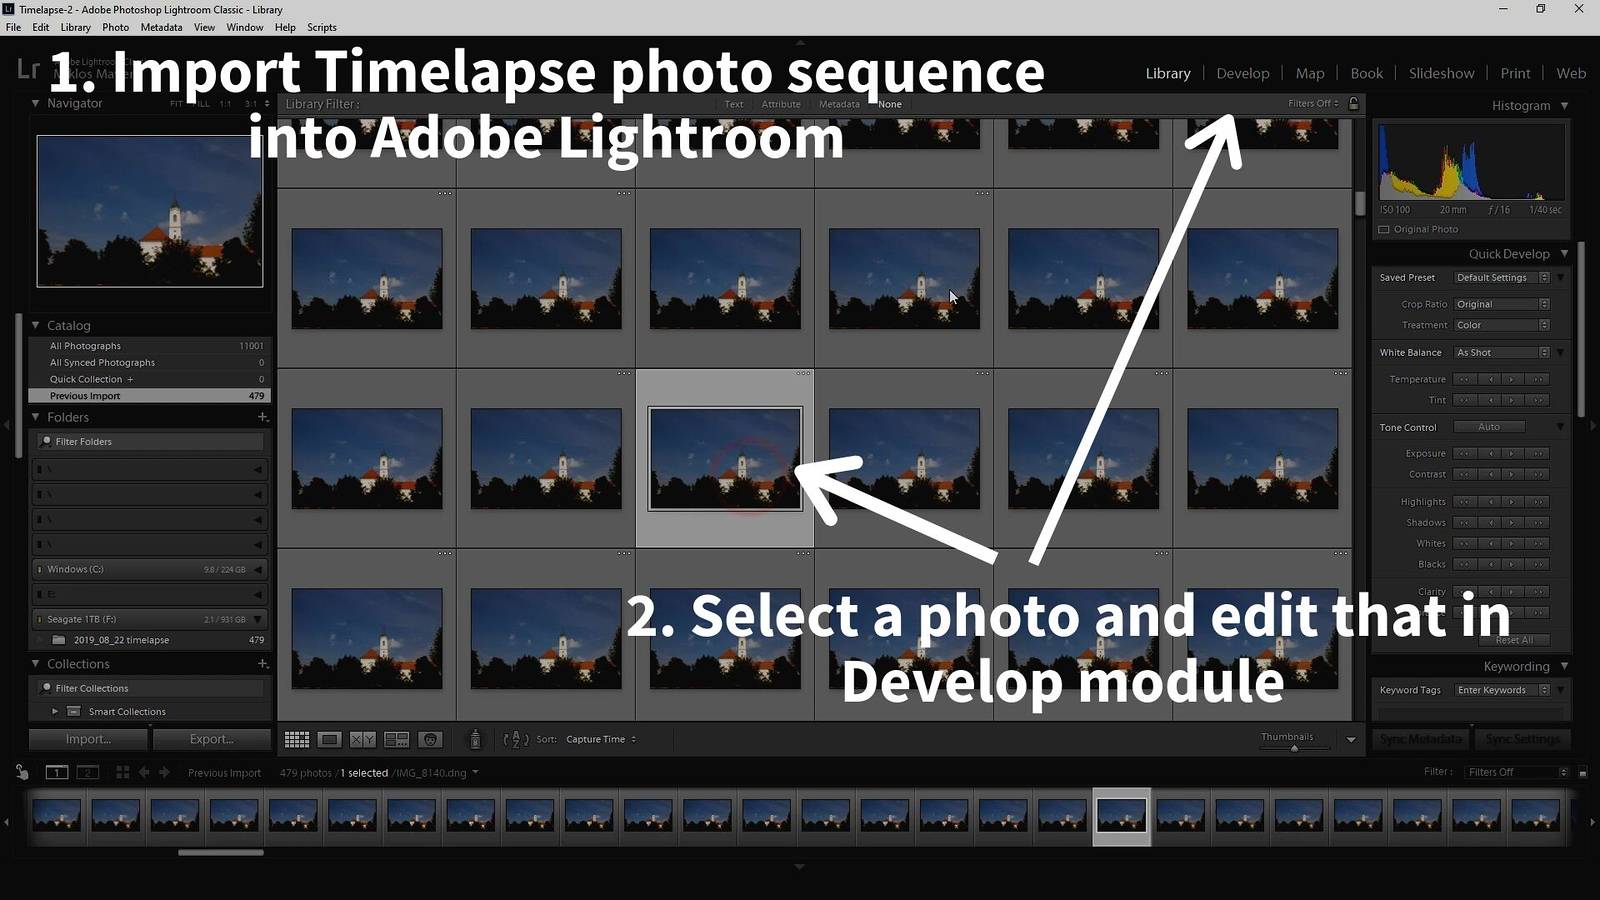
So let’s jump to Develop panel.
Edit one photo of the sequence to your taste
If you are shooting in RAW file format with Auto white balance setting, it may happen that the camera chooses a different Kelvin value for the shots.
For example, one shot would be 5600 K, and the next one would be 5200 K. Of course, we don’t want that…
To have the same white balance setting across the board, it’s easiest to edit the white balance a little bit. So instead of Auto, you will see Custom.
Then you should edit the photo to taste: I usually tweak the levels and add some color saturation using the Vibrance slider.
Of course, this depends heavily on the scene…
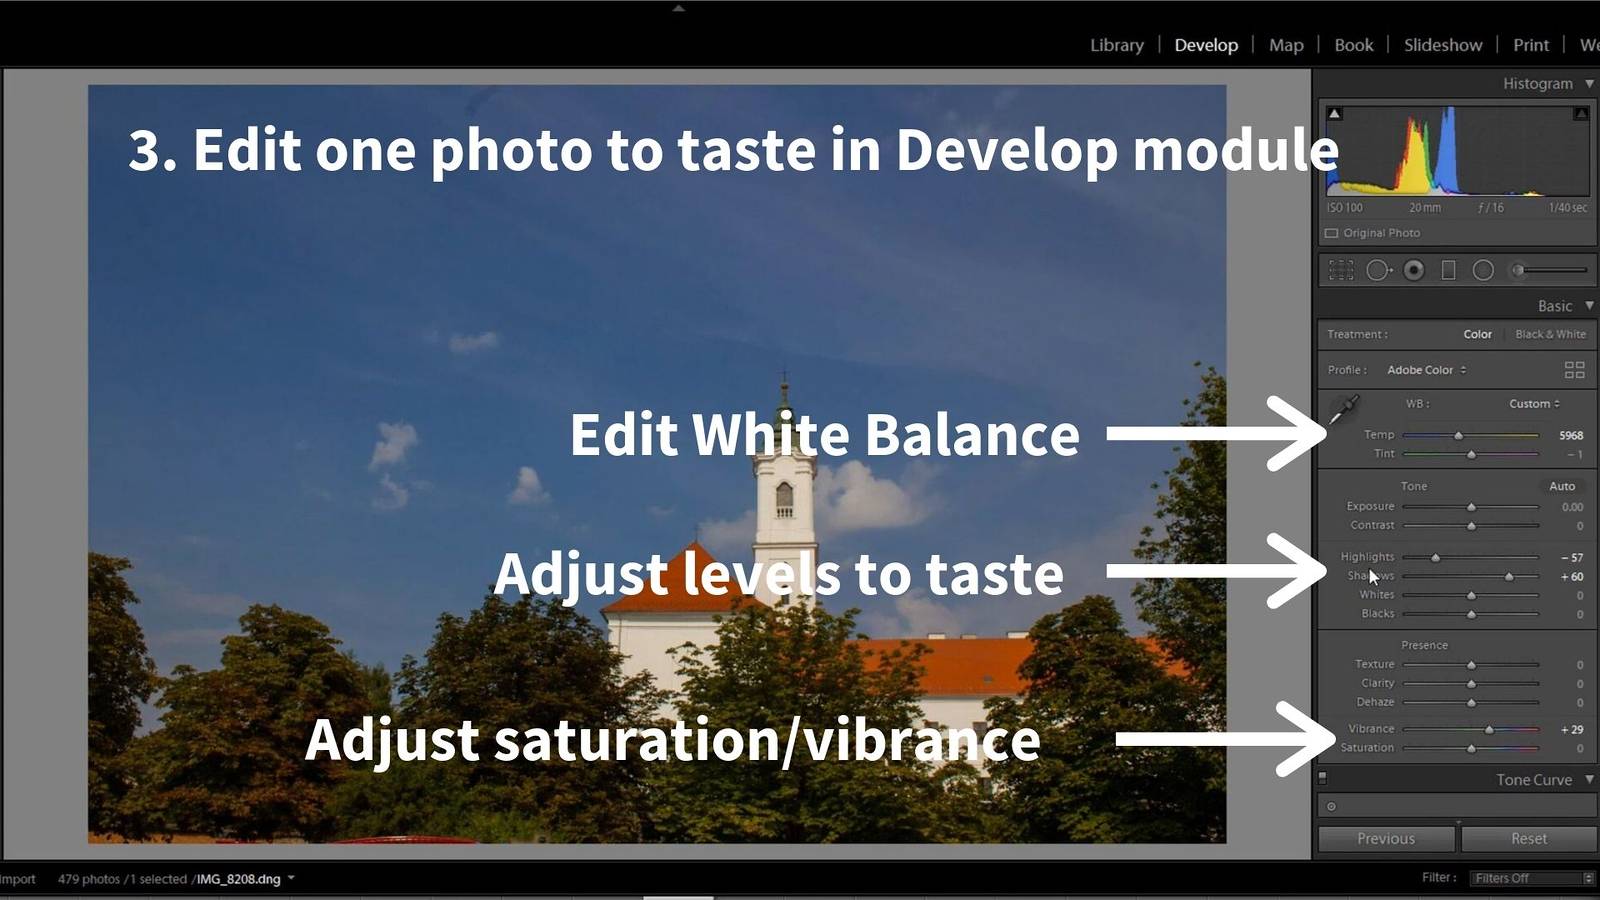
Once the photo is edited, I usually label it with a green color (8 on keyboard).
Then comes a crucial step.
Synchronizing the settings over to the other photos
You want all the other photos to have the same editing as the edited photo.
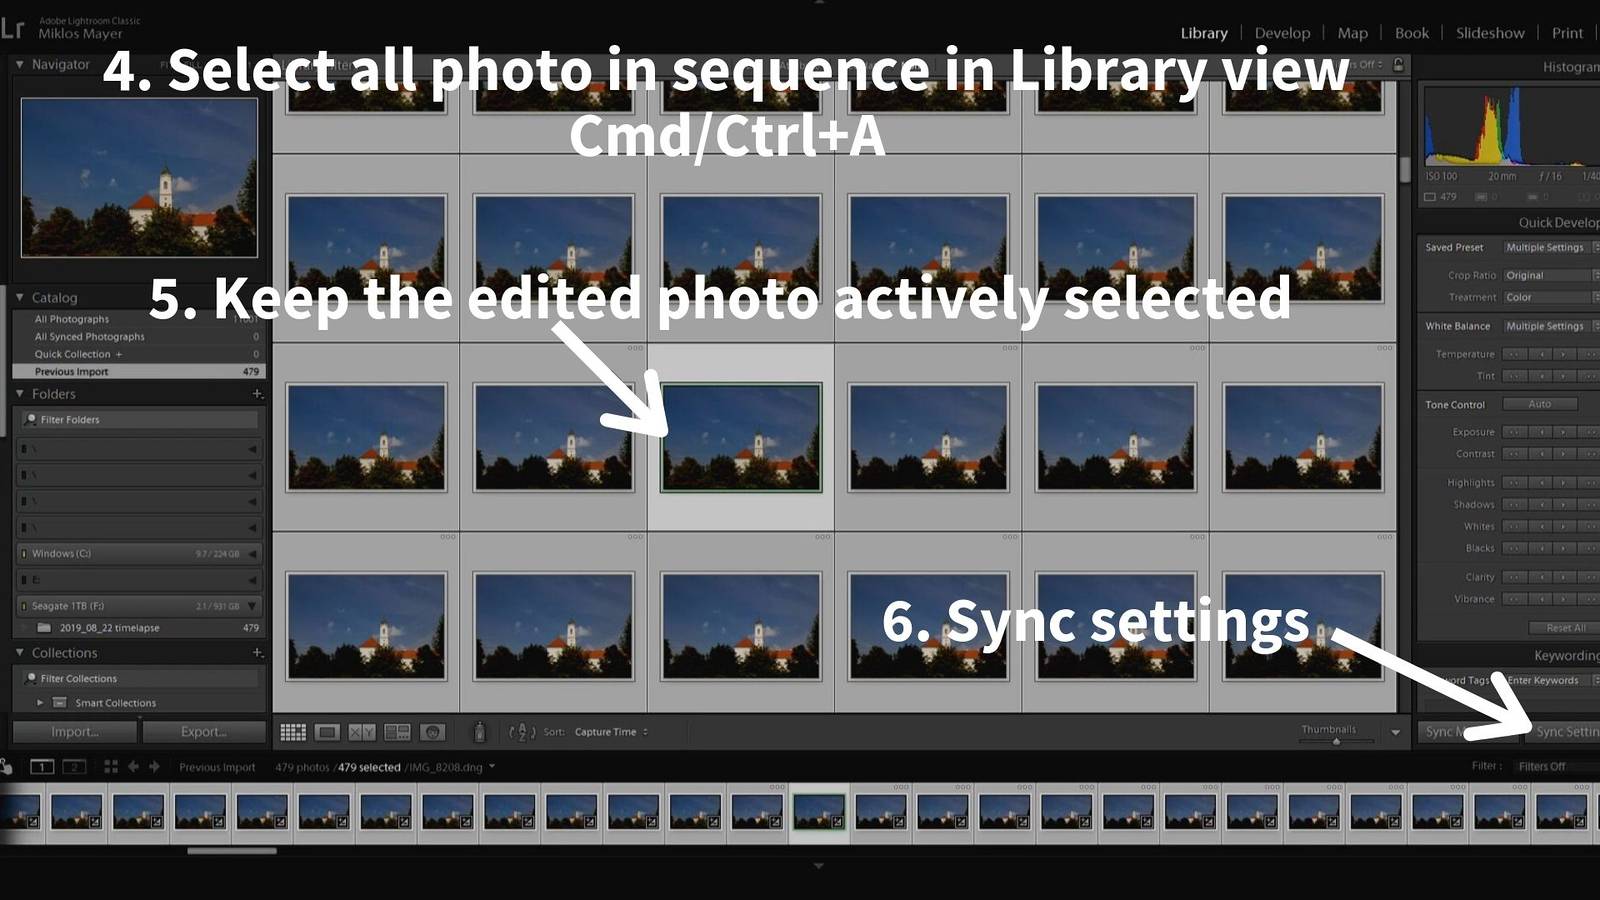
It’s best to go back to Grid view by hitting G on the keyboard, it’s easier to see what’s selected.
So with the edited photo being selected, press Cmd / Ctrl + A to select every photo.
Note that you should have the edited photo actively selected, and the rest is just normally selected.
And now you click on Sync settings, and the synchronize settings window pops up.
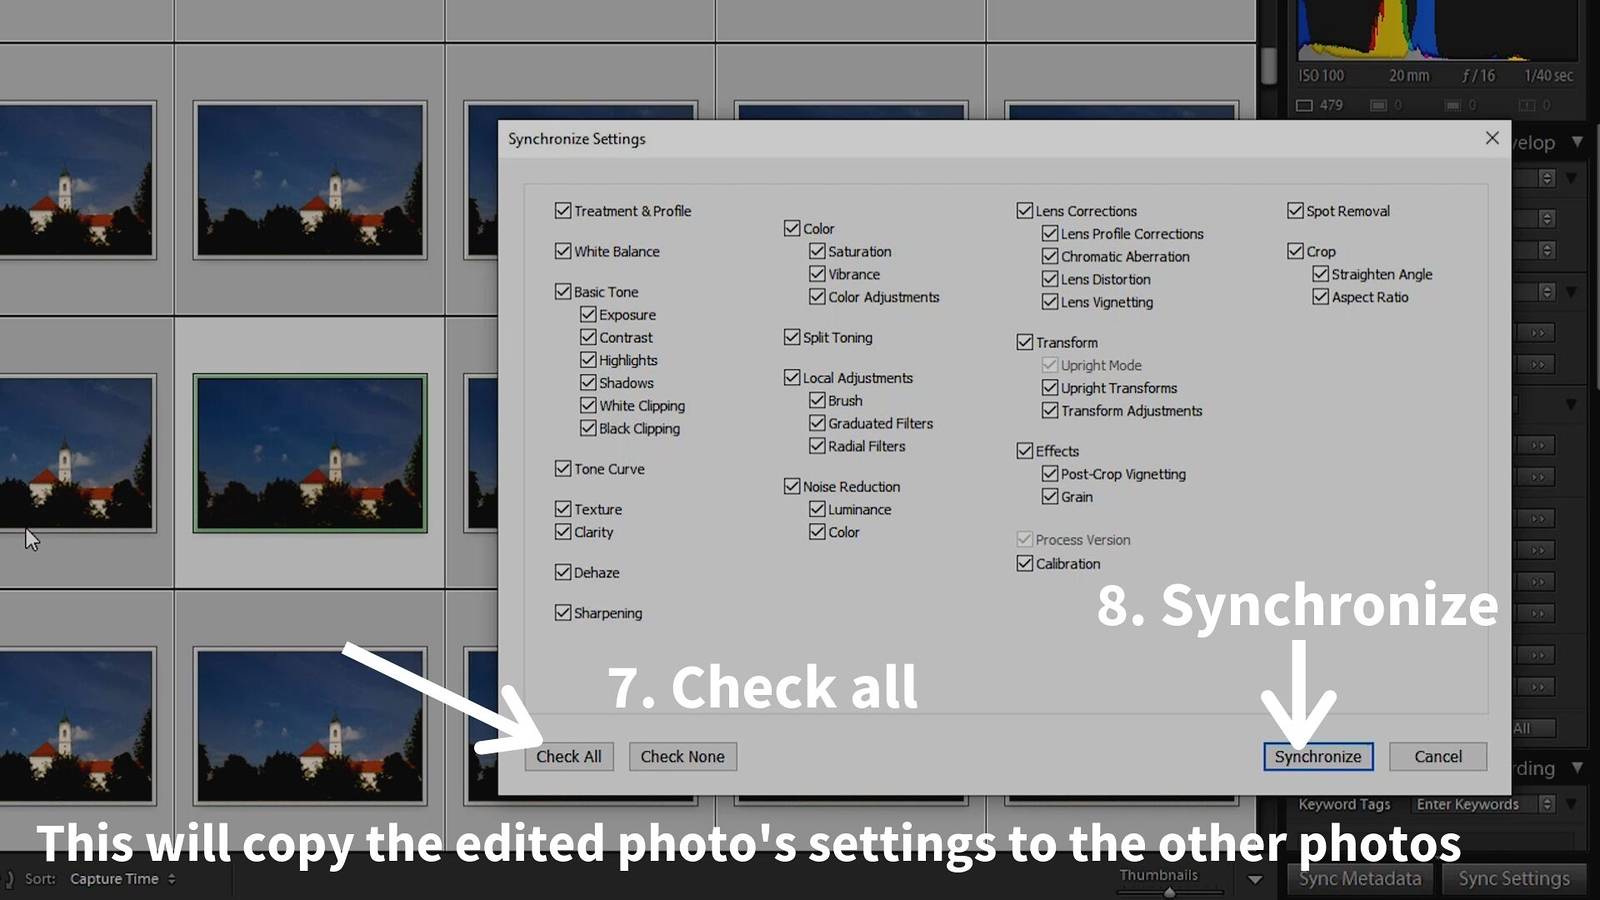
Here you can set which editing parameters should be copied onto the other photos.
Press Check All, because you want to have exact same photos.
Then Synchronize.
Now every photo in this sequence has the exact same editing as I wanted.
Great!
With all photos still being selected, let’s Export them as JPGs!
Exporting the JPG sequence from Lightroom
It’s crucial here that the exported files have numbers as their last characters.
This is important because later the frames need to be in correct order.
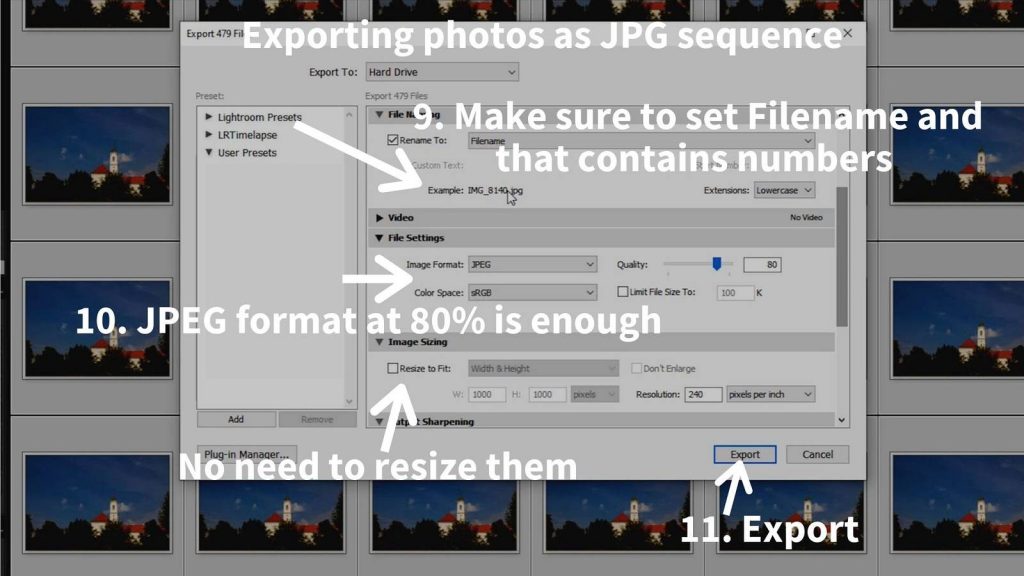
After Lightroom has exported the JPGs, you’ll have hundreds of JPGs with the same exposure and same editing.
This is the point, from where you have lots of options to make a video from the JPG photos.
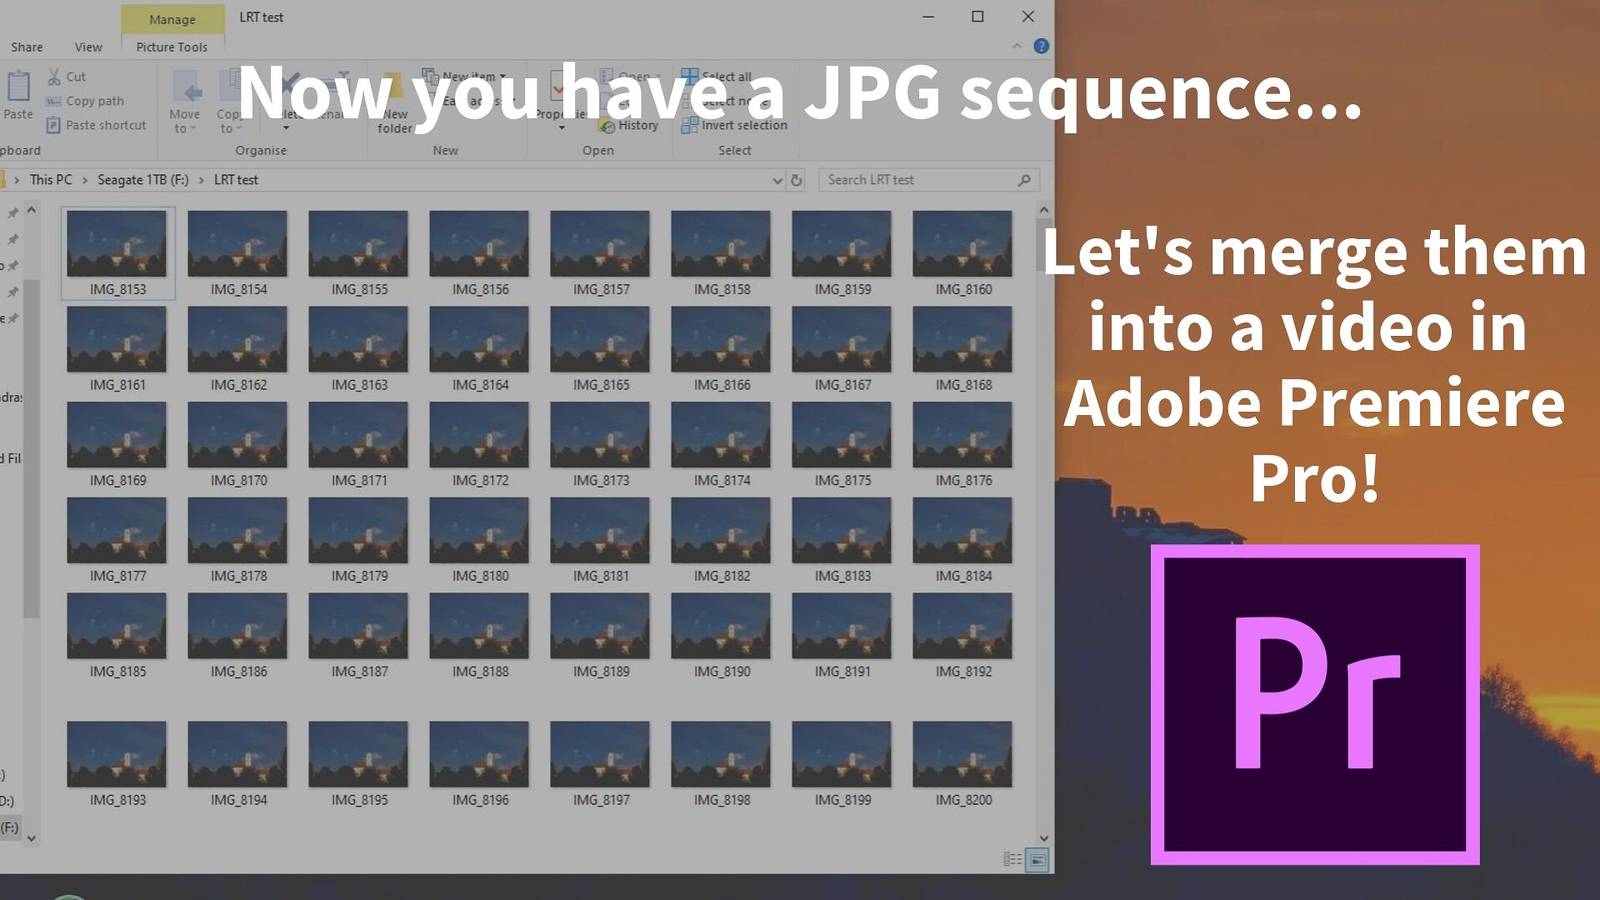
Merging the edited JPEGs into a video
You can use many different softwares for this, for example, Photoshop, Premiere Pro, After Effects, VirtualDub, Final Cut or LRTimelapse.
Yes, you heard it right, even in Photoshop. However, PS is very slow in this respect, so I’m not going to show you that.
Timelapse video assembly in Premiere Pro
To make things really simple, I’m going to show you how it’s done in Premiere Pro.
Premiere is the most widely used video editing software, and the workflow here show is pretty much the same as in the other programs.
Create a new Project and new Sequence
Fire up Adobe Premiere Pro, and create a new project.
In Premiere, you have to create a Sequence to put the videos onto, so I create a Sequence.
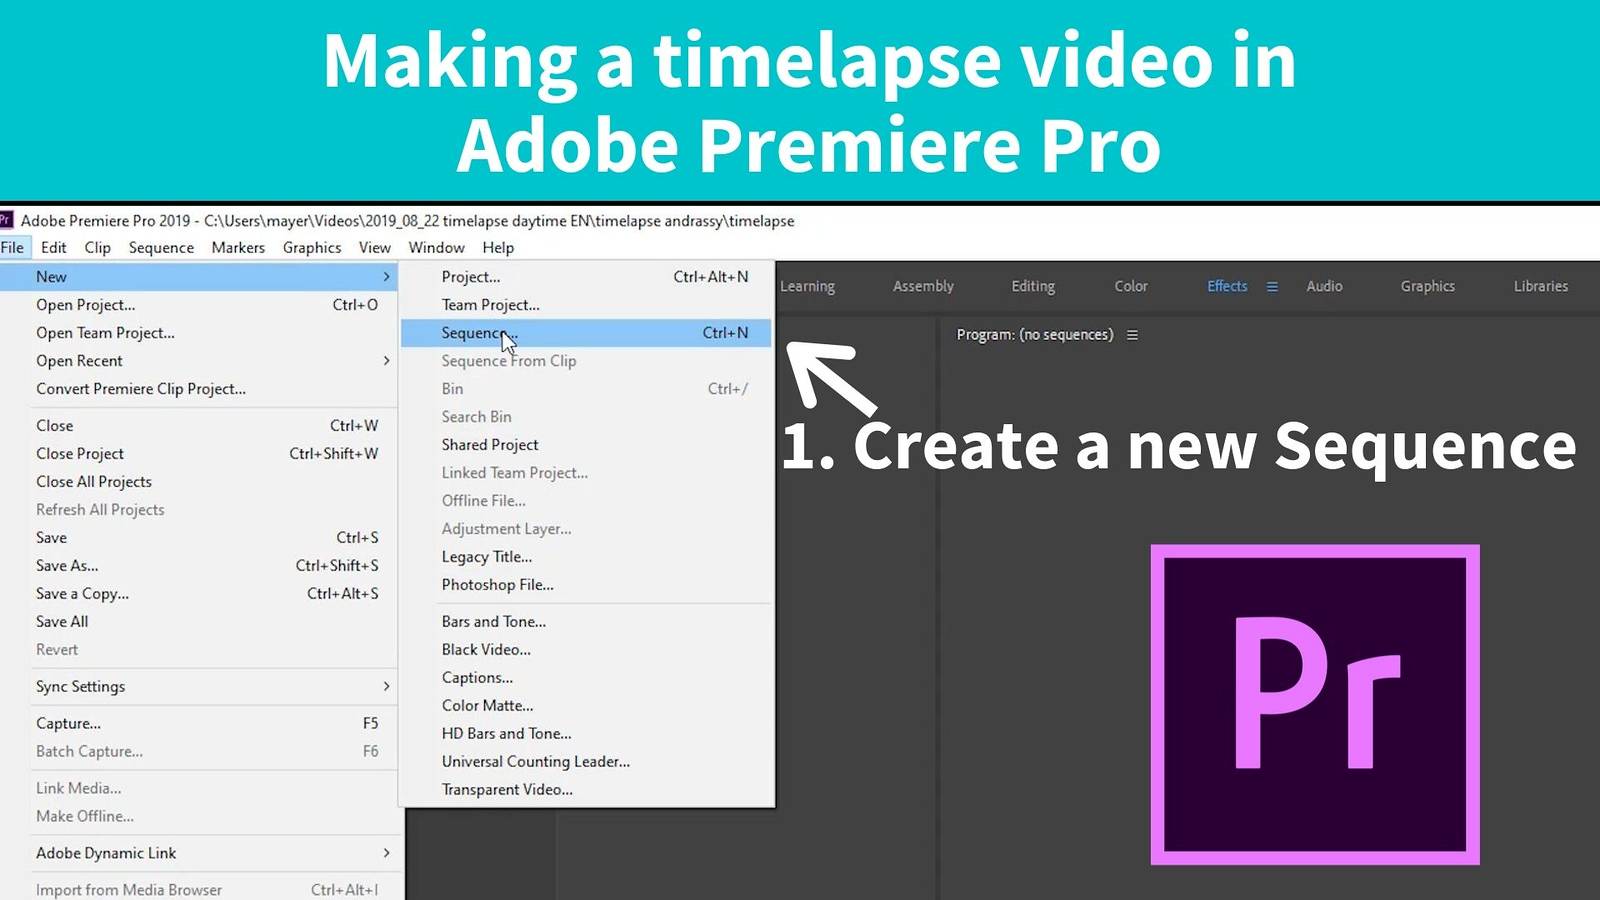
Then the Sequence settings window pops up, and here you have to specify the dimensions and frame rate.
Luckily, there are already hundreds of pre-made sequence templates. So for a Full-HD video played at 24 fps (the standard in the film industry), go for AVCHD 1080p24:
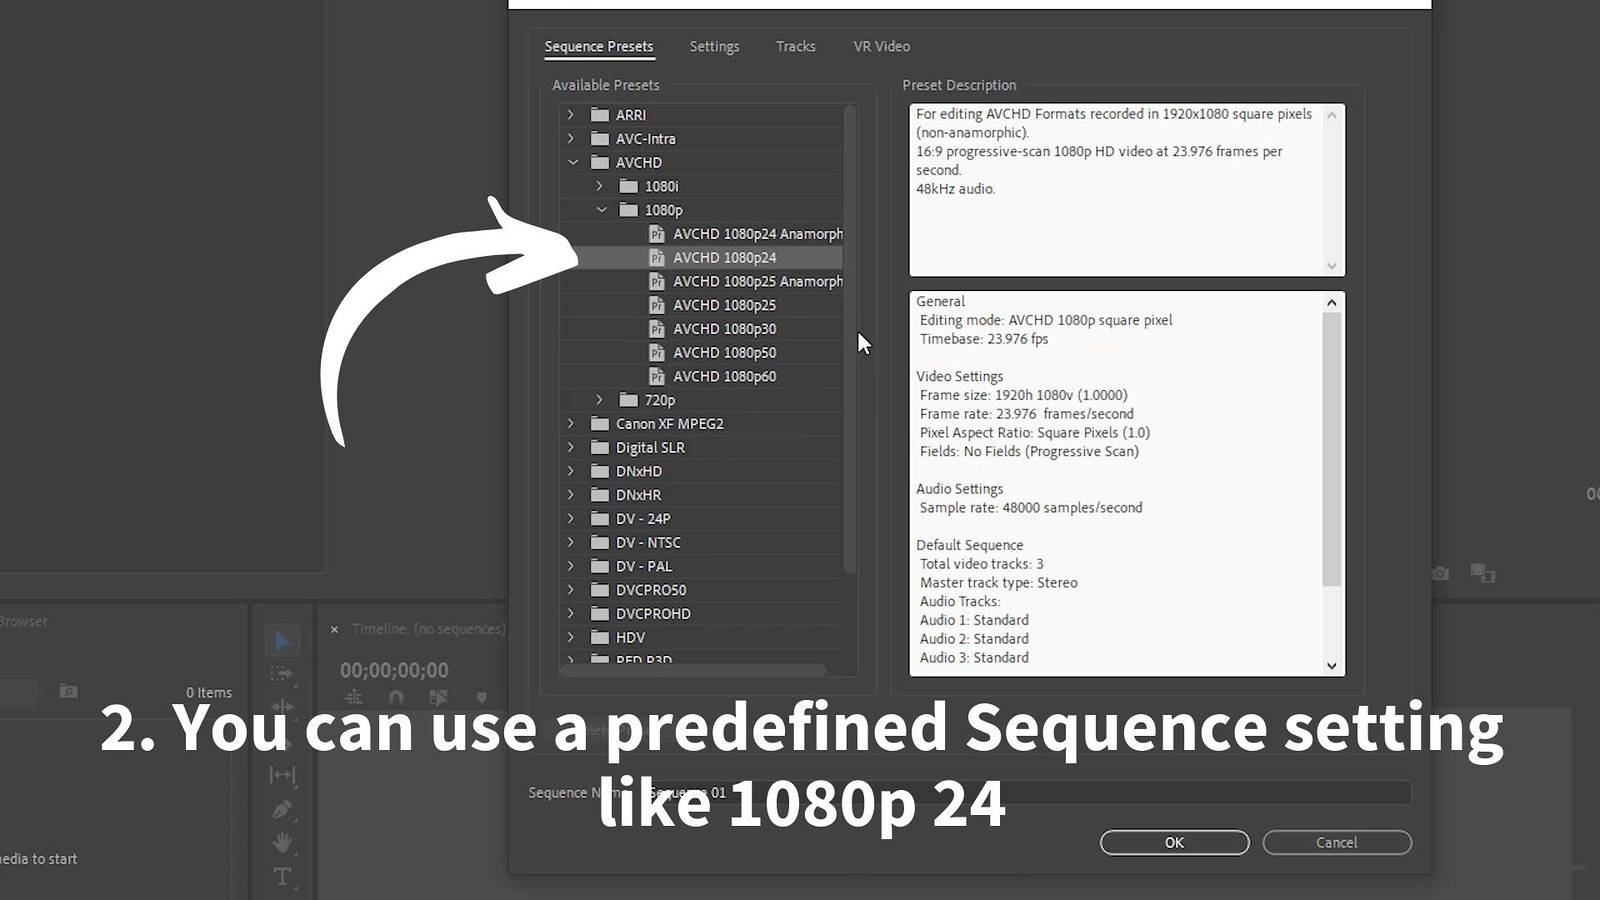
Or if you want to have a 4K or 6K video, then you can manually edit the dimensions.
After this, we only have the Sequence. Now we need to add the frames of the video (the prveiously exported JPGs)
So now let’s import the image sequence!
Import the image sequence into Adobe Premiere Pro
Go File – Import, or Press Cmd / Ctrl + i.
The Media Import panel pops up.
Look up your JPG photos, and order them according to filenames.
Select the first photo, and make sure to have the “Image sequence” box ticked.
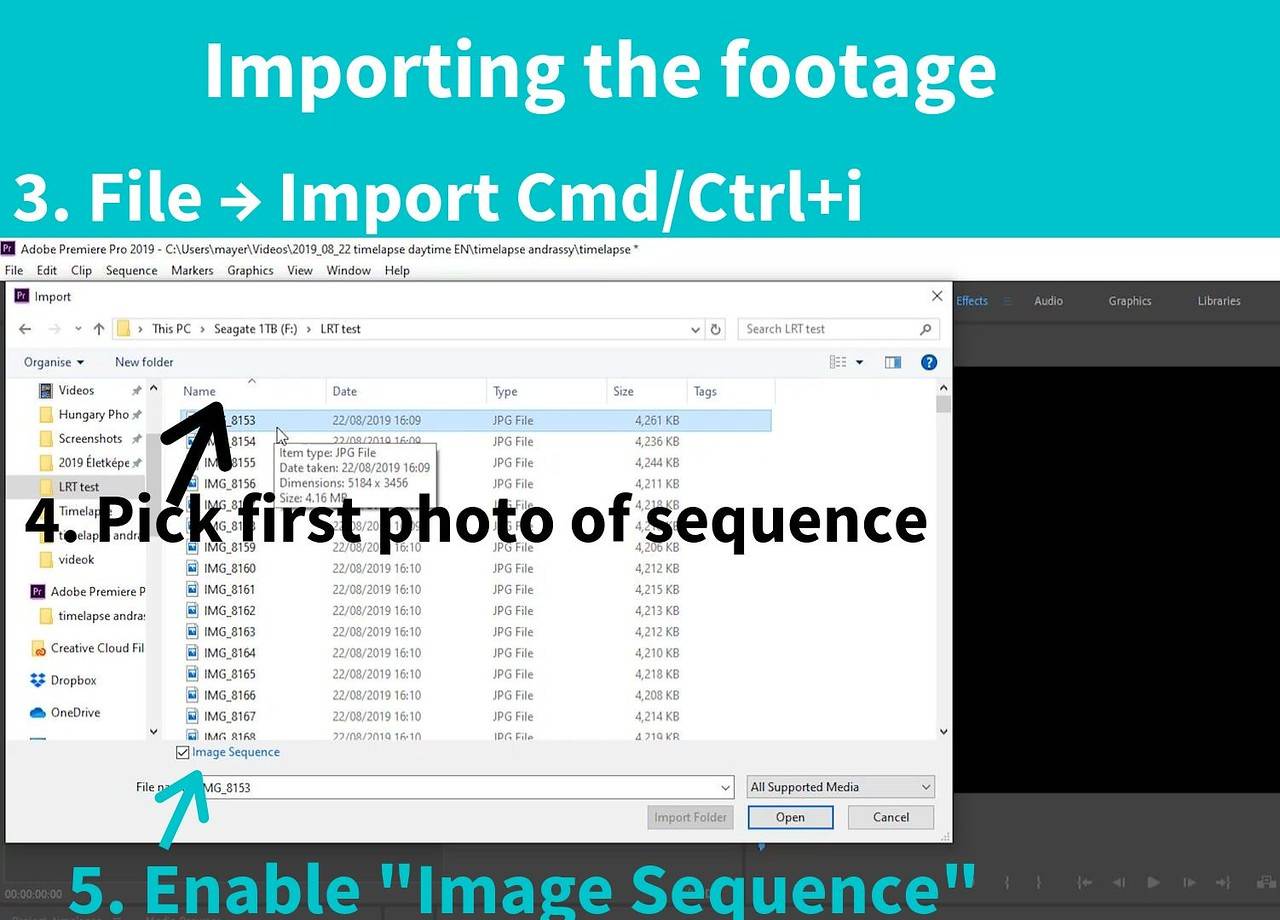
This will tell Adobe that it’s not a single photo, but a sequence of individual frames.
Import and now the image sequence appears as single element, like a video, in the Project Window.
If you don’t see the same screen, select the “Editing” view above.
Now you just have to drag and drop the footage onto the timeline.
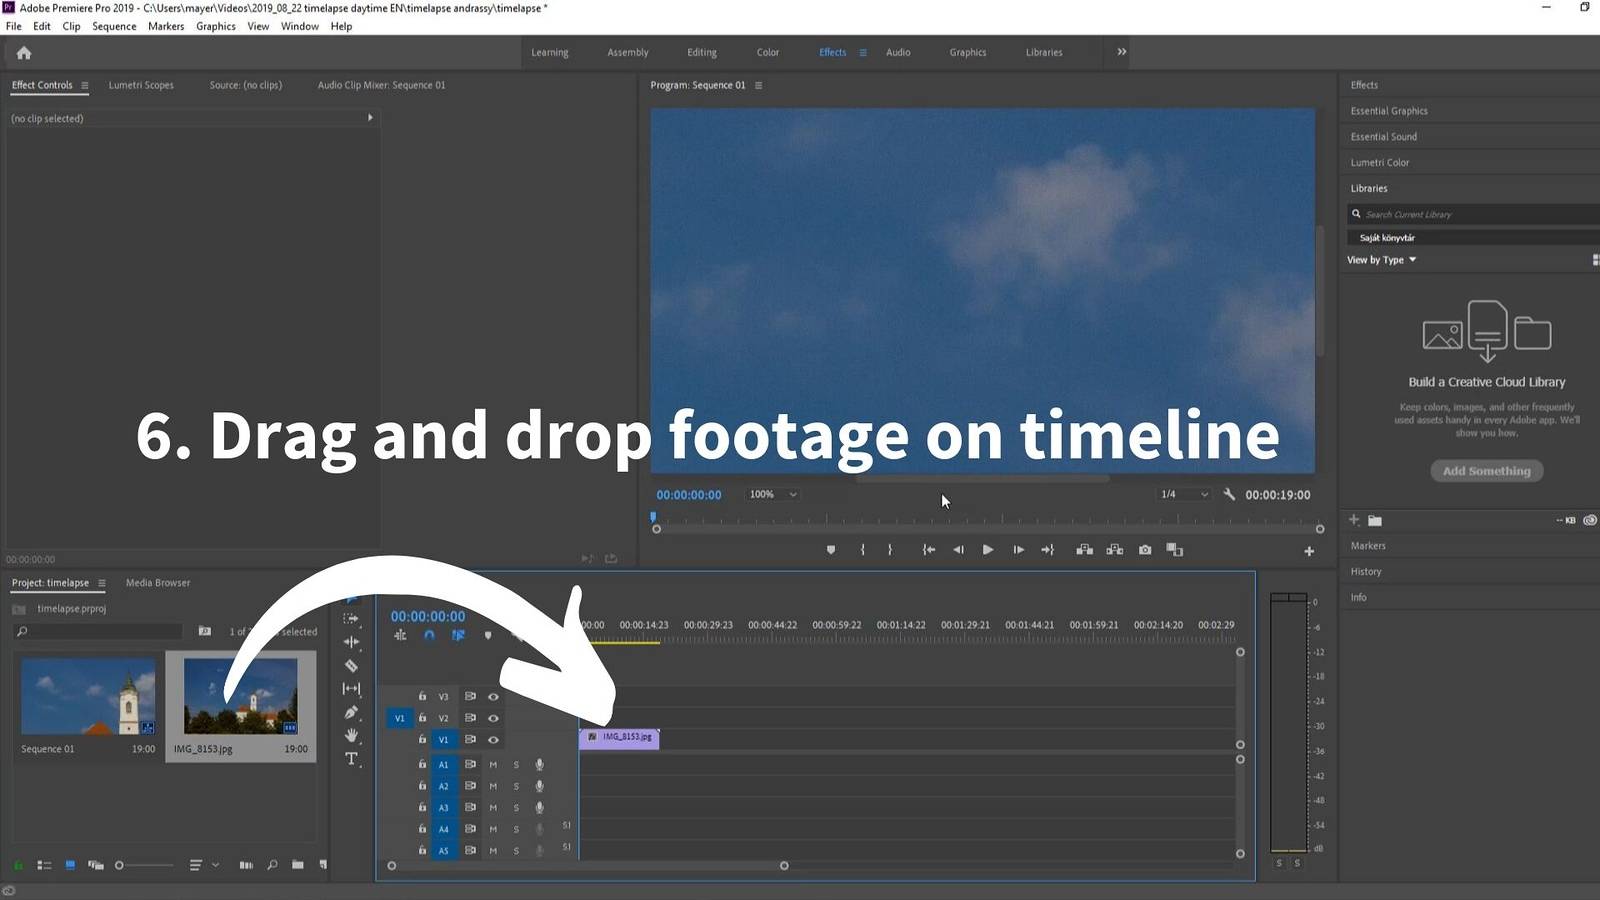
When doing this, Premiere Pro will probably warn you that you footage has different dimensions than sequence.
This is normal, as the photos have a lot higher resolution, than a video.
So go for Keep Existing settings.
Resize and position timelapse video to fit frame size
What you see now is just a fraction of the original photo, because it has not been resized.
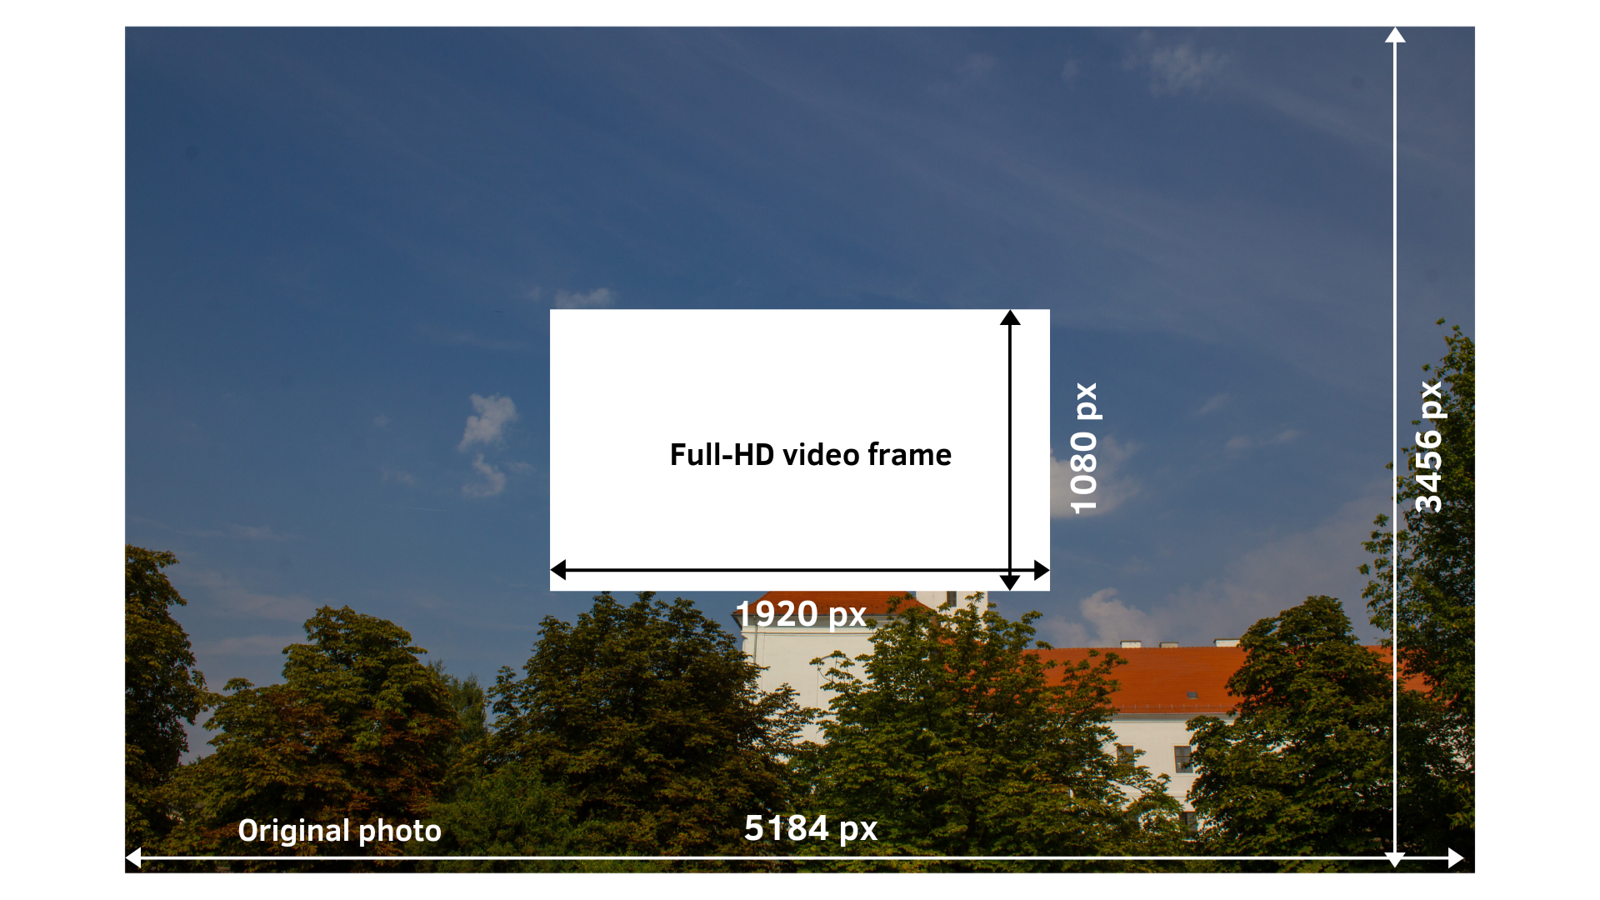
So click on the video in the timeline and go for the Effect controls.
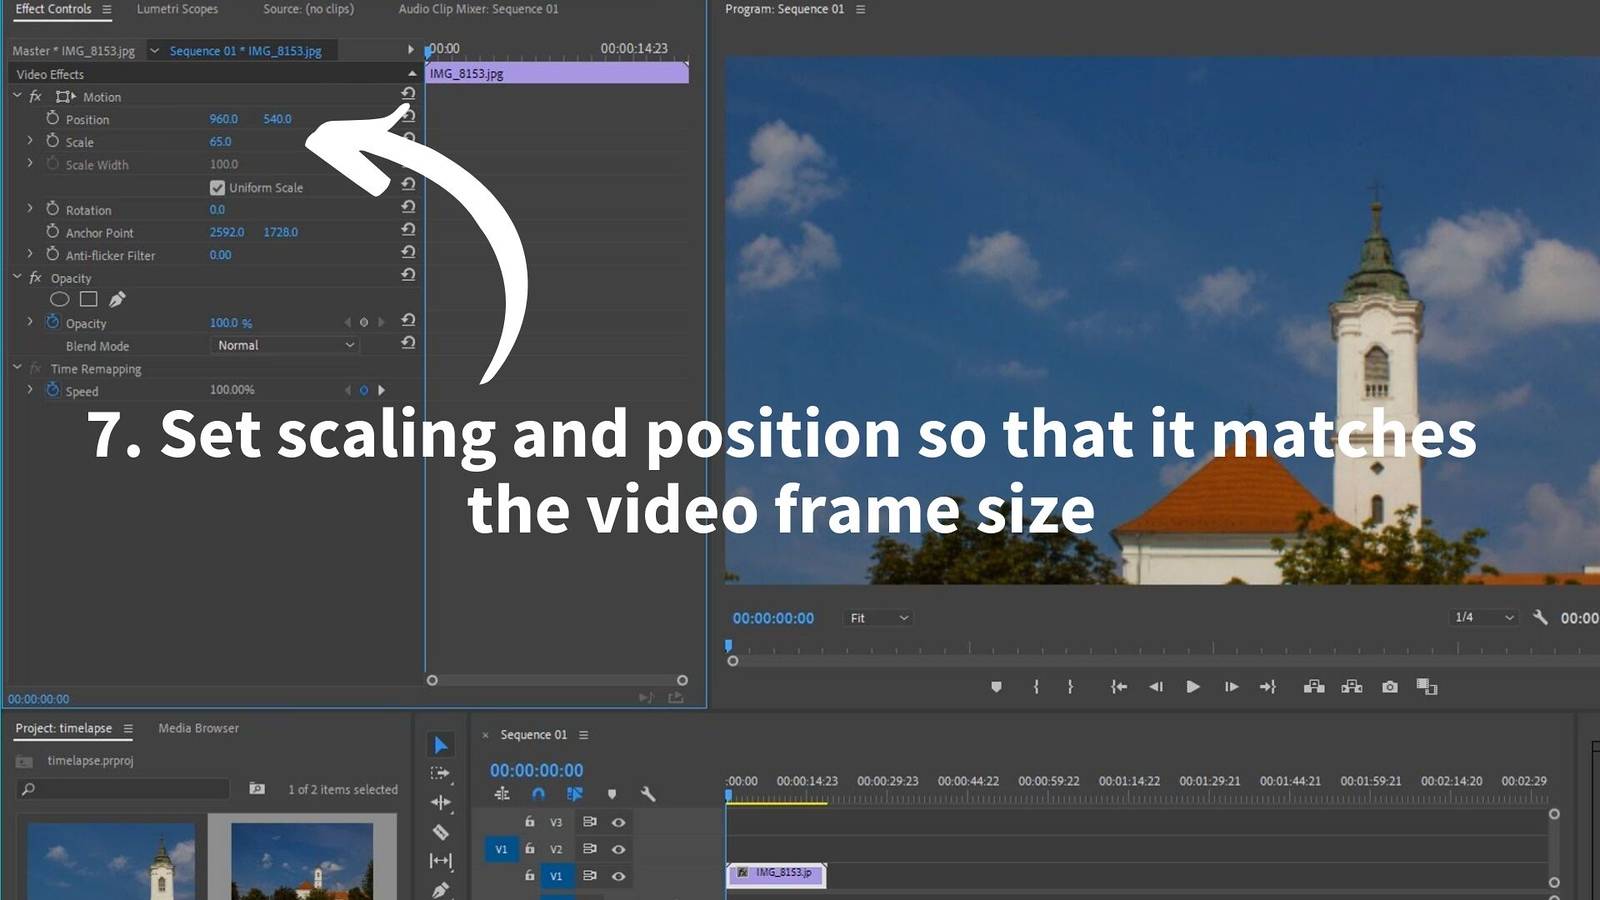
Here you can play with the Scale parameter: originally it’s 100%, but you can make it resize it to any size.
Make sure not to have any black borders.
You can also play with the position. If you zoom into the footage more, you even have space to move within the frame.
Here the possibilities are endless, I’m not going to go deep there.
Sharpen the footage (optional)
One final thing is to sharpen the video. This is needed because we resized the photos.
Go into the Effects window, and type Sharpen.
Then select the Sharpen effect.
Just simply drag and drop the effect on to the footage in the timeline.
Then select the Sharpening level you want (on the Effect controls tab on the left, while the video is selected on the timeline). It’s best not to overdo it.
It’s done now, the only thing left is to Export the timelapse video!
Rendering out the timelapse video from Premiere Pro
Just go for File → Export → Media
Now the rendering window pops up.
Here you can select where the video should be rendered and also in what quality. I usually use the Match Source – High Bitrate preset.
Then click Export.
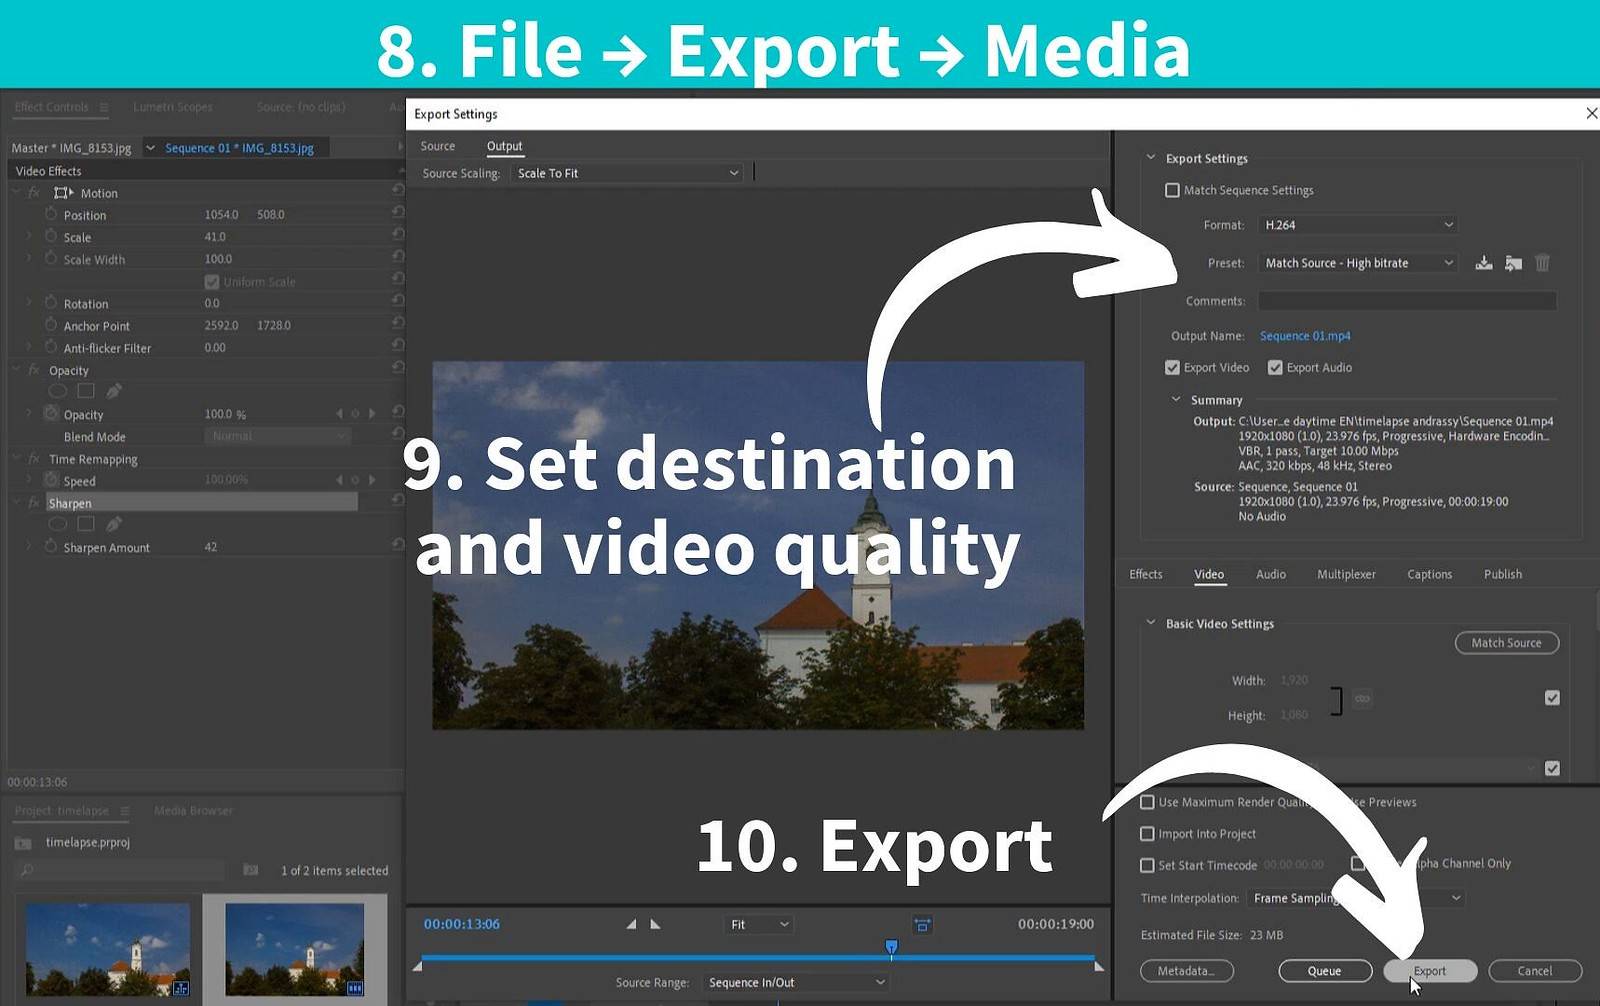
And it’s done, you’ve made it! You have your own timelapse video!
You can link your work in the comments! (Please first upload the video to Youtube / Vimeo, and here just copy the link).
Check out some of the links below for more inspiration.
Useful links
Create your first timelapse video – my tutorial on Youtube
My Milky Way photography guide, with a dedicated part on starry sky timelapse videos
My timelapse photography checklist – free download
Expert Photography has an extensive guide on timelapse video making
VirtualDub download (Windows only)
MSU Deflicker for VirtualDub (works only with 32 bit VirtualDub!)
For changing conditions, AUTO-ISO can be used in timelapse photography – just set the minimum shutter speed to around half of the interval time.
Free timelapse footages from the International Space Station
Timelapse photographers to be inspired from
Mike Olbinski – you might have seen his haboob timelapse
Rob Whitworth, the master of flow-motion technique
Geoff Tompkinson, known for his “hyperzooms”

 Welcome! I'm Miklós Mayer, a photo tour guide in Hungary. My job is to show fellow photographers around in my home city and teach them everything I know about photography.
Thanks. Really useful. Did my first timelapse last week. It turned out really good, but having read this I can see how much I could have improved it. Thanks for taking the time to post your knowledge.
Best wishes
Andy
Thank you Andy, I’m happy to hear my material helped!
Cheers from Hungary 😉