That’s just simply NOT true!
In this guide, I will show you how astro landscape photography is done, from camera settings to post-processing in Lightroom, and you’ll say: ‘this is really easy!’
And you really don’t need fancy equipments to capture the stars on your pictures…
Let’s get into it!
Don’t have time to read the whole article right now?
No worries! I’ve compiled a super actionable checklist PDF that you can read anytime (maybe on your phone when setting the camera). Just let me know where I can send it to (takes 5 seconds):
Contents
Chapter 1:
Planning the Milky Way shot
![]() Chapter 2:
Chapter 2:
Equipment for star photography
Chapter 3:
Camera settings
Chapter 4:
Focusing at night
Chapter 5:
Picking the longest shutter speed
Chapter 6:
Setting aperture and ISO
Chapter 7:
Taking the exposure
Chapter 8:
Post-processing in Lightroom
Chapter 9:
Advanced techniques
Chapter 1:
Planning the Milky Way shot
That the quality of the sky is the most important factor of a great Milky Way shot!
Even the most professional equipment is worth nothing, if the sky is polluted or the Moon ruins the scene.
So the first step should always be to plan the location and time of the photoshoot.

What is the Milky Way in the first place?
What we call Milky Way is actually our Galaxy, and from the outside it looks pretty much like the Andromeda Galaxy:

But as we’re the inside it, it looks like this:

The galactic centre is the most photogenic area, and this is what you see most often on photos. The density of the stars is highest here, also there’s a lot of interstellar dust in the space. This is what makes that light patch on the sky.
The galactic centre is visible from the early mornings of April until the evenings of October. That’s good news, because it’s best in the summer 🙂
Pick the darkest location
The internet is full of questions like “what’s the best lens / camera for night photography?”, but the questions should really be about “what are the best places to shoot?”.
Because the quality of the sky is No 1 factor in taking a breathtaking Milky Way shot.
I cannot emphasize this enough:
The quality of the sky is the most important factor to obtain a good Milky Way shot.
Basically, you want be as far from cities as possible.
In practice, this means at least 30-50 miles away from bigger cities.
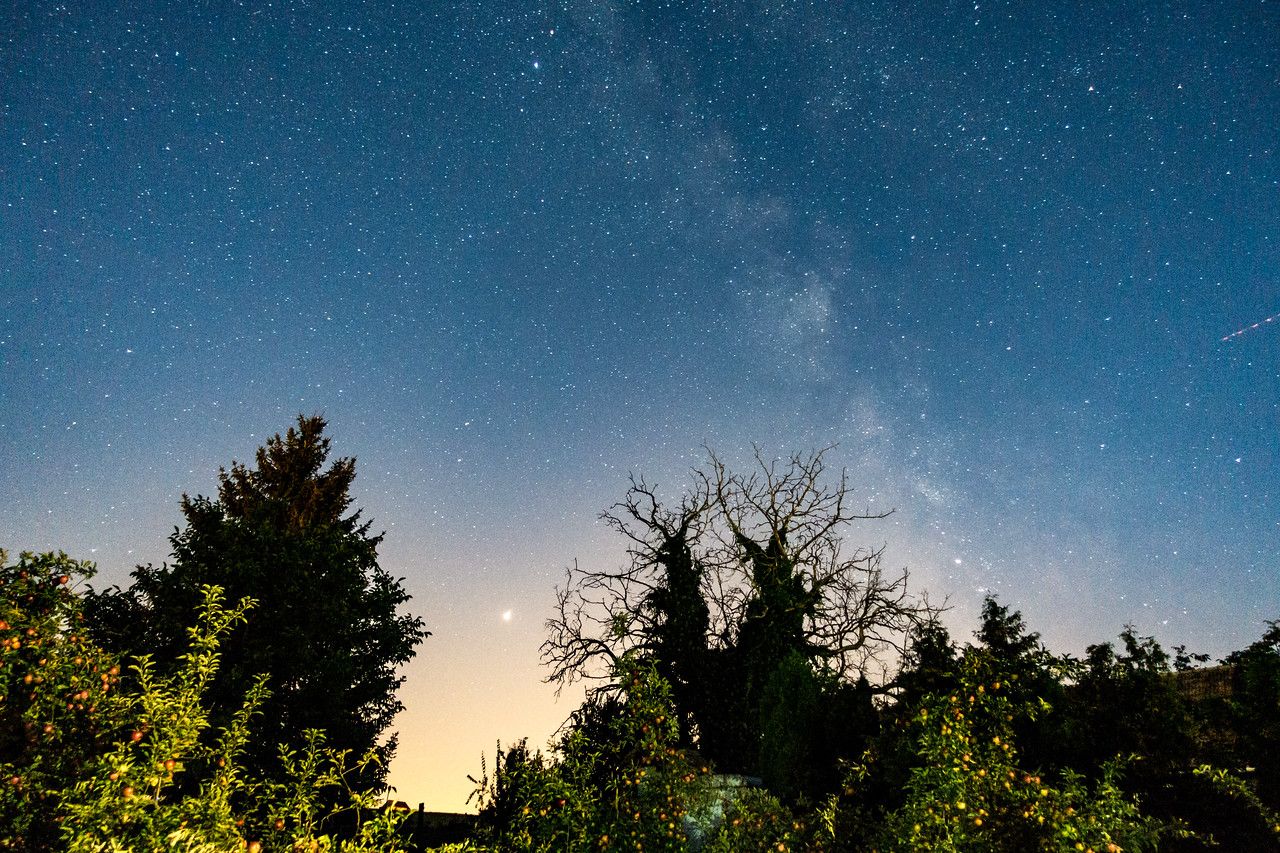
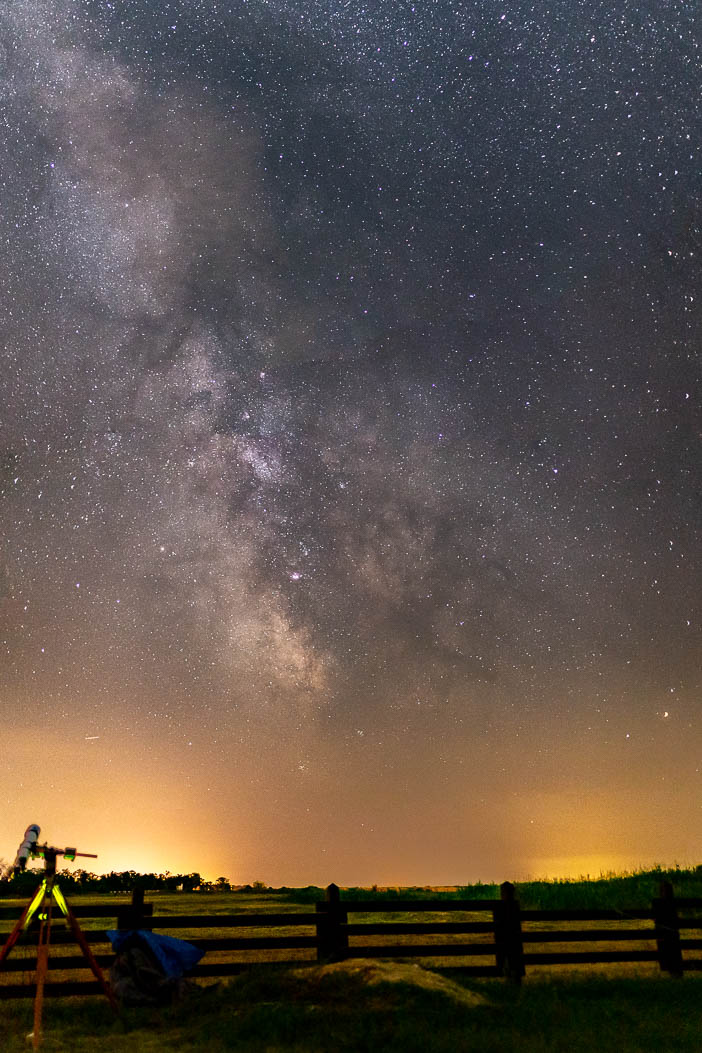
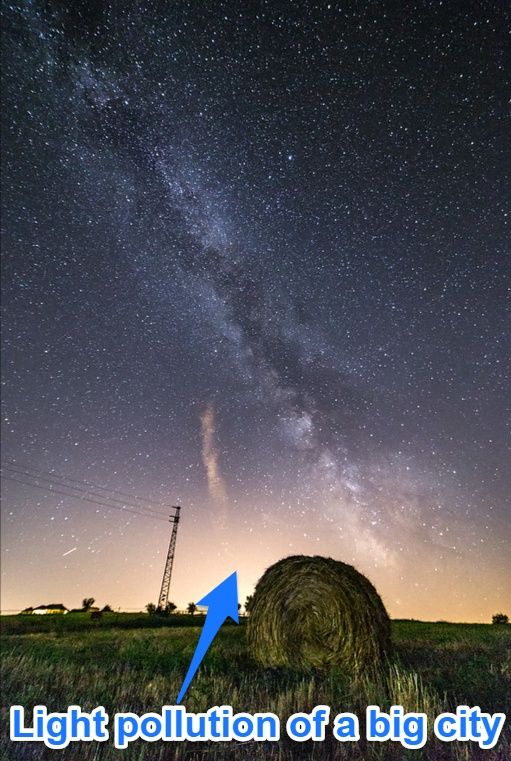
This picture was taken 15 miles from the edge of Budapest, Hungary, a capital with 2 millions of people. Look how the light pollution of the city masks out the central part of the Milky Way:
Compare that to this beautiful picture of David Kingham, taken at the famous Oxbow Bend in Grand Teton National Park:
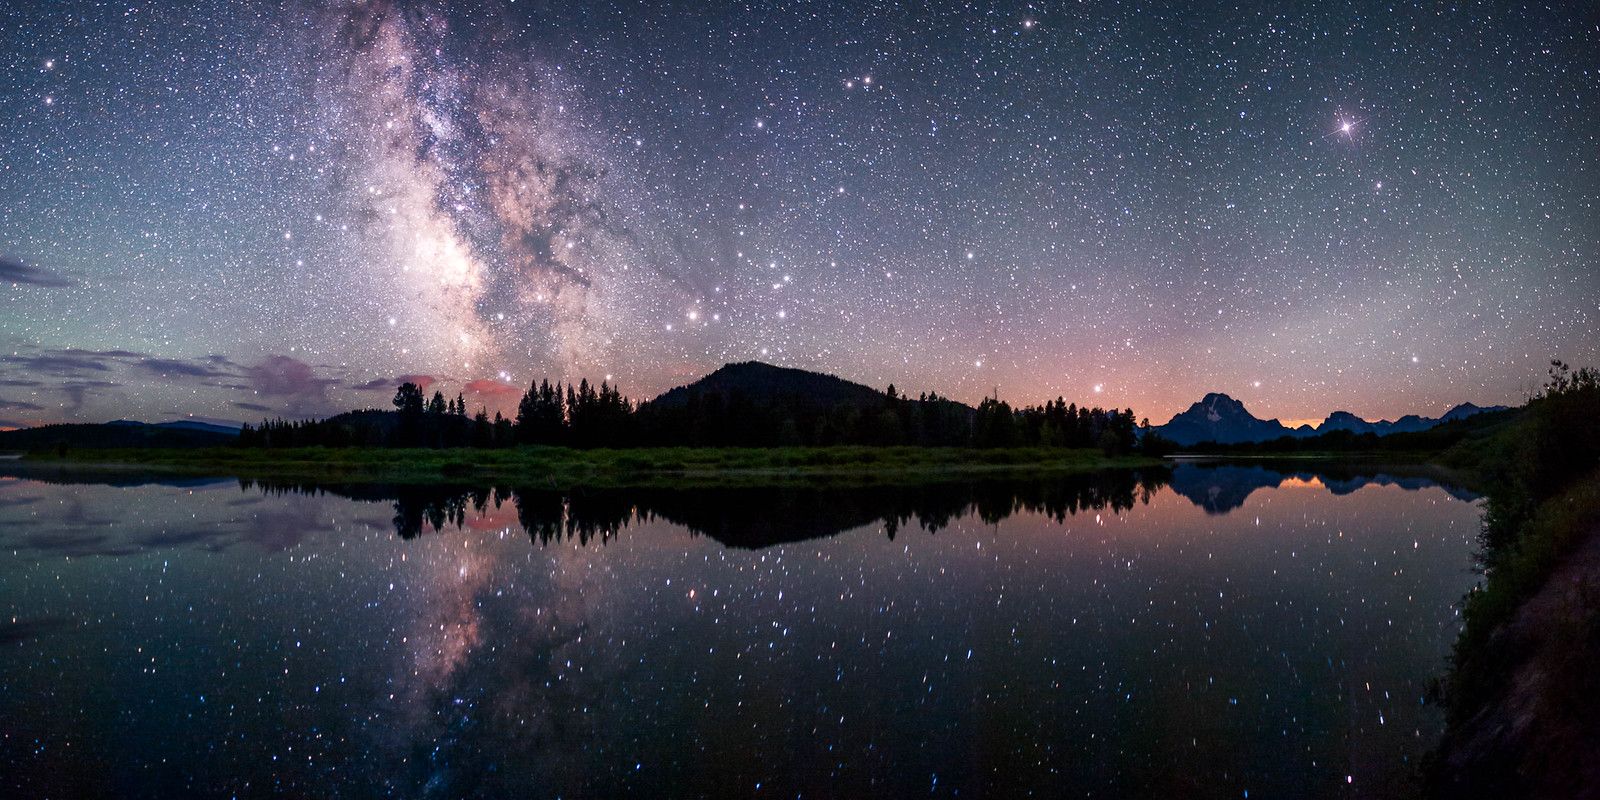
The direction of the nearest city also matters.
For example, on the northern hemisphere, the centre of the Milky Way is usually around 20-40 degrees above the southern horizon. With this mind, you have to make sure that the nearest city in southern direction is at least 40 miles away, otherwise the light pollution will be covering the center part of Milky Way.
So you want to avoid the light pollution on the southern horizon mainly (this article goes in-depth about light pollution and how you can avoid it).
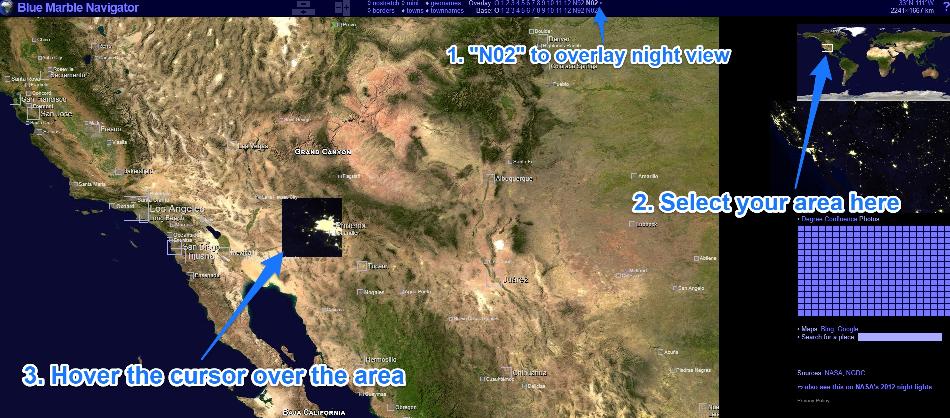
A good tool to find dark areas is Blue Marble’s maps where it shows you the “normal” map, but if you move your cursor over, it will show you the night satellite image:
Plan with the Moon
But being in a very dark, non light-polluted area is not enough: the Moon should not be on the sky either. Best time for Milky Way photography is around New Moon.
Or if the Moon is above the horizon, it should be around new moon, plus-minus 3-4 days, otherwise it will blow out the sky.

Two websites with lunar calendars to plan with are: MoonGiant and Stardate
Chapter 2:
Necessary equipment for star photography
You’ll need to have clear and dark sky, plus a tripod.
Of course, buying more expensive gear will produce better results, but after a point you’ll see diminishing returns.
Here I’ll show you my favorite equipments for night photography.
Tripod
You can have any kind of tripod, I’m not going to recommend anything specific here.
What matters is that it should hold your camera steady for many minutes.
And it should be sturdy and stable enough so that wind is not shaking it. The less you extend the tripod, the more stable it’ll be.
Practical advice #1: don’t put the camera very close to ground, especially in summer, because as the air cools down, dew will likely form on the lens, ruining the shot:
Of course this applies only in certain weather conditions (humid and non-windy warm nights).
Practical advice #2: If you hang your camera bag on the tripod to increase its weight, make sure that the wind is not swinging the bag!
Because if it does, then it does more harm than good…
In this case, I recommend to adjust the height of the tripod so that the bottom of the bag would slightly touch the ground, not letting it to swing, but still pulling the tripod enough.
Camera
Almost any camera will suffice that is capable of shooting in Manual mode and can take long exposures. It should be also capable of going up to ISO 1600.
As you can tell, this covers every DSLR and mirrorless camera on the market.
Ideally, cameras with bigger sensor (like full-frame) work best, because the sensor produces less noise, and the lenses that fit those have wider physical diameter which helps to collect more light.
But this does NOT mean that an APS-C or micro 4/3″ camera would fail under the starry sky!
Even compact cameras with wide aperture lenses are very good under the stars!
Look at this one, taken with a Sony RX-100 III (24mm, f/2, 15 sec, ISO 1600):
Here’s a great night test of premium compact cameras from Ian Norman.
I wanted to give you a list of recommended cameras, but I really just can’t…
Of course, if your budget allows it, cameras with bigger sensor produce better results, because:
- at a given ISO speed they have less noise
- longer focal length lenses have to be used, which also means there’s a bigger physical diameter that captures light
An ideal astro-landscape setup for example:
- full-frame camera coupled with 14mm f/2.8, 24mm f/1.4 lenses and 50mm f/1.4 lenses (Rokinon makes very good manual lenses that are cheap and very sharp at the same time)
- APS-C sensor camera with 11-16 f/2.8 or similar lens, or 12mm f/2
So, the bottom line is: literally every DSLR or MILC camera will do, believe me!
Though fanboy people will go very far to convince you the Camera maker X is better for night photography than Camera maker Y, it matters NOT.
Partly because much of the picture depends on the lens…
Lens
Every month, someone emails me their experience which goes like this:
‘Oh, I bought a 35mm f/1.4 prime lens, because that’s got a wide aperture and good sharpness, and when I went out to take pictures of the sky, I realised it’s way too tight!’
Indeed it is tight.
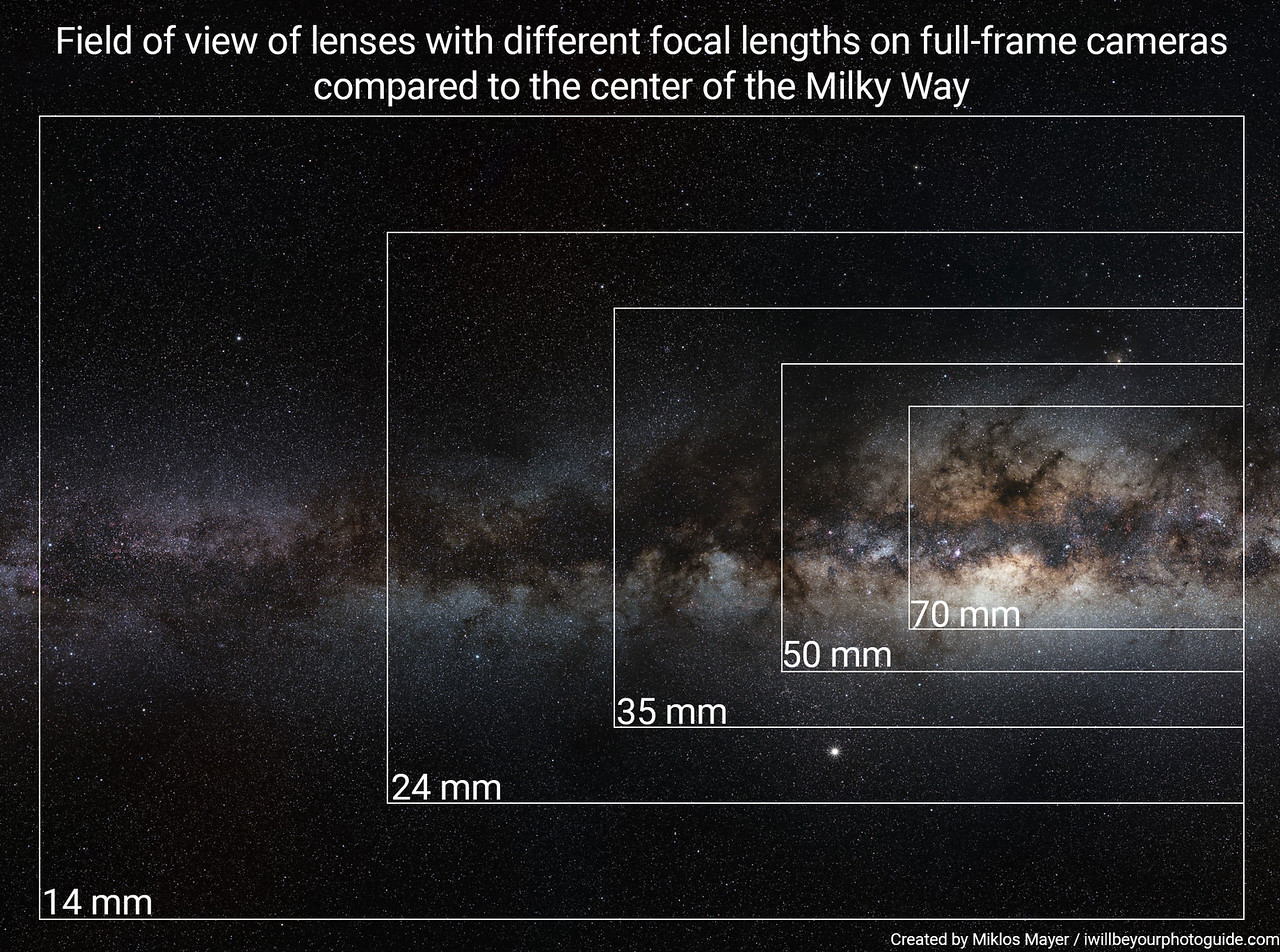
The Milky Way surrounds us: it goes around the whole sky: therefore wider lenses work so much better than longer lenses.
The first shot is with a 14 mm, while the second shot is from a 50 mm lens on a full frame camera:
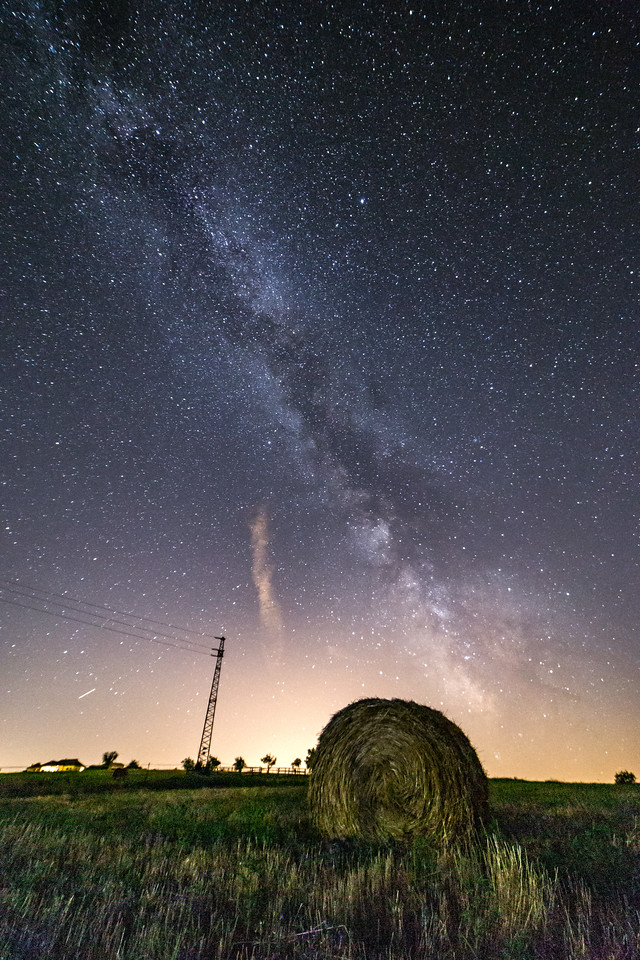
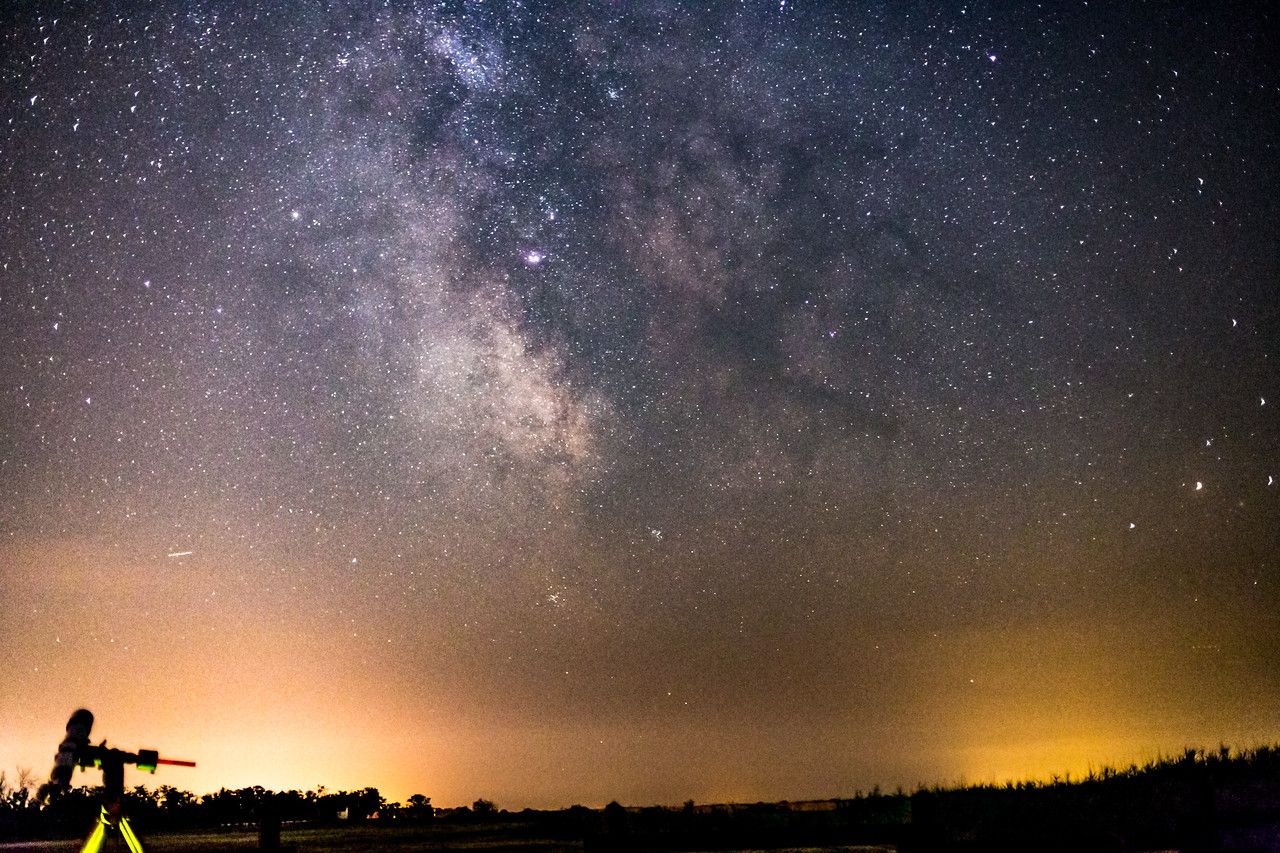
So be prepared that with lenses longer than 35mm, you will probably have to take panoramas.
Milky Way panos can be technically better, but take a lot of work both on-site and on computer. Also, panoramas can NOT be used in timelapse videos and making startrail pictures.
The other reason why wider lenses can work better is the increased shutter speed they allow for.
For example, with 14 mm you can shoot 30 seconds, while with a 50 mm, you can shoot max 8 seconds without the stars making trails. More on that later, when I discuss the shutter speeds.
My recommended setup for astrolandscape photography:
– Full-frame camera + 14mm f/2.8 or 24mm f/1.4 lenses
– APS-C sensor camera + 11-16mm f/2.8 lens or 12mm f/2
Mike Hollingshead from Storm and Sky has a good article with different Samyang / Rokinon lenses. He compares many of the different lenses often used in astrophotography, and provides a lot of sample pictures that shows the stellar image quality of the cheap Rokinon glasses.
Chapter 3:
Camera settings for stars
Although today’s cameras are very smart, you’ll want to control every aspect of the camera yourself, and not leave the settings onto some automated mechanism.
Hence, for most cases, Manual mode is the way to go.
 Want an excerpt of the camera settings? I’ve compiled a super actionable checklist PDF that you can read anytime, click here to grab your copy.
Just let me know where I can send it to (takes 5 seconds).
Manual mode
At night, when there’s hardly any light, the camera’s metering system cannot be trusted, so it’s best if you switch into Manual mode.
Why Manual mode?
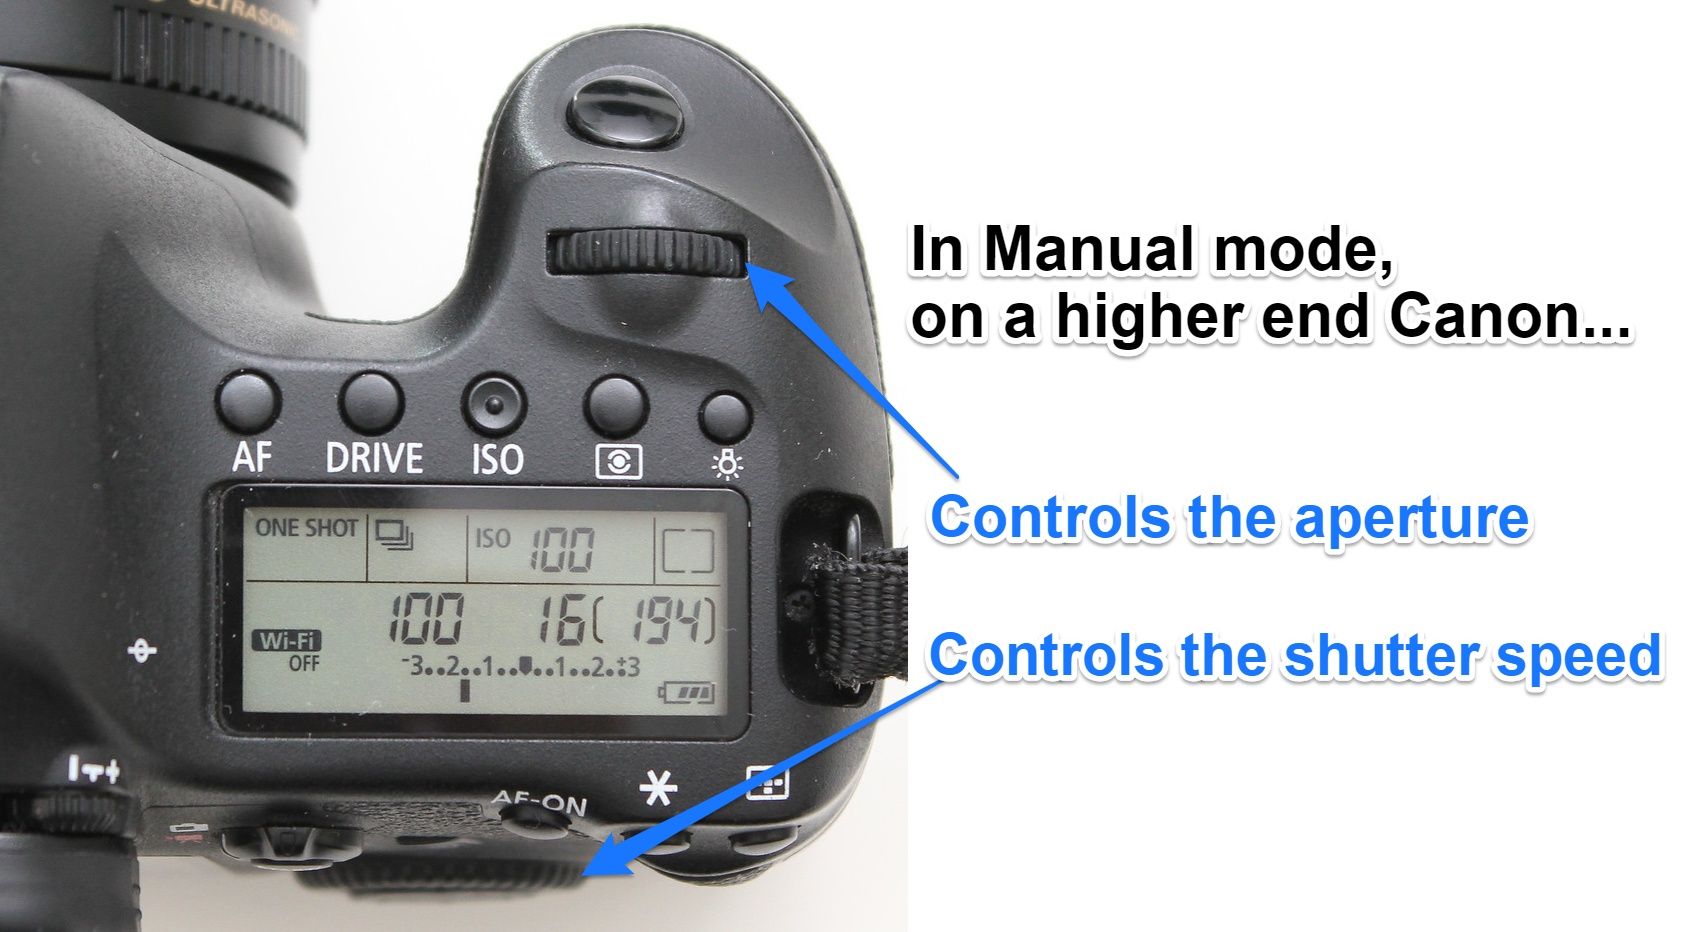
Because there you have control of both aperture AND shutter speed, independently from each other.
On most higher-end cameras, the shutter speed can be controlled by one dial, and the aperture with the other dial:
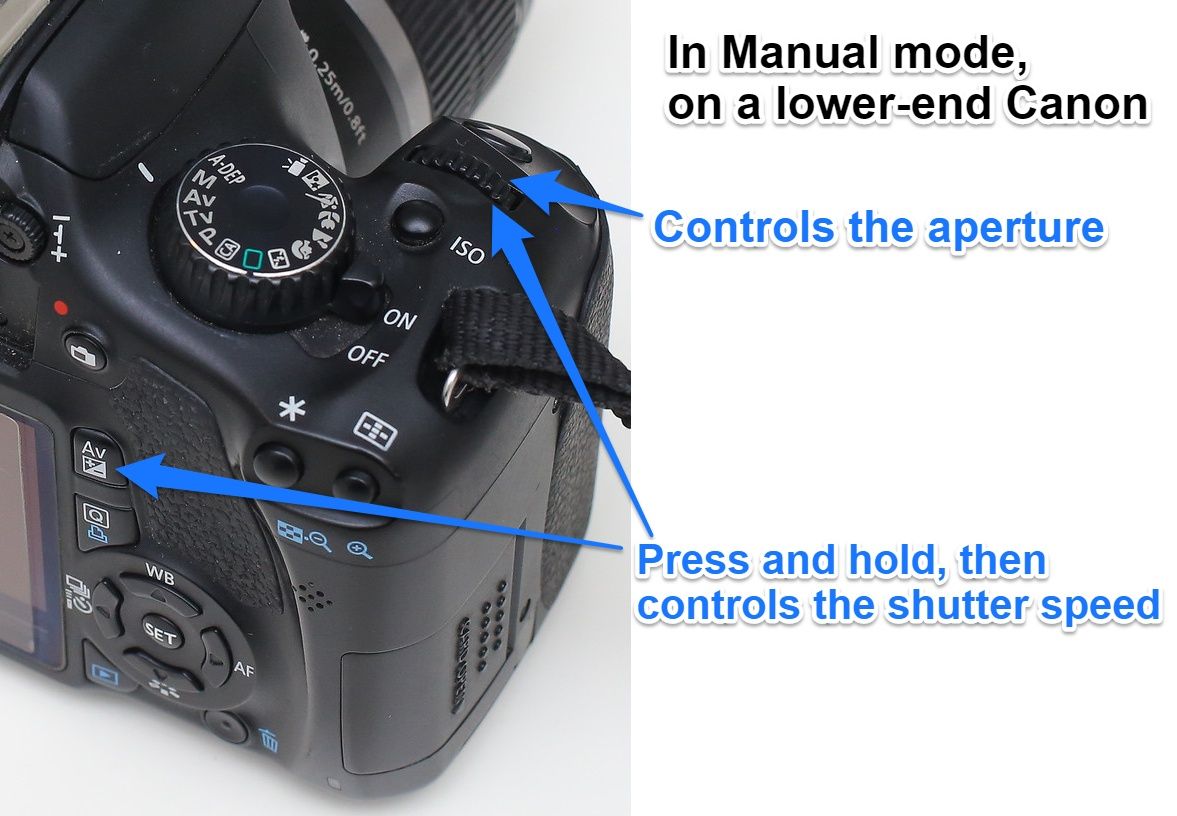
On lower-end cameras, the main dial controls either the aperture or the shutter speed.
To be able to adjust the other parameter, you’ll have to press and hold the +/- button, and then rotate the dial:
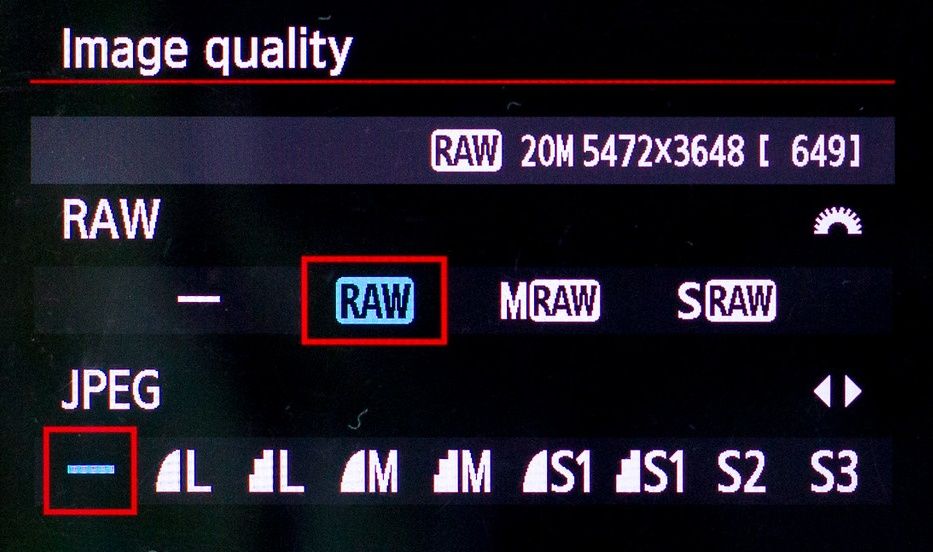
RAW vs JPEG
Although I’m not a hardcore RAW fan, who never ever would shoot JPG…
But for night pictures, I always go for RAW file type.
Why RAW?
Because it’s got a lot more information, hence the pictures can be processed to a far greater level.
Also the White Balance can be set up properly, and appropriate noise reduction can be applied
And starry sky pictures need to be edited heavily!
Just look at this comparison (picture out of camera versus edited RAW file):


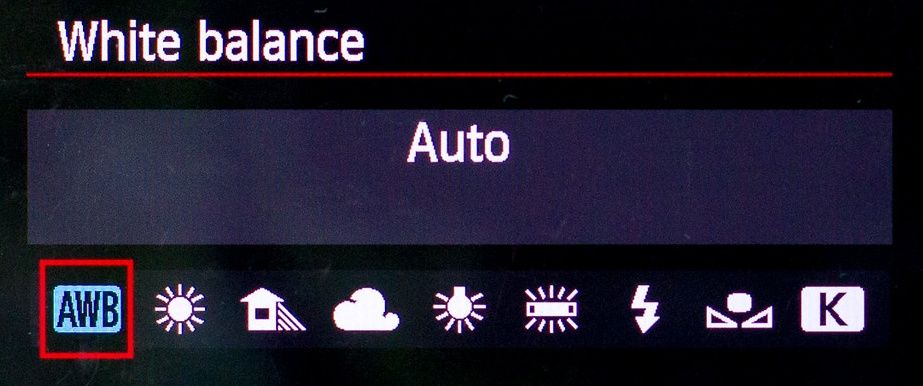
White Balance
If you’re shooting in RAW, then it does not matter in what White Balance you are using.
It’s easiest to leave it on Auto, and set it later in post.
However, if you shoot in JPEG, then you may want to rather get it properly in-camera, as later, in post, you’ll not be able to change it.
For most times a white balance around 3000 – 4000 K gives good results.
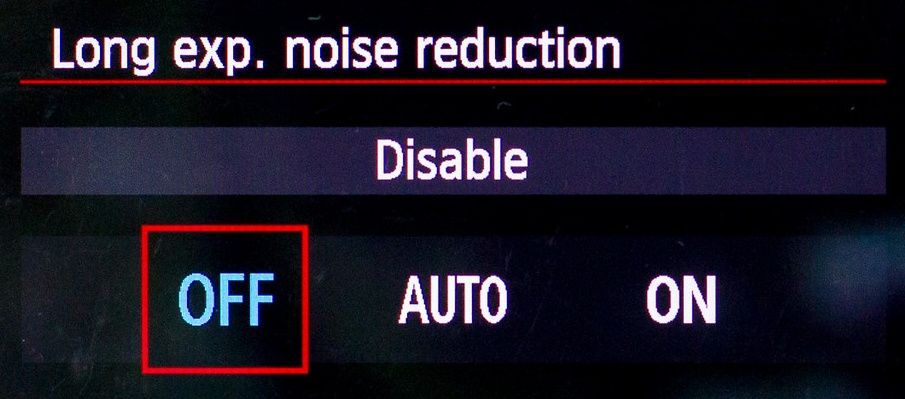
Long exposure noise reduction
This is the feature that every camera has, and luckily it can always be turned off / on.
The goal of the long exposure noise reduction is to eliminate hot-pixels. These are blue or red pixels that contain no practical information, and can appear scattered around the frame.
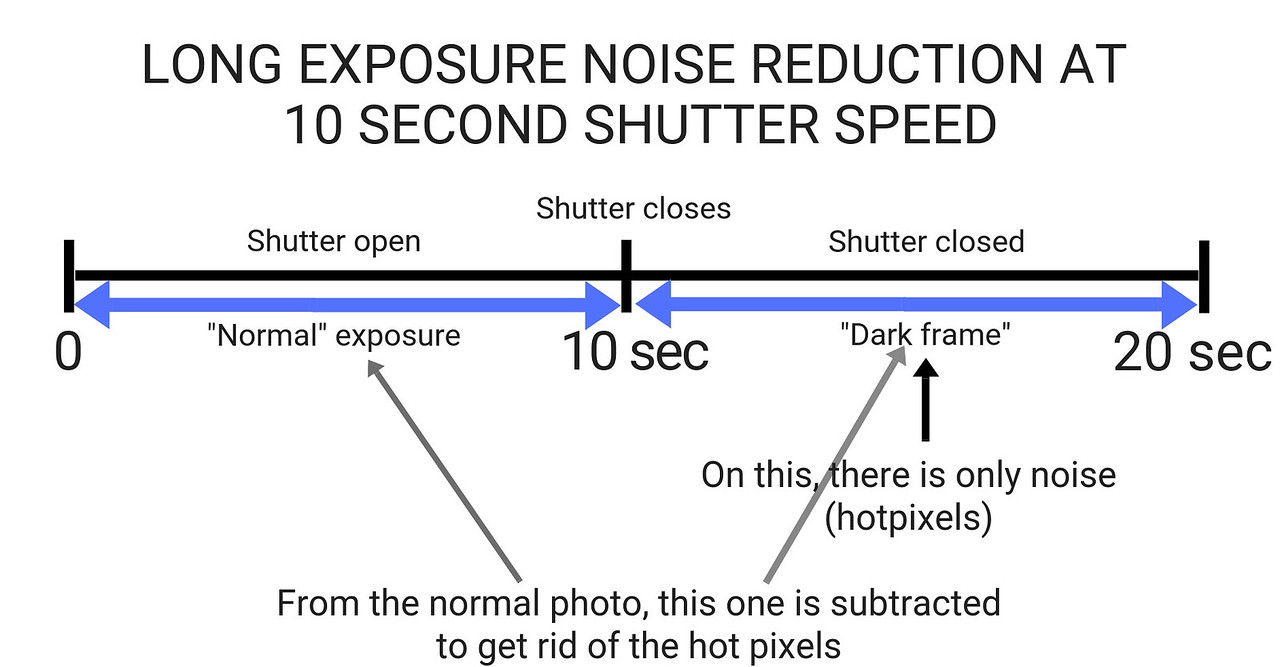
The way long exposure noise reduction works is that after the normal exposure, it takes a second frame with the same settings, but with zero light coming in. This second frame is called the “dark frame”, and it contains only the hot-pixels.
So by subtracting the dark frame from the normal exposure, the hotpixels can be removed:
Ideally, it’s best if this feature is ON, but the downside is that really makes shooting time consuming, and does not allow you to capture startrail pictures.
Luckily the newer cameras are not really prone to produce hot-pixels, so you can leave this setting turned OFF. Although it’s best to check for hot-pixels at 100% magnification after you set your final exposure.
Chapter 4:
Focusing the camera at night
The most common question about night photography is “how do I set the focus?”.
And for a good reason: the AF of the camera fails under the starry sky.
And the distance markings on the lenses are not 100% accurate either…
So what’s a good way to find focus on the stars then?
It is Manual focusing, so you can be sure you’ll have tack sharp stars.
Manual focusing
The only way to go is Manual focusing!
But manual focusing can’t be done through the viewfinder, you have to use Live View mode.
Here’s my process.
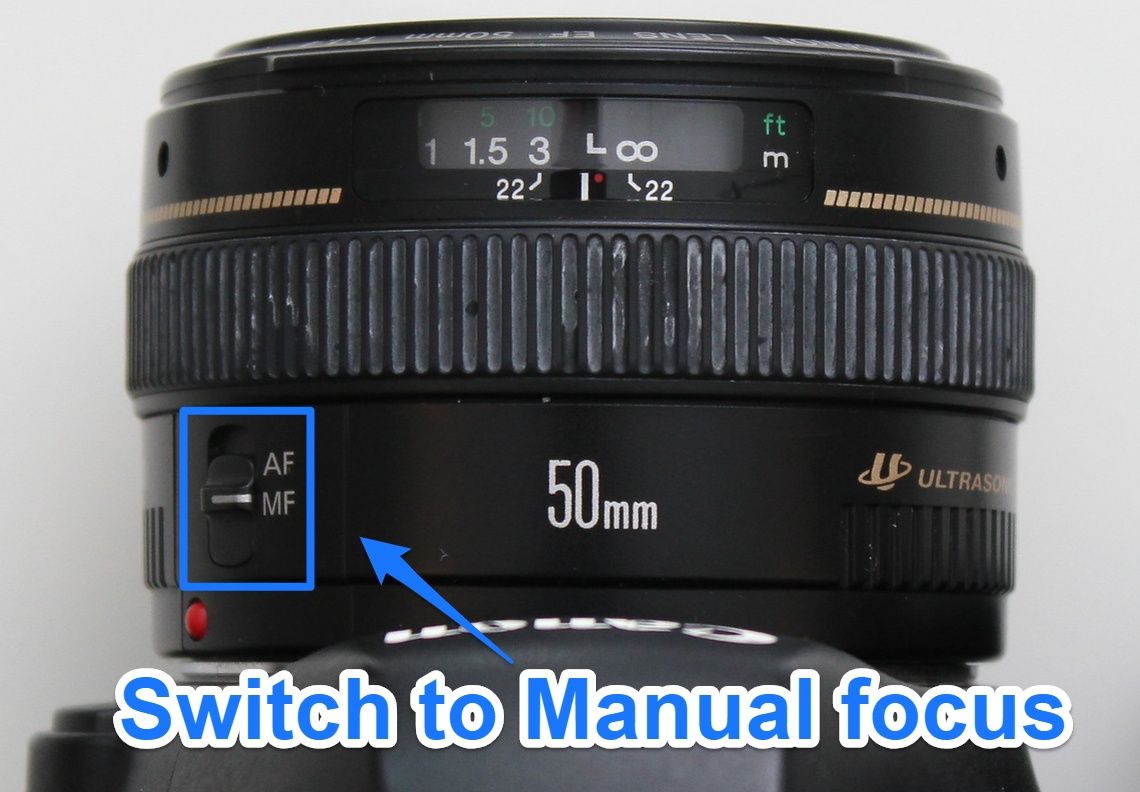
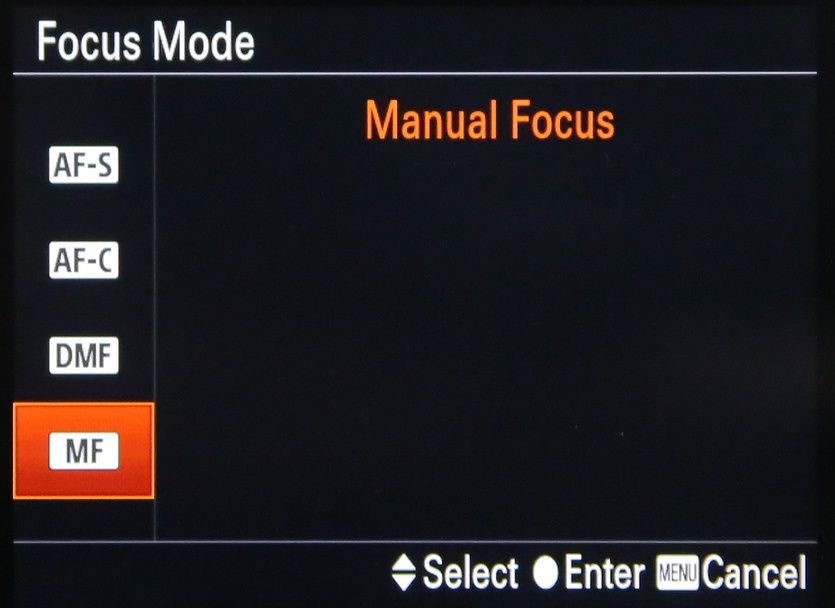
Step #1: Switch to Manual Focus
On a DSLR, turn the AF switch into MF:
Or on a mirrorless camera, activate MF in the Menu, and also enable the Manual Focus assist feature (this will automatically zoom into Live View to aid focusing).
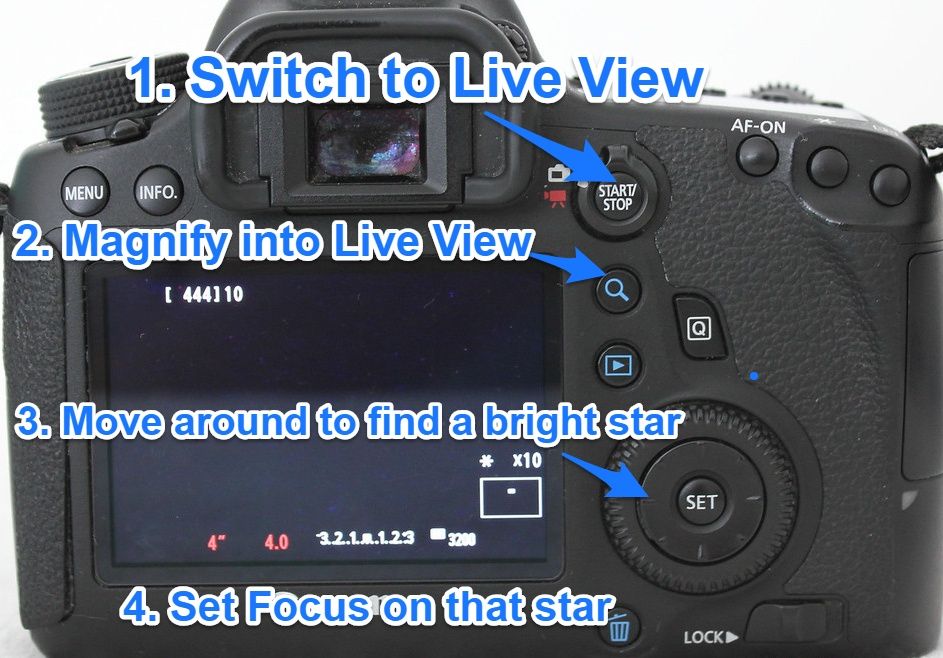
Step #2: Switch to Live View
With Live View, the mirror of the DLSRs flip up, and you get to see what the sensor is actually recording.
Mirrorless cameras are in always Live View, so no need to switch anything there
Step #3: Set aperture to f2.8 or widest, and the exposure time to 15 seconds, and the ISO to 3200.
These settings will be changed later, but let’s have these in order to be able to see something in the Live View.
With these settings you probably already see some stars in the Live View. But it can also happen that you see a black screen: don’t worry!
Step#4: Magnify into the Live View
On a DSLR, press the magnify button until you’re all the way in the Live View.
On a mirrorrless camera, if you have the MF Assist enabled, it automatically magnify a given area.
Once you magnify into Live View, you’ll start to see more stars. If you can’t find one, just move around the frame looking for a brighter star.
Step #5: Focus for sharp stars
Now, with magnified in, it’s easy to set the focus on a bright star.
Here’s a short video of me doing it:
Chapter 5:
Determining the longest shutter speed for stars
As the Earth is rotating around its axis, the stars are moving accordingly.
So if the exposure time is too long, then stars will not be star-like, but rather streaks.
In most cases, we want to avoid streaks, and want to have just “points”.
But we want the longest possible shutter speed to capture as much light as possible.
So the question is:
What is the longest exposure time we can use without the stars becoming streaks?
The 500/focal length rule
The first factor that has effect on the longest shutter speed is the focal length of the lens.
The longer the lens, the less exposure time can be used.
To be more specific, it is the angle of view.
For example, a 24mm lens on a full-frame camera allows the same shutter speed as the 8.8mm lens of the Sony RX100 M3, which has the equivalent field of view of a 24mm lens.
The rule is simple: the longer the focal length, the less is the shutter speed that can be used.
There’s a widespread rule called 500 / focal length rule.
This means that with lens having a 24mm equivalent field of view, you could have 500 / 24, that is roughly 20 seconds of exposure without the stars moving in.
Or with a 50mm lens, a 500 / 50, that is 10 seconds long shutter speed, and the stars would not move in.
In my experience, the 500 rule is a bit too much I think.
I usually use 15 seconds with a 24mm lens, and around 6 seconds with a 50mm lens. So for me, it’s more like a 300 rule, instead of 500.
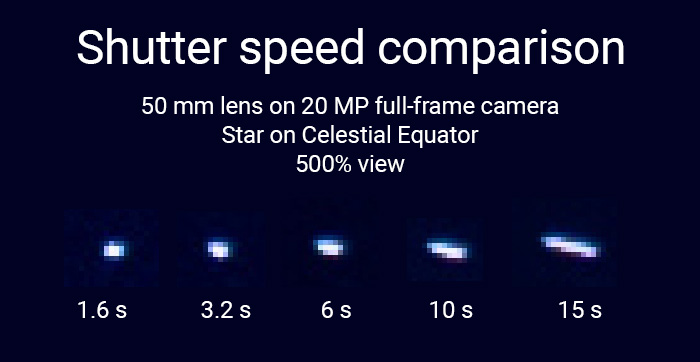
Here’s a comparison of different shutter speeds with a 50mm lens, on stars near the Celestial Equator:
Note that the above comparison is at 500% view. This means that the little trailing at 10 seconds can be hardly noticed at normal viewing (25% – 50% magnification).
(Later in this post, you’ll find an advanced exposure time calculator that takes into account every parameter).
So why have I emphasized on the picture above that the stars are on the Celestial Equator?
Because it’s not just the focal length that have in impact on stars apparent speeds…
It also matters where the star is on the sky!
Considering the latitude of the stars
The stars that are on the Celestial Equator move the fastest, at 15 degrees per hour speed.
What is the Celestial Equator?
This is the Equator of Earth being projected onto the sky.
And as you go towards the poles, the apparent speed of the stars slow down.
And finally, at the poles, the stars are not moving.
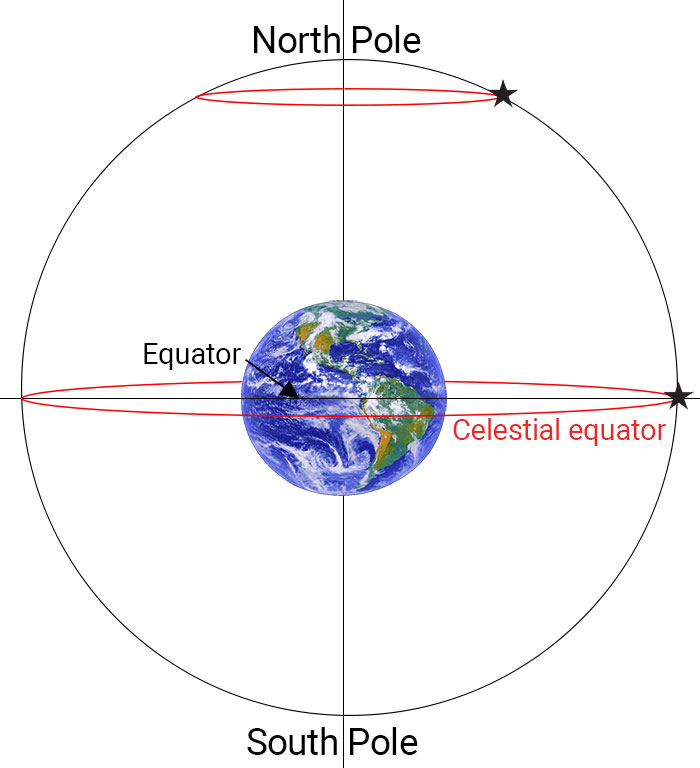
This may be a bit confusing, but if you come to think of it…
The stars that are closer to the pole have to move around a much smaller circle in 24 hours, than the stars on the Equator.
This means that the stars going on a smaller circle will be moving at a slower speed.
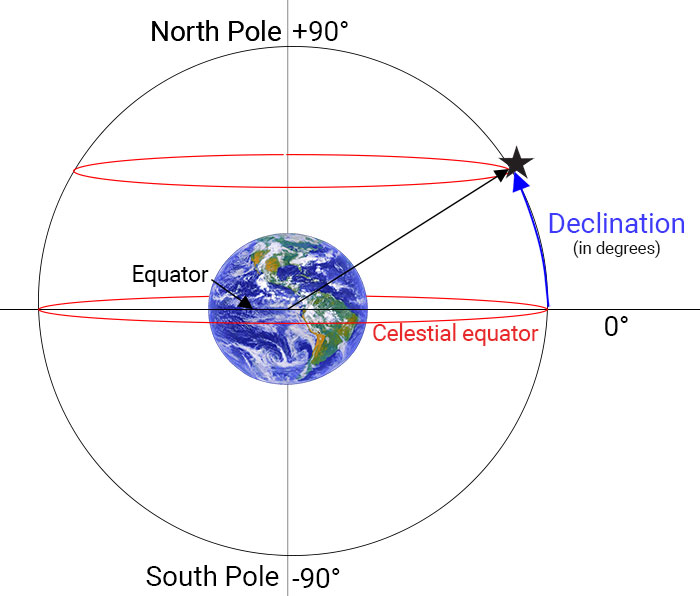
Explaining Declination
The distance of the stars from the Equator is called Declination in astronomy, and is always measured in degrees. The Celestial Equator is 0°, while the north pole is +90°.
For example, the Belt of the Orion lies on the Equator, while the center of the Milky Way is around -30°.
The Big Dipper is around +55°.
The declination is the equivalent of the geographical latitude: a star that has the same declination as our latitude, will be right above as in the zenith at certain times.
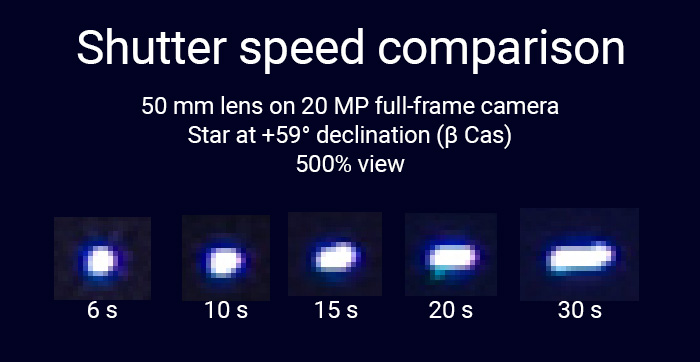
So here’s again that shutter speed comparison, but this time I aimed at the constellation Cassiopeia, to its second brightest star, which has a declination of 59 degrees.
You can see that here roughly 10- 13 seconds can be used to have the same amount of star trails! Twice as much as on the Equator!
Considering the usage
So how long shutter speed can you use then? What is the star trailing that is too much, and what’s just good?
Well, this depends on your need!
For example, if your intention is tack-sharp single photo that you’ll blow up, it’s best if your stars don’t trail. So this means a bit less shutter speed, which results in less signal to noise ratio.
Note that even if you have a bit of trailing, it will not be obvious even at 100% view.
But, if your goal is timelapse movie, where you’ll use the whole frame, and compress it into a 4K frame, which will not be viewed very closely, you can allow some star trailing.
Or, if your goal is a panorama shot, where the overall resolution will be way higher than the original shot, the star trails will be not visible.
I’ve put together a Shutter Speed Calculator for Star Photography takes into account all the above parameters.
More on how to use the shutter speed calculator, and what’s the math behind it.
Aperture
For most cases, you want the widest aperture possible to let the most amount of light in.
Simpy because wider aperture means a physically larger disk collecting the light.
For example, on a 18-55mm kit lens, you could go down to f/3.5 at 18mm.
Or on a 16-35mm f/2.8 lens, to f/2.8.
But beware that extremely fast lenses that have f/1.4 aperture (like 50mm f/1.4) tend to be “soft” at the widest aperture.
With these lenses, it’s best to pick at least f/2, but if you want the best image quality, then go for f/2.8.
My Canon 50mm f/1.4 lens at different apertures, at 100% magnification:
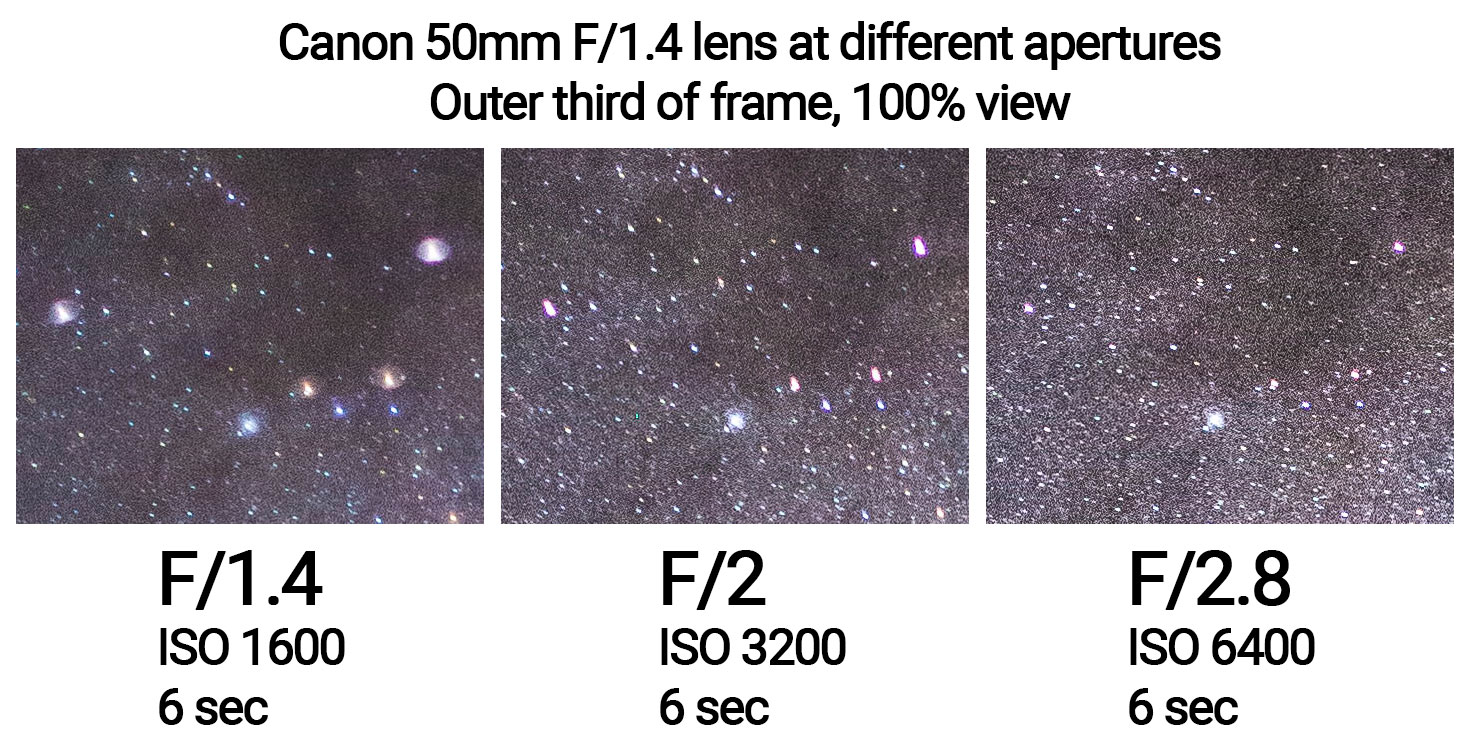
The bird-like stars you see on the f/1.4 – f/2 pictures are caused by coma effect.
The newer prime lenses, like the Sigma Art series exhibit less coma effect, and therefore are sharper at wider aperture. From the comparison above it’s easy to see why astrophotographers are obsessed with wide apertures…
Because lower ISO is needed to have the same exposure. And lower ISO means less noise.
Usually lenses that have starting apertures at f/2.8 are already very sharp at f/2.8.
This means that f/2.8 is the best aperture value for most cases.
ISO speed
Aperture and shutter speed is already set, only the ISO speed left.
You’ll have to use very high ISOs to give pleasant results: at least ISO800, but most typically around the ISO 1600 – 6400 range.
Cranking up the ISO takes its toll: as you go higher up, more noise will be introduced.
For me, looking back my astro shots with my Canon 6D, I’ve always used ISO 3200 – 6400.
But with an APS-C senzor camera I would not go higher than ISO 3200 for most cases.
Every parameter is set now, the focus is spot on, only the exposure needs to be taken!
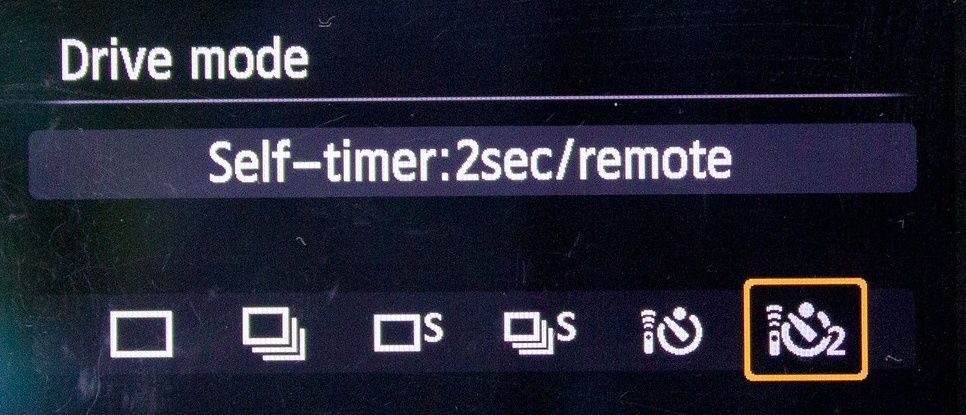
To reduce shake that comes from you pressing the exposure button, it’s best to set the camera’s drive mode Self-timer:
Usually 2 seconds of delay is enough.
If you have a remote release cable or phone app, even better. I prefer the good old cable releases, as they drain the battery a lot less.
After you have the picture, make sure that you check for sharpness by previewing and magnifying into it. And not just magnify a bit: go all the way into the picture, so you can really tell if it’s sharp or not.
Let’s go through all the settings in a quick summary:
Chapter 8:
Post-processing night photos with Adobe Lightroom
For post-processing the pictures you can use Adobe Lightroom or Photoshop.
I strongly recommend Lightroom, as it’s a lot easier, and allows you to simply copy the settings over to many images.
With the huge dynamic range of RAW files, you can bring out surprisingly lot of details.
So here I’m going to show you my usual Milky Way processing workflow in Adobe Lightroom CC Classic.
Using Adobe Lightroom to post-process
Adobe Lightroom is the industry standard software for RAW file editing.
Though one can argue about its pricing system (monthly subscription), or not so high speed, this is still No 1 software when it comes to fast and advanced editing of many pictures.
It does not matter if you use the Classic, or the CC only version, as the sliders are the same.
I must emphasize that this level of editing can only be performed on RAW files, not on JPG files.
Here I’m going to show you my Lightroom editing process on a Milky Way photo.
Every photographer edits their pictures differently, even I process them differently from time-to-time, depending on my mood.
But workflow described here is pretty general, and will work for most of the Milky Way shots.
Also, I’m not a fan of over-editing the astrolandscapes shot, so I’m more on the “realistic” side of things.
Editing the levels
The goal in editing is to darken the sky and make the stars brighter at the same time.
This can be achieved with clever combination of using the Highlights, Shadows, Whites and Blacks slider.
The stars are always “bright” pixels, so the Highlights and Whites sliders will affect them.
In this case, first I increased the Whites, and decreased the Shadows.
Note: Most of the times, the Highlights slider can also be used instead of the Whites slider
I can play with the Blacks slider as well, to make the background darker:
Clarity and Dehaze
The Clarity slider increases micro-contrast. This means that it elevates the brightness difference between the sky and the star.
Basically, it makes the stars pop out!
On daytime photos I hardly ever use it, but on starry pictures, it can really do magic!
Also, the Dehaze slider acts by increasing contrast, and by applying a colder white balance:
You can see how the Dehaze filter changes the white balance of the picture as well.
But let’s make the picture color correct!
Setting the correct white balance
As the White Balance was left on Auto when I was shooting, the picture looks way too yellow.
This is something that people regulary discuss in forums and facebook groups: how blue / black should the sky be?
My personal taste is that I like just a little bit of blue in the sky, although in real life it was pitch black. But you should definitely not leave it on Daylight settings, as it will be painfully orange.
So in this case I went for 3800 Kelvin, and moved the Tint slider to 17.
Reducing noise
As high ISO speed is used, some noise reduction has to be performed, although it’s not always necessary.
Lightroom has two different noise reduction: Luminance and Color.
By default, the color slider is up at 30, I never touch that.
I only increase the Luminance slider to 20-30.
Editing is almost done…
Brightening back the foreground
Almost, because the foreground now got very deep black.
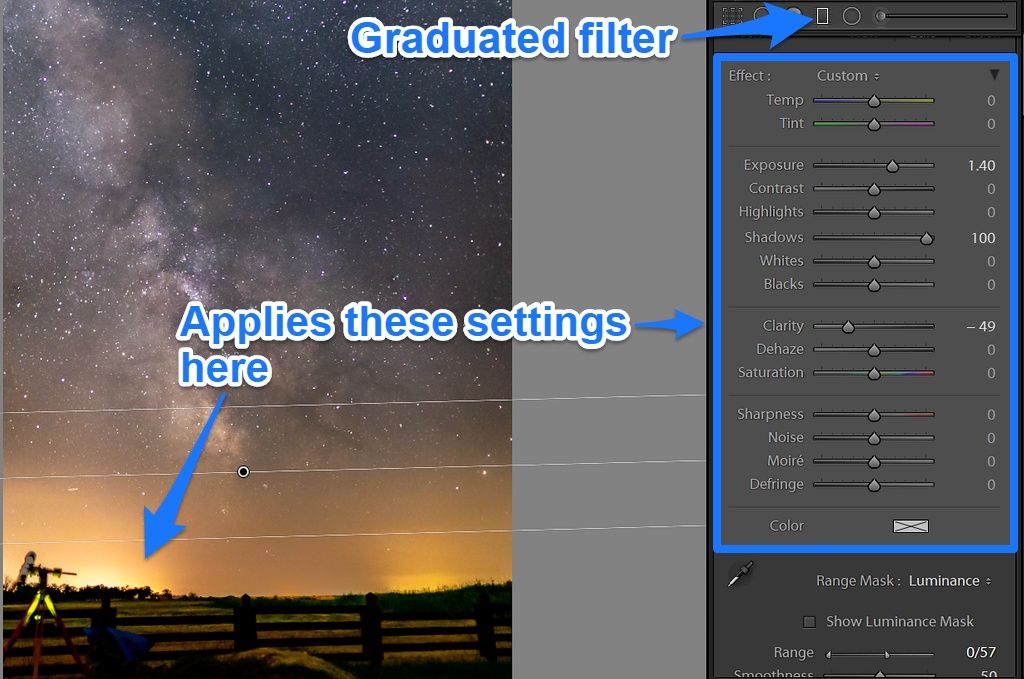
So I’ll apply the Graduated filter on this area (press M to activate it). I click around the horizon, then drag the cursor up. This will create a gradient for me.
So I raise up the Exposure, the Shadows here.
Also, I’ll bring down the Clarity, because originally I cranked it up, but I don’t want the foreground to be affected by that big Clarity setting.
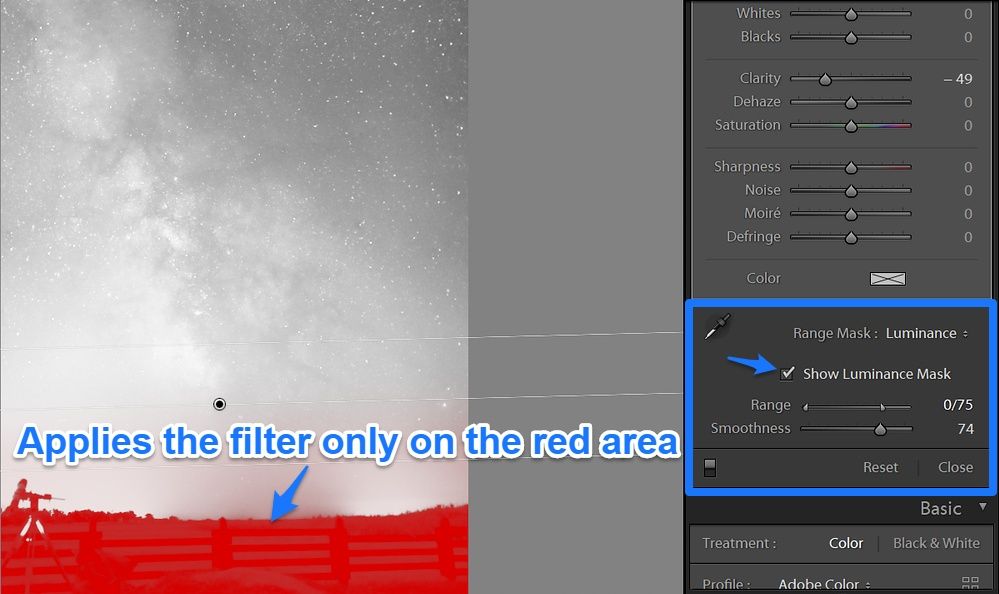
To make sure the Graduated filter only affects the foreground, I select the Range Masks option, choose Luminance, and pick the lower range of brightness.
It can even show where the filter will be applied (the red area):
So here’s how it looks before-after in Adobe Lightroom:
Here’s the final result:
Extra step (I don’t really do this): brushing on the Milky Way
You can use Lightroom’s Brush and just selectively brighten the Milky Way.
This is NOT something I like to use.
But it exists, and of course, you can enhance the Milky Way this way as well.
Just select a Brush with no Masking, 100 Density, and add some Whites and lower the Shadows, plus some Clarity:
It will have an effect like this:
It’s not my style…
When I had my first photos, I often overprocessed them, when used this selective enhancing. Then I had realised, it’s not necessary, so I quit using selective enhancement methods like this.
But anyway, I’ve saved this Brush into a Brush Preset, and it’s included with the Lightroom preset:
Compose some Earth-ly foreground in
You can say that this is just my personal view, but after talking to many people, they agreed on this:
An astrolandscape photo that shows foregrounds from Earth attracts a lot more attention than those pictures that are “just” astrophotos, without anything Earth-like object.
Of course, astrophotos are gorgeous, but still, our human brain cannot measure it’s scale, hence feel isolated from the subject.
However, if there is special landmark, or a human body in the picture, the viewers brain can measure the scales.


Take a timelapse of the Milky Way
Once the camera is set, it is very easy to capture a timelapse sequence of the Milky Way.
Just like Michael Shainblum did in his short film of Californian astrolandscapes:
How to do the Milky Way timelapse:
I have a step-by-step guide on timelapse photography here. If you’re new to it, I highly recommend to read that as well.
#1: Find the final exposure settings using the techniques in Chapter 4 – 7.
#2: Set the camera’s drive mode to Continuous.
#3. Use a remote cable, and just push and lock the exposure button.
This will force the camera to take exposures one after each other, without virtually any gap between the frames.
Note the exact time of the start.
#4. Taking the shots
Have at least 240 frames (corresponds to 10 second of video)
Just multiply the exposure time in seconds by 4, and you’ll get the necessary time in minutes for 240 frames.
Time for 240 frames in minutes = 4 * exposure time in seconds
For example, if using 30 seconds exposure, to get a 10 second long timelapse video (meaning 240 frames), then you’ll need to shoot for 30 * 4 = 120 minutes.
#5. Post-process timelapse in Adobe Lightroom:
Once done with the shooting, locate all timelapse frames into a dedicated folder, and import all the frames into Lightroom.
After that, edit the picture in the middle of the sequence:
Then select all frames in the sequence, and click Synchronize Settings:
Here, check all:
This will copy the develop settings of the edited photo over all the other frames.
After this, all the pictures will have exactly the same editing.
Now you can export all the frames into JPG, and then merge them into a video using Adobe Premiere, After Effects, VirtualDub or Final Cut or even Photoshop.
But there’s an easier way, with the software LRTimelapse. It’s free for working up to 400 frames.
It was put together by an awesome german photographer, Günther Wegner, please give him a big thumbs up, because this tool can really save hours of work!
#6. Export the pictures with LRTimelapse module
With all the pictures selected, press Export (or Cmd-Shift-E keys), and select on the top of the Export panel “Export Time Lapse”
This will load LRTimelapse’s export panel. It’s still Lightroom that does the exporting, though.
#7. Render timelapse video with LRTimelapse
Once done with Exporting, open up LRTimelapse, and go to File – Render Video. (If LRTtimelapse was running meanwhile LR exporting, this window will automatically pop up):
Locate the sequence you want to render, and set the additional parameters. With free version you don’t have many choices, but for start it’s enough.
And there it is, the Milky Way timelapse is ready. You’ll see that the longest part of the process is the Lightroom exporting (converting the RAWs into JPGs).
After that, the render in LRTimelapse is just a flash of time 🙂
Try a Milky Way panorama
As the Milky Way surrounds the whole sky, even a wide angle lens will not show it from horizon to horizon.
This is when you need to shoot multiple exposures, side by side, with around 30% overlapping.

The shooting and post-processing is exactly the same, except for in the end you’ll have to merge the frames together with Photoshop, Microsoft ICE or HUGIN.
In Lightroom, edit one picture, snychronize the settings over to the other frames, select all the frames, right-click, and Photomerge – Panorama. This will merge the frames together. Prepare, that it can be a slow process…
Taking a Milky Way pano with a longer lens
If you have a relatively long lens, like 50mm, then you’ll need to take dozens of shots to cover more than just the very center of our galaxy.
Although with such a lens half as much shutter speed can be used as with a 24mm, this is compensated by wider the physcical diameter of the lens.
For example, a 24mm lens used at F/2 has a physical aperture of 24 / 2 = 12 mm, whereas the 50mm lens at F/2 has a physical aperture of 50 / 2 = 25 mm.
In practice this means that the 50mm captures 4x more light, while the shutter speed only drops by a factor of 2.
This translates into seeing fainter stars and more stellar objects. So it does make sense to use an ultra-fast 50mm lens, but it comes with a price of more work (eg. taking a pano).

Pros of a panorama
- Fainter stars, stellar objects will be visible
- High resolution image
Cons of a pano
- Long post-processing / stiching
- Unable to do timelapse photography
- Unable to do star trails
Summary
Taking pictures of the Milky Way is much simpler than it first seems.
You just have to:
- pick a dark location
- pick a time when the Moon is not shining
- put the camera on a tripod
- use a relatively wide and fast lens (even a kit lens can be a good start)
- set the camera to Manual mode
- Use manual focusing using the Live View
- determine the longest exposure time
- Set a wide aperture and ISO of 1600 – 6400
- And use a self-timer or remote release
That’s it!
I wish you having a great time under the starry sky! 🙂
Now it’s your turn, answer me one question in the comments:
Which part of the article was the most useful for you?
 Want an excerpt of the camera settings? I’ve compiled a super actionable checklist PDF that you can read anytime, click here to grab your copy.
Just let me know where I can send it to (takes 5 seconds).
Useful resources
Photographers
Michael Shainblum’s California nightscapes
Eden Bhatta’s The Tainted Tripod
Tools
Advanced exposure time calculator for astrolandscape photos – to obtain a long enough shutter speed without the stars leaving trails
Timelapse video making guide – one of the easiest and most gorgeous timelapse subjects is the starry sky
The Photographers Ephemeris – planning where the Moon and Sun goes down
Stellarium – to plan what will be on the night sky (constellations, planets, etc)
Blue Marble’s light pollution map – to be able to find a really dark location
LRTimelapse – to create timelapse videos with Lightroom
Downloadables
My Milky Way photography checklist – a practical excerpt of this article











Excellent article Miklos! I’ve done a course on astro and you’ve certainly captured the important information, and explained it very well. I’ve downloaded your checklist to keep in my camera bag as a cheat guide (memory does fade). Hopefully I get some clear skies soon to practice astro again.
Thank you Liesl! I always aim for simplicity, and clear explanation, so I was very happy to hear your words 🙂
I’m sure you’ll take great pictures, even without the checklist 🙂
Your basic post processing process is simpler than others that I have seen and tried.