Why is exposure time so important when taking astro pictures?
As the Earth is rotating, so move the stars apparently.
So if a too long exposure time is used, then the stars will leave trails, and will not be star-like.
If a too short exposure time is used, then the stars will be star-like, but the signal-to-noise ratio will be low: the picture will be dark and noisy.
Here’s a comparison between 30 seconds and 9 minutes (taken with Canon 550D + Samyang 8 mm fisheye lens) :
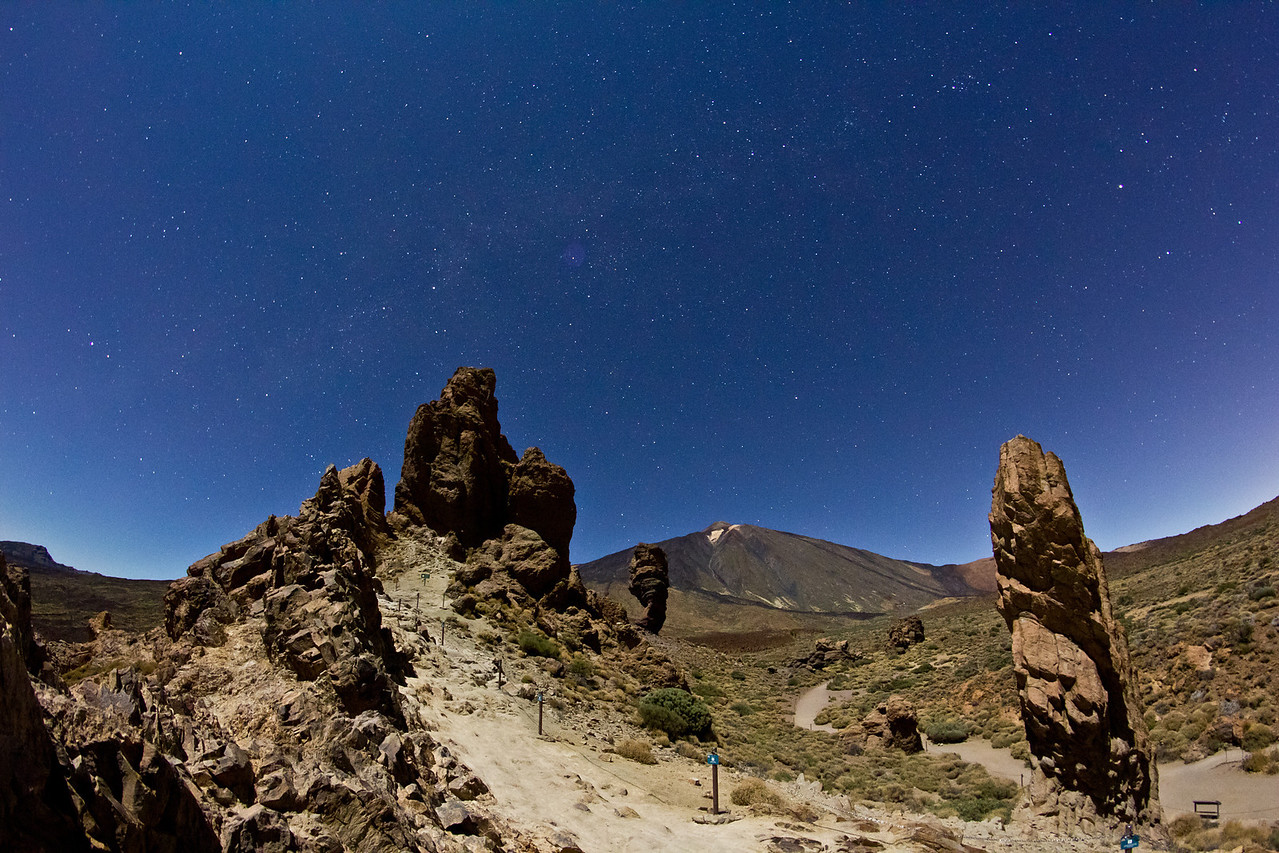
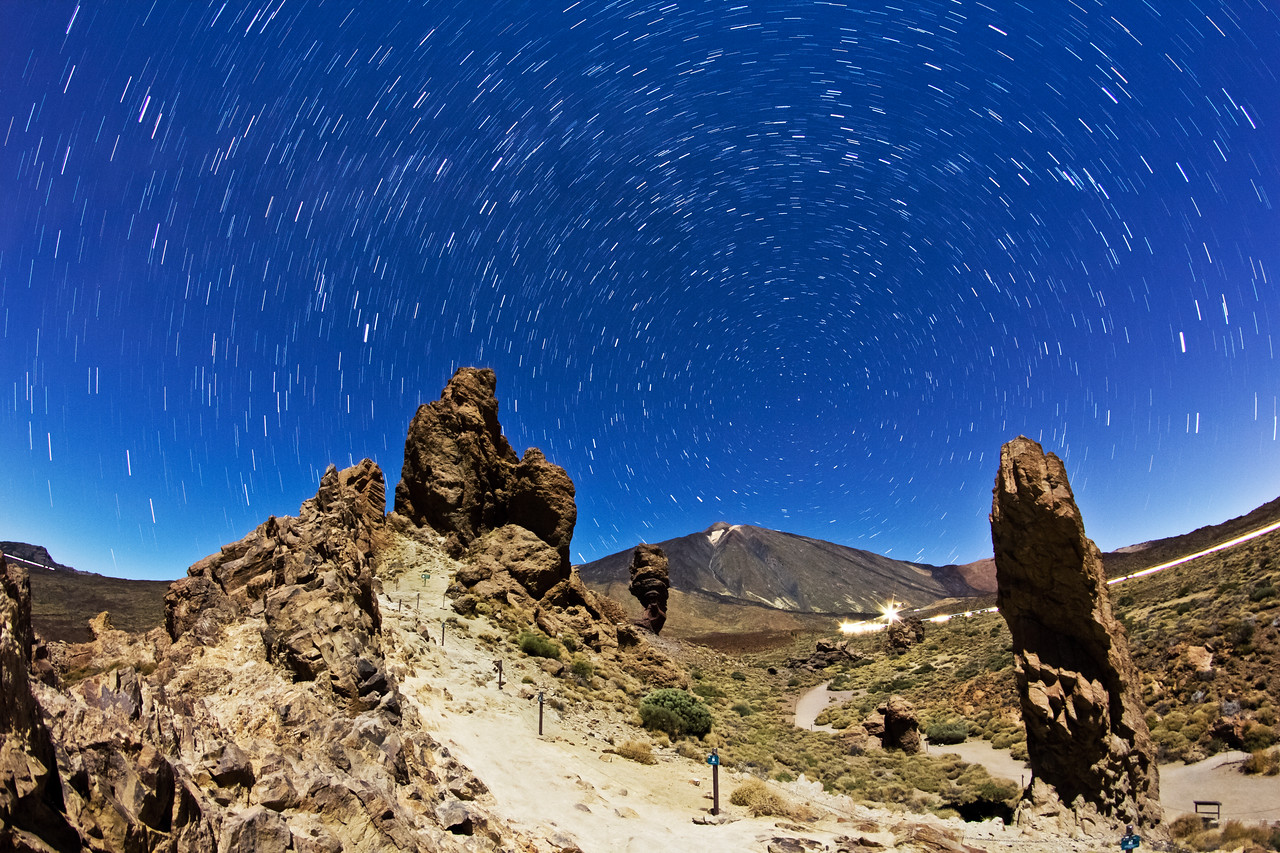
So the goal is to use the longest possible shutter speed (exposure time in other words) that provides star-like stars without any visible trailing.
And this is exactly what this calculator does.
It takes into account several parameters:
- focal length of the lens
- megapixel count of camera sensor
- how long startrails you allow
- where the star is on the sky
Download my Milky Way photography guide
I’ve compiled a super actionable checklist PDF that you can read anytime (maybe on your phone when setting the camera). Just let me know where I can send it to (takes 5 seconds):
How to use this calculator?
#1. The first field is the full-frame equivalent focal length of your lens.
This means that if you use a full-frame camera, this is your actual focal length. So for example, with a 24 mm lens on a Sony A7, enter the value 24 here.
But, if using an APS-C senzor camera, like Canon 80D, with a 11-16 mm lens at 11 mm setting, enter a value of 11 * 1.6. This means that a 18 mm lens on a full frame body would have the same field of view. So in this case, enter 18.
Or when using a Sony RX-100 at its widest setting (8.8 mm), enter 24 here.
The reason I’m using the 35mm equivalent focal length is that this is what almost everyone knows, especially the compact camera owners.
#2. The second field is the megapixel count of your sensor.
Enter the value in megapixel (million pixels) here.
So for a Sony A7R II, enter 42.2 here, NOT 42.200.00.
After this comes the part why I call this as an advanced calculator 🙂
How much trailing allowed?
#3. The next field is the Pixel spread.
This is an arbitrary number in pixels, and gives you how many pixels long the startrails should be.
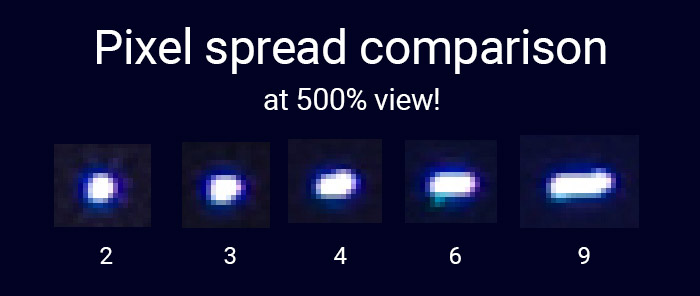
Ideally we aim for pinpoint-like stars. But we also aim for longer shutter speeds to reach a higher signal-to-noise ratio as well.
So a balance must be find. I personally think that it’s better to have a bit of startrailing that’s only visible very close-up.
The pixel spread parameter describes this balance:
- a small value means pinpoint-like stars
- higher values mean longer trails
Things to consider
#1. Even if a super short exposure is used, a star will always look a few pixels wide, at least 3.
#2. A pixel spread value of 6 will return the same value as using the often referred 500 / focal length rule. (More on this in my detailed guide)
#3. The above picture is 500% view, and even a 6 pixel long trail will look star-like when the picture is viewed “normally” (say 33%).
My recommended value here is a pixel spread of 6 for timelapse and panoramas, and 3-4 for single exposures with very sharp stars.
Where is the star on the sky?
The next field is the declination of the star.
What is declination?
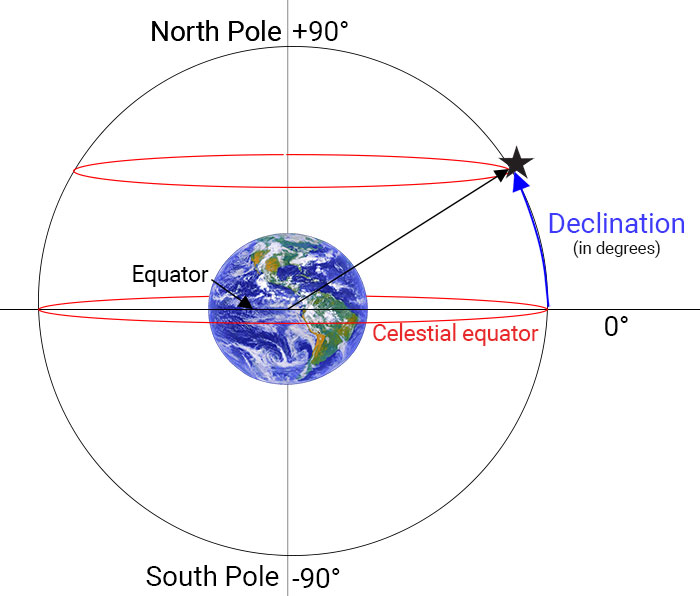
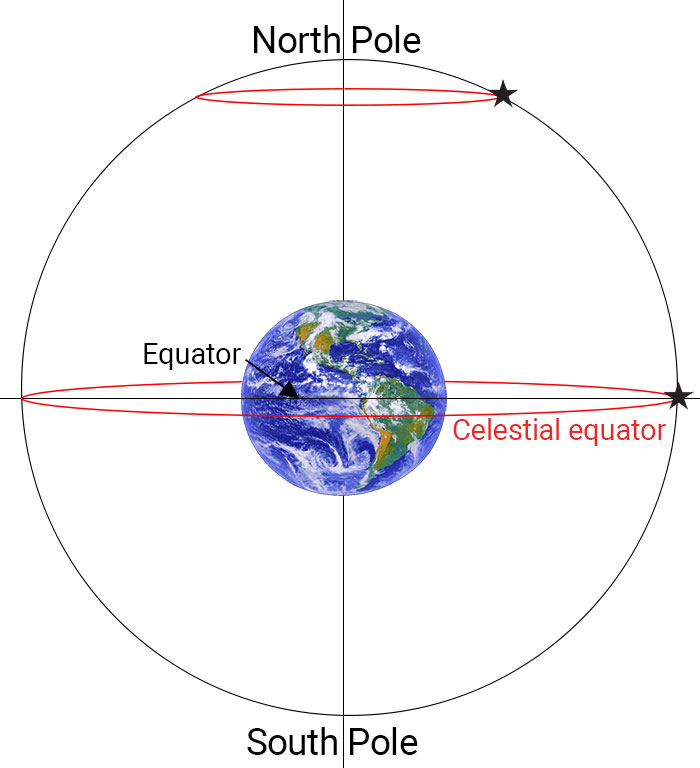
The distance of the stars from the Equator is called Declination in astronomy, and is always measured in degrees. The Celestial Equator is 0°, while the north pole is +90°. The Celestial Equator is the mirror of the Equator on Earth, projected onto the sky.
For example, the Belt of the Orion lies on the Equator, while the center of the Milky Way is around -30°.
The Big Dipper is around +55°. And because of geometry laws, the stars of the Big Dipper move half as fast as the Belt of the Orion.
The reason why declination matters is that closer to the poles, the apparent speed of the stars slow down.
The stars that are on the Celestial Equator move the fastest, at 15 degrees per hour speed, while at the poles the stars are not moving.
This may be a bit confusing, but if you come to think of it…
The stars that are closer to the pole have to move around a much smaller circle in 24 hours, than the stars on the Equator.
This means that the stars going on a smaller circle will be moving at a slower speed.
If you don’t know the declination of the area you’ll be shooting, or the pixel spread you want, just leave them as is, and the calculator will calculate a time that is very close to the 500 / focal length rule.
The math behind the calculator
This part will go a bit deep into mathematics, but it’s not rocket science either…
I took the idea from Ian Norman’s shutter speed calculator, and approached the calculations in a similar way, though with a bit easier-to-use inputs.
The final goal of the calculations is to obtain the speed of a given star on the sensor, in pixel / seconds.
Here’s how I got to this value, using the inputs.
The inputs were:
- F = full-frame equivalent focal length of lens (mm)
- MP = megapixel count of sensor (million pixels)
- P = pixel spread (pixels)
- D = declination (degrees)
#1. Calculating the field of view (V)
A quick Google search revealed a very simple way to calculate this
V = 2 x arctan (h / 2*F) (degree)
Where F is the focal length of the lens, h is the sensor’s given size. Both have to be in the same dimensions, in this case, millimeters.
Now I’m counting everything for a full-frame sensor, so h = 36 mm here, while F is the input of the first field.
Right now we have the horizontal field of view of that lens in degrees (V).
#2. Calculating the pixel dimensions of the sensor
Goal is to calculate the the horizontal dimensions of the sensor in pixels.
The megapixel count is simply the the two sides multiplied by each other:
MP = a * b
Where a is the longer, b is the shorter side in pixels
But considering a 3:2 aspect ratio the megapixel count of a sensor is
a = 1.5 * b
MP = a * a/1.5
Concluding from this
a = sqroot(1.5*MP) (pixel)
#3. Calculating the pixel / degree star speed
Dividing that a value by V, we obtain how many pixels cover one degree on the sky with a given lens and sensor
a / V (pixel/degree)
#4. Calculating the star speed
On the Celestial Equator the apparent speed of the stars is easy to calculate: they move 360 degrees in 24 hours (To be precise, under 23h 56m, but I did not consider this small difference).
This means 15 degrees an hour, which equals 0.0041667 degrees in every second.
v (star) = 0,0041667 degree / sec
So if I multiply this speed with the above pixel / degree value, then I’ll get the speed of the star in pixel / second
v (star)(px/s) = 0,0041667 * (a / V)
This value shows how many pixels the star moves in one second on the Celestial Equator with a given sensor and lens.
Almost there!
#5. Considering the declination (D)
The above star speed needs to be corrected with the declination.
It has to be divided by the cosine of the star’s declination (D)
v (star)(px/s) = 0,0041667* (a / V) / cos (D)
This value shows how many pixels the star moves in one second at a given declination with a given sensor and lens.
A tiny step from here…
#6. Getting the final value
Dividing the pixel spread (P) with the above pixel / second speed will give return the time I’m looking for:
Shutter speed (s) = P / v (star)
And that’s the final result. This gives me the time that a star at a given declination covers as many pixels as I want to set.
#7 Minor tweaks
- I have rounded the values to 0.1 seconds
- To be able to use minus declinations, I’ve taken the absolute value of D
- if you enter declination of 90, it will return a huge number 🙂
Useful resources
How to photograph the Milky Way – my complete guide
Advanced shutter speed calculator on Lonely Speck
Photopills app has a same feature
So why use the calculator at all, why not just take test shots?
This is indeed a good question.
Why not just take test shots, and determine the longest shutter speed on the scene.
Well, most of the time, this is exactly what we do.
But the calculator gives you a good starting point, especially if you’re working with 50 mm or longer lenses.
These lenses show a lot less from the sky and declination really has to be considered.
Also, if you’re shooting a timelapse video with different lenses, it might be a good idea to shoot all the footages with shutter speeds resulting in the same pixel spread.
I’m curious: if you look back your night photos, what pixel spread were you generally using?
Do you like sharper stars, or did you allow a bit of trailing?
Tell me in the comments!



How does the calculated exposure mean anything without knowing aperture and ISO? I must have missed something!