Ever happened to you that you saw a beautiful night scene, but you didn’t have a tripod?
So you had to shoot handheld and the only way to go was to bump up the ISO.
But then there was going to be noise everywhere, and non of us likes that…
That’s when a very simple but effective method can be used to significantly reduce noise.
Check it for yourself:
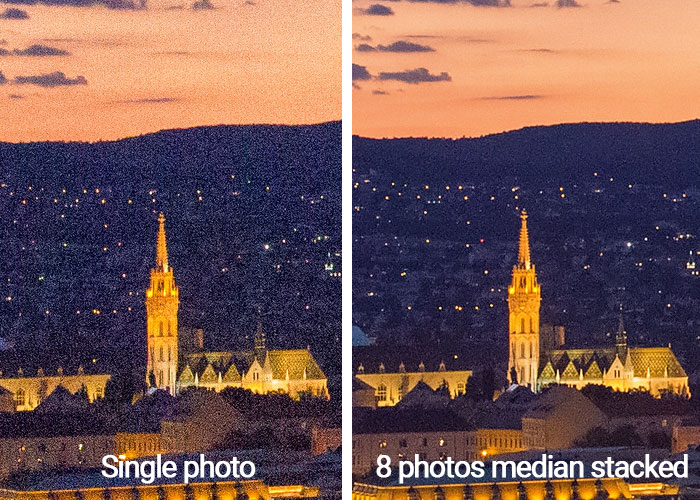
The method is called median stacking noise reduction, and in this article I will show you the exact process from shooting to work in Photoshop.
What is median stacking noise reduction?
- You take a bunch of photos with the exact same settings (they will be noisy because of high ISO, but don’t worry)
- In Photoshop you average out the photos so that noise will disappear
So what is median anyway?
Median is one kind of averaging method. It is calculated by putting the numbers in ascending order, and then picking the middle one.
For example, let’s say you have 3 pixels, and you want to take the median of them.
| Red | Green | Blue | |
| Pixel 1 | 120 | 51 | 220 |
| Pixel 2 | 70 | 67 | 140 |
| Pixel 3 | 150 | 45 | 145 |
| Median of pixels 1-3 | 120 | 51 | 145 |
When to use median stacking noise reduction?
This method is particularly useful in low-light scenarios where you have to handhold the camera and the subject is not moving at all.
So it’s especially useful for night landscape / cityscape photos, and also for compact and smartphone cameras, that are inherently a lot more noisy.
How to reduce noise with median stacking – the shooting part
The key here is to take many photos with similar composition and same exposure. Also, sharpness is key here, so make sure the shutter speed is fast enough (don’t worry about the high ISO!)
Lock exposure and drive mode
1 – Set the camera into Manual mode, and adjust the exposure. Make sure to have a fast shutter speed that you can safely handhold
2 – Set the camera’s drive mode into Continuous mode
3 – Use RAW file format is possible. If you’re in JPG, turn the noise reduction OFF
Compose and shoot
Compose and take 10+ shots. Try not to move when shooting, as you want almost identical frames.
The more photos you take, the better result you’ll get in the end (though requires more computerwork, too).
How to reduce noise with median stacking – the Photoshop part
Edit the photos to taste in Lightroom (optional)
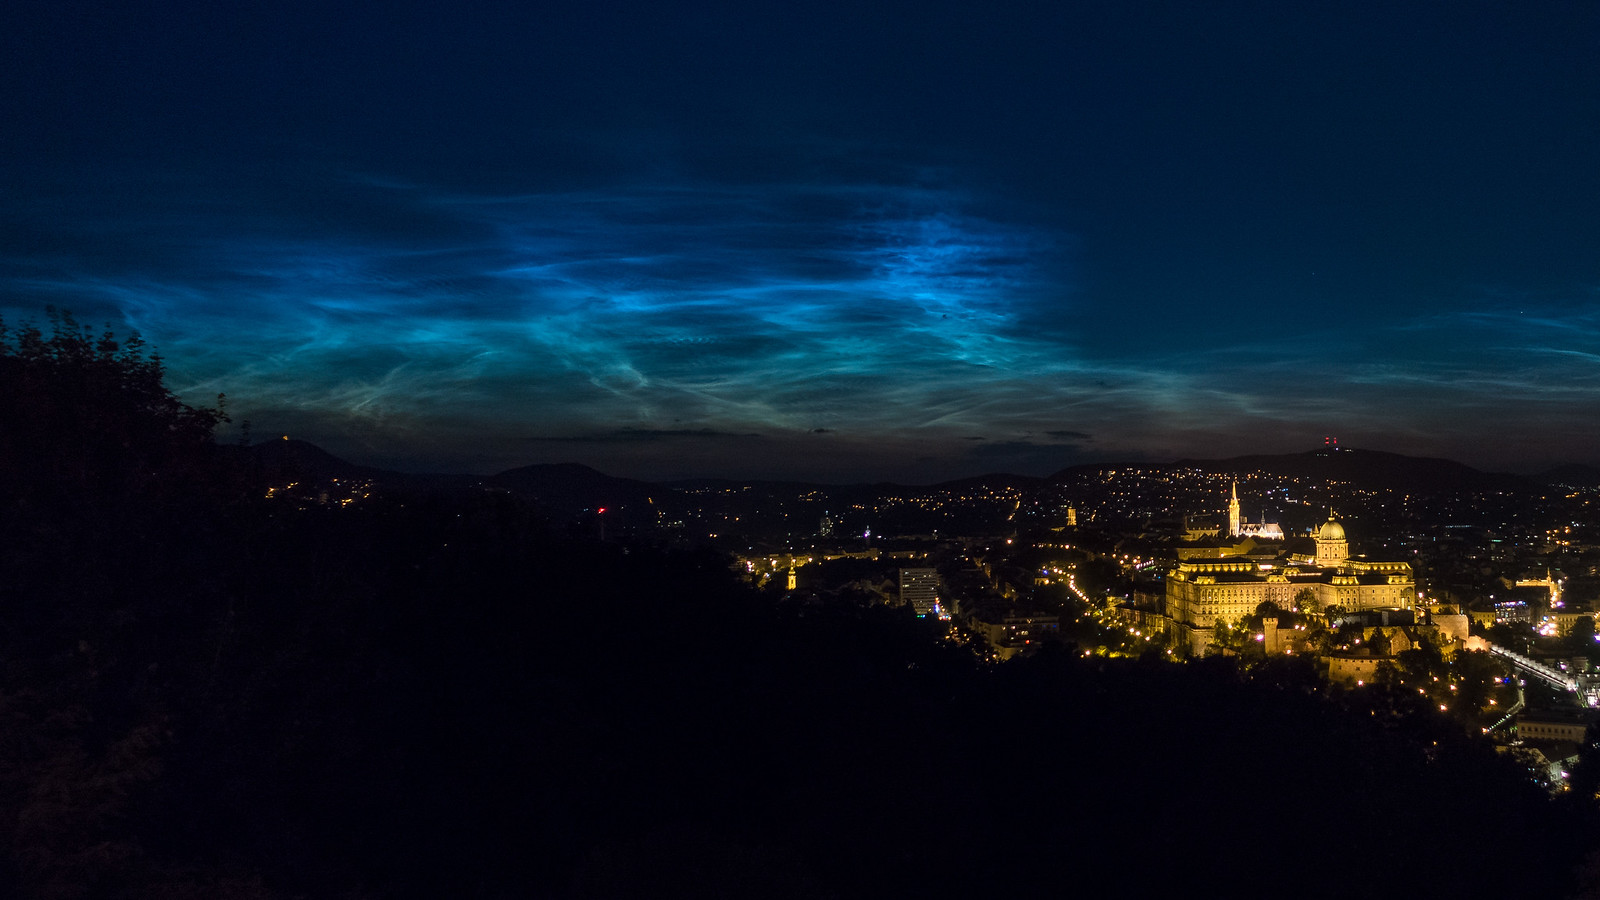
I’m going to demonstrate this on my Noctilucent cloouds over Budapest photo, because it was created with the exact same process.
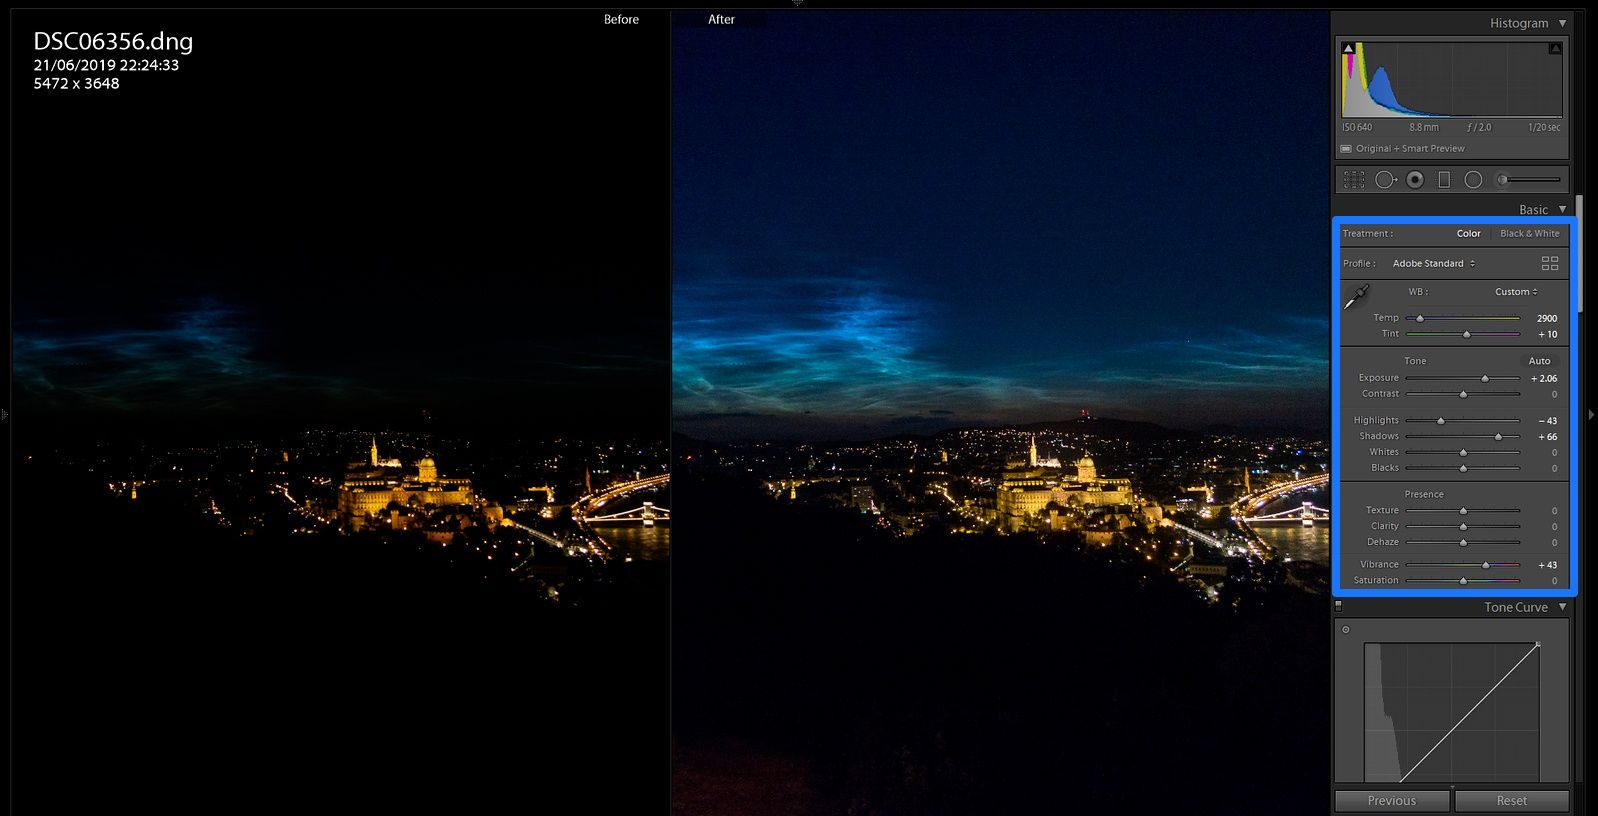
Once one photo has been edited, Synchronize the settings over to the other frames.
Make sure the edited photo is actively selected, and then select the other photos and click on Synchronize settings:
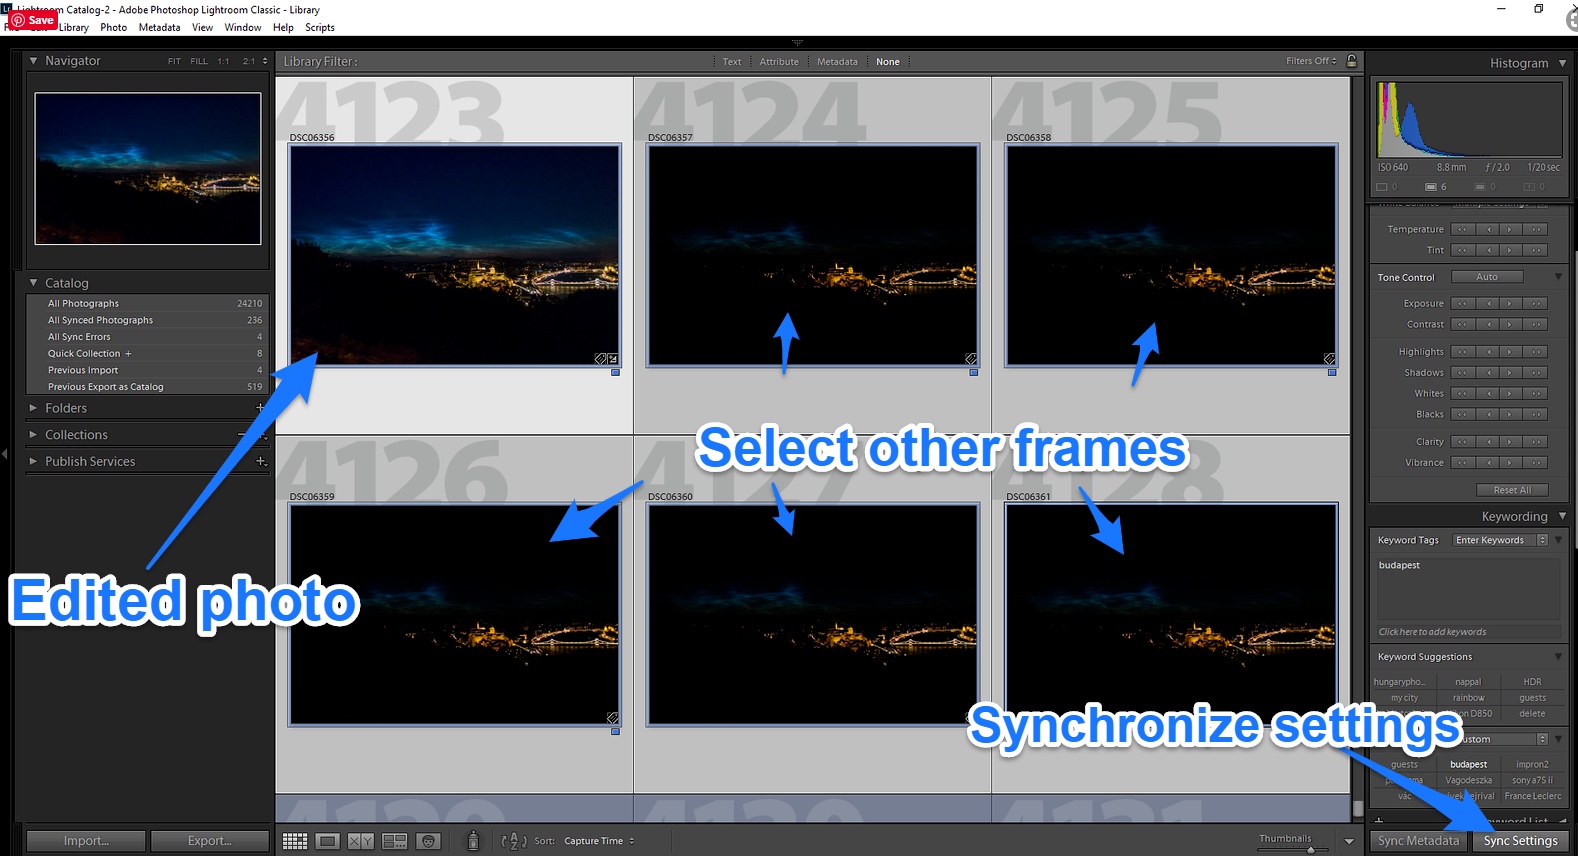
Once the Sync Settings window pops up, check all parameters to be synchronized.
Open the photos as Layers in Photoshop
In Lightroom while all layers still being selected, right-click on one of them, and go to Edit In → Open as Layers in Photoshop
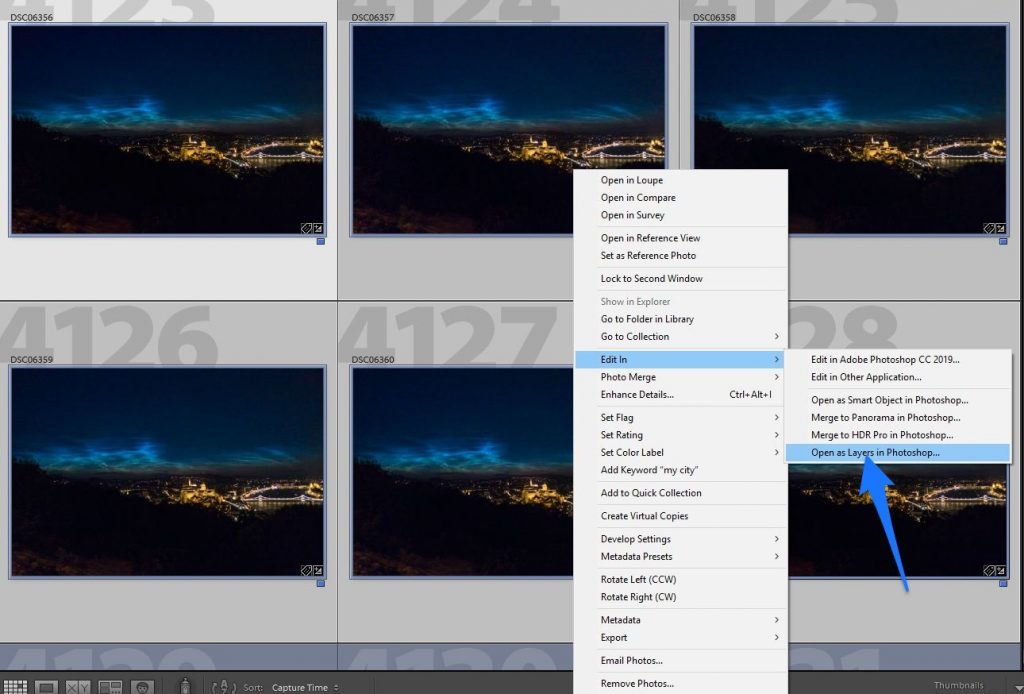
After that, Photoshop will open, and it will load each photo onto a separate layer:
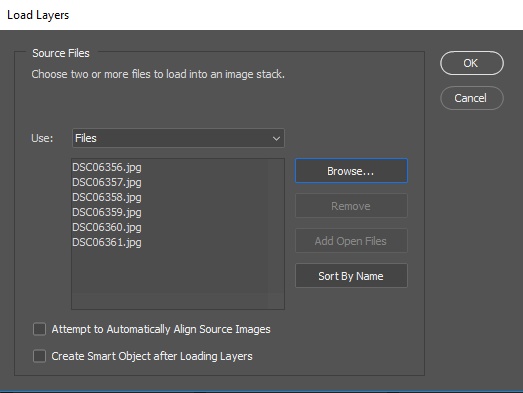
Alternatively, if you did not use Lightroom, you can just open Photoshop, and go to File → Scripts → Load Files into Stack
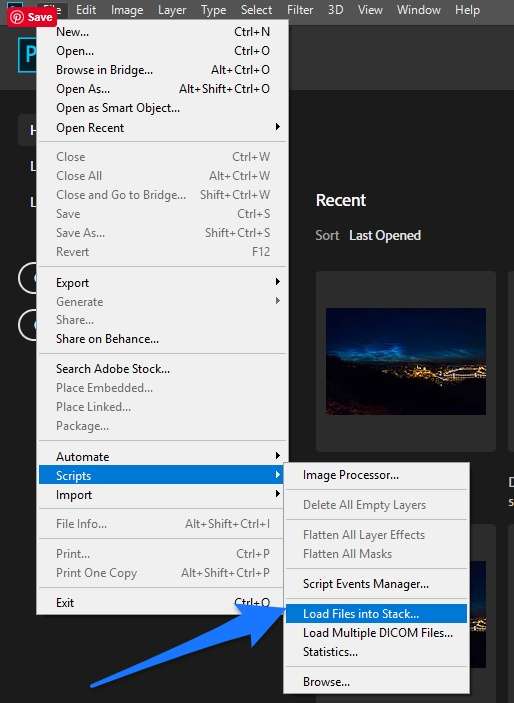
Leave the Convert to Smart Object box unchecked (but you can have the Auto Align enabled):
Essentially this will do the exact same thing as “Open as Layers in Photoshop” command in Lightroom.
Check sharpness of each and every photo
Averaging photos works well only on sharp photos.
So in Photoshop, go through each layer and check them at 100% magnification.
You can solo view each layer by holding ALT (Option) and clicking on the eye icon of the layer in Photoshop.
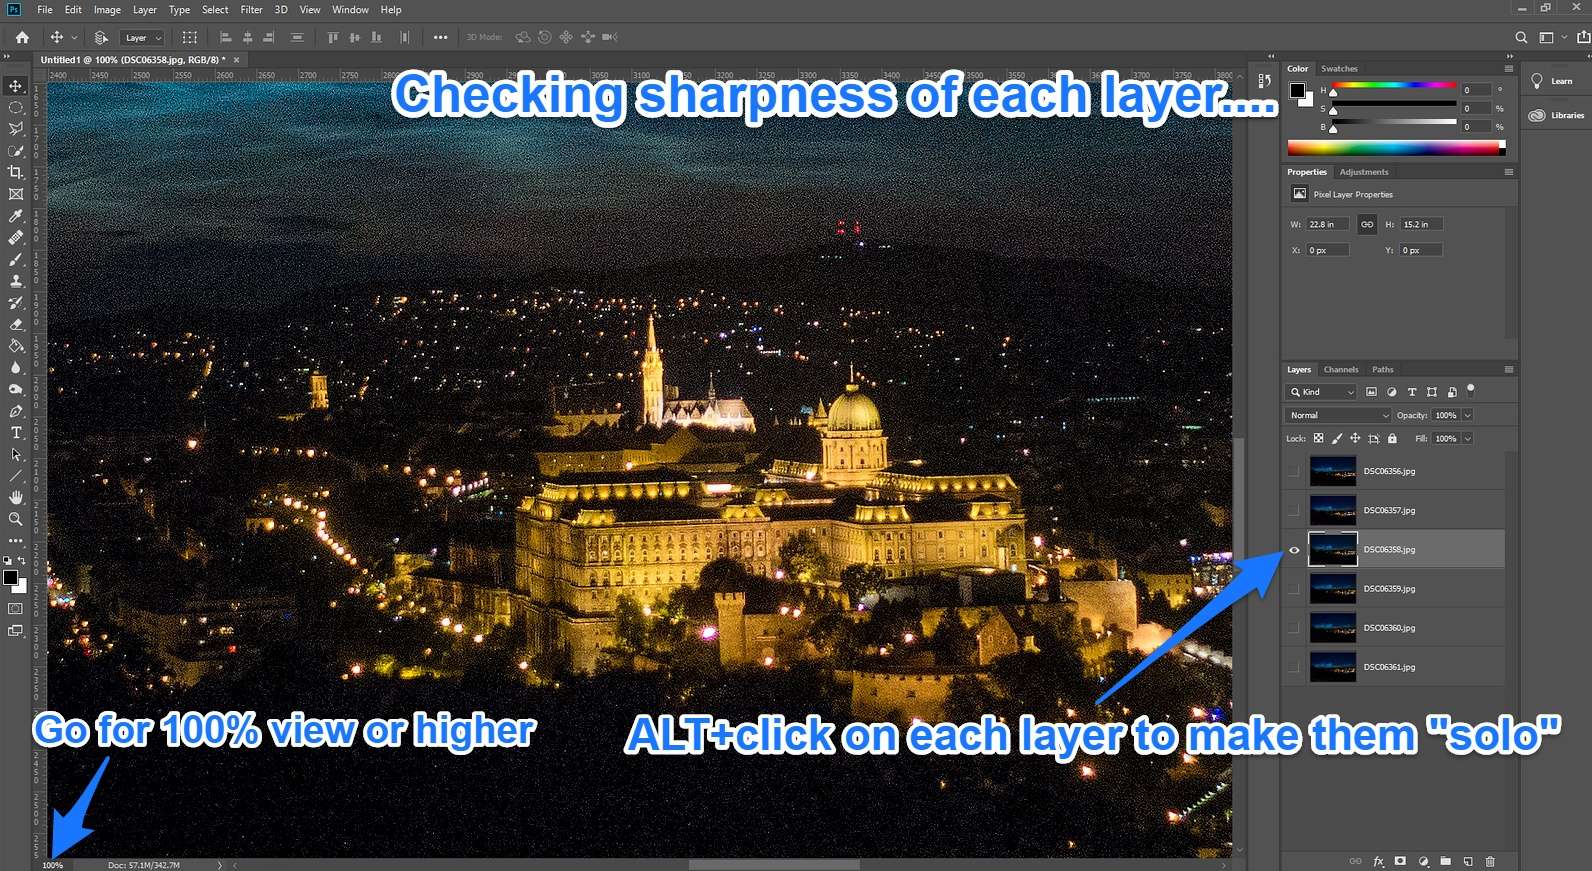
Those layers that are not 100% sharp, just delete.
Align Layers
As you were probably shooting handheld, the photos are slightly off compared to each other.
Photoshop can easily fix this.
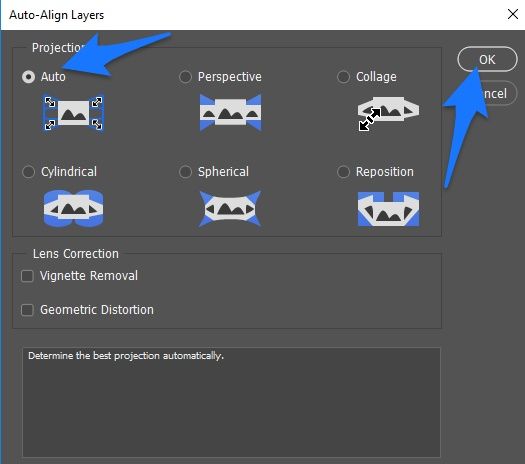
Just select all layers and go to Edit → Auto-Align Layers.
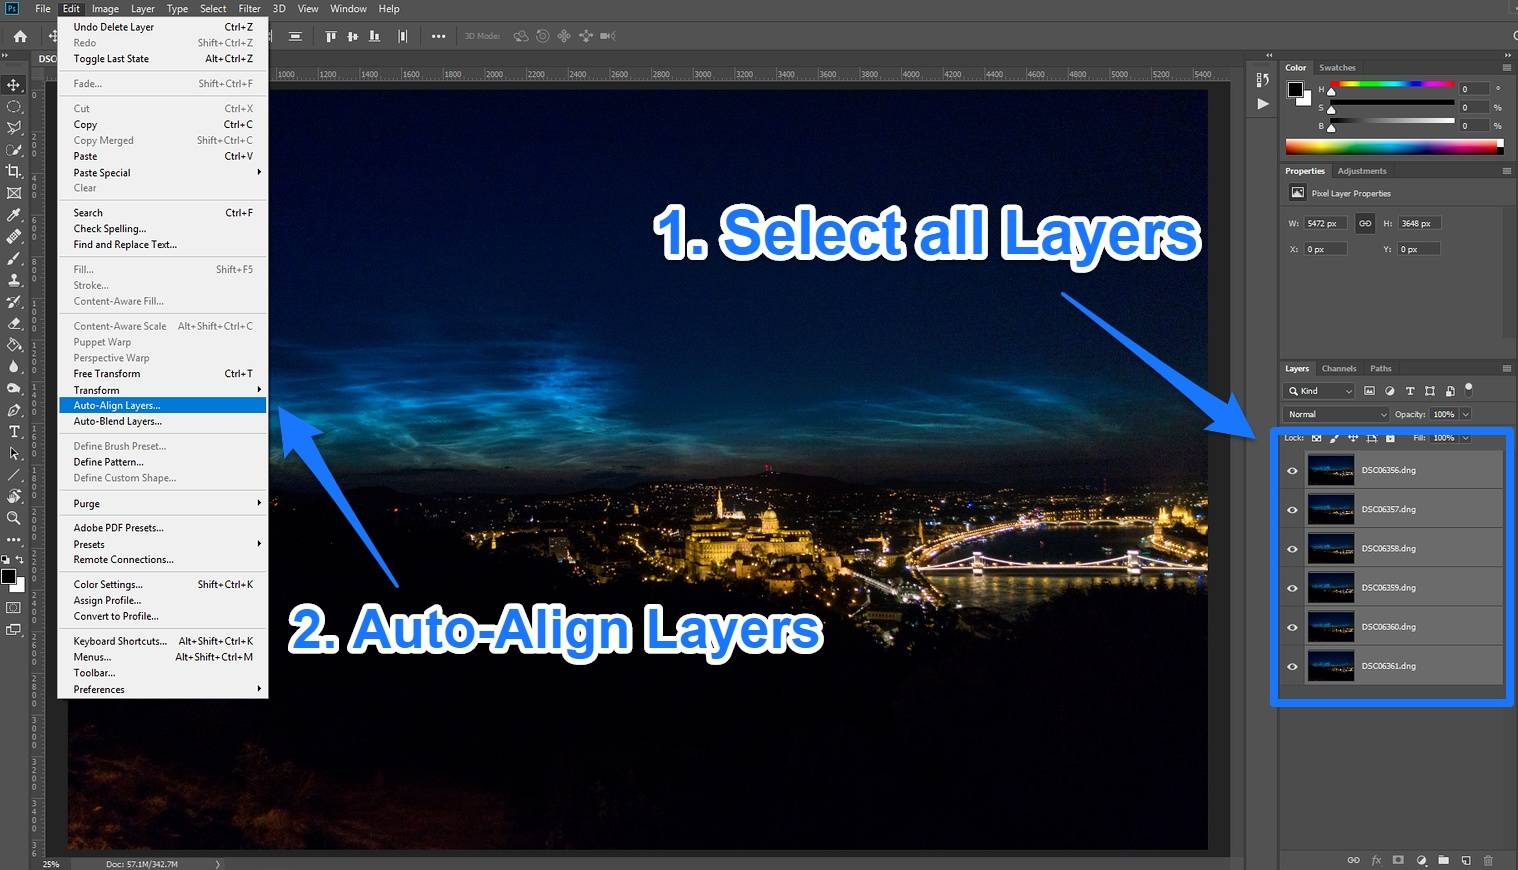
Leave it on Auto:
Now all layers should be aligned perfectly (but it’s worth checking with the same method as you did with sharpness)
Convert into Smart Object
With all layers selected, Layer → Smart Object → Convert to Smart Object.
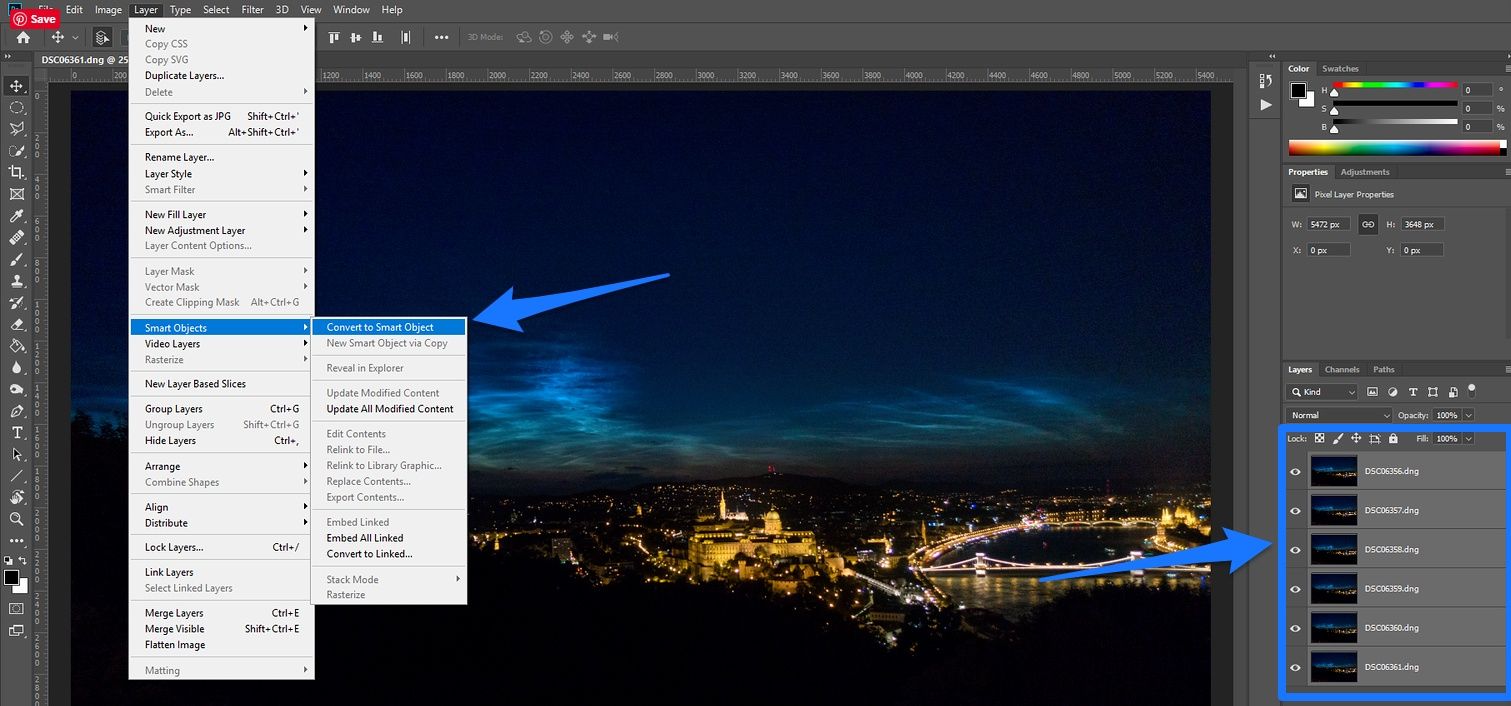
This will turn all layers into one Smart Object.
As I already noted, you can skip these steps if you use the Scripts → Load Files into Stack in Photoshop and check the option Auto-Align and Convert to Smart Object.
Now comes the last step…
Enable Median stacking
With the Smart Object layer selected, go to Layer – Smart Object – Stack Mode – Median.
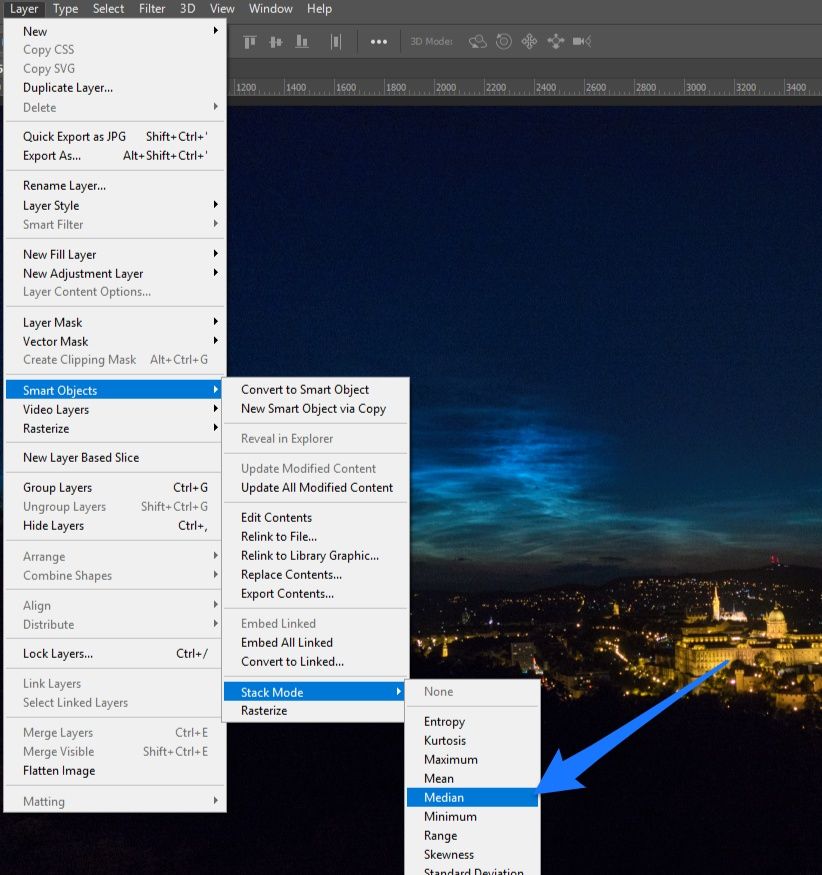
Now Photoshop will start working, and you’ll probably have to wait minutes…
But once it’s done, all you have to do is to Save it!
As we have a lot of layers, it’s probably a huge PSD file.
So what I often do is that after I checked that the median stacking went alright, I just export it to 100% JPG or TIFF, and then get rid of the PSD file to save on memory space.
Done!
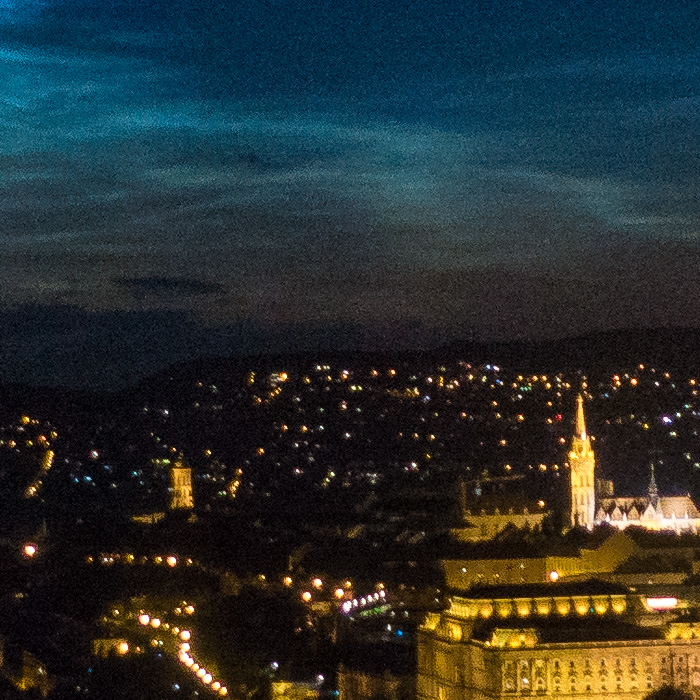
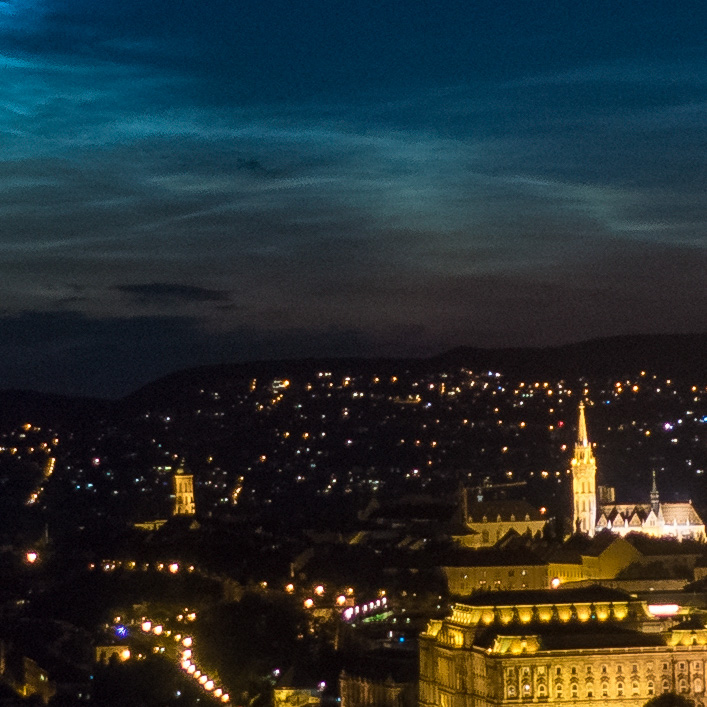
Here’s a before-after view at 100% magnification:
Here’s another comparison side by side (click to enlarge):
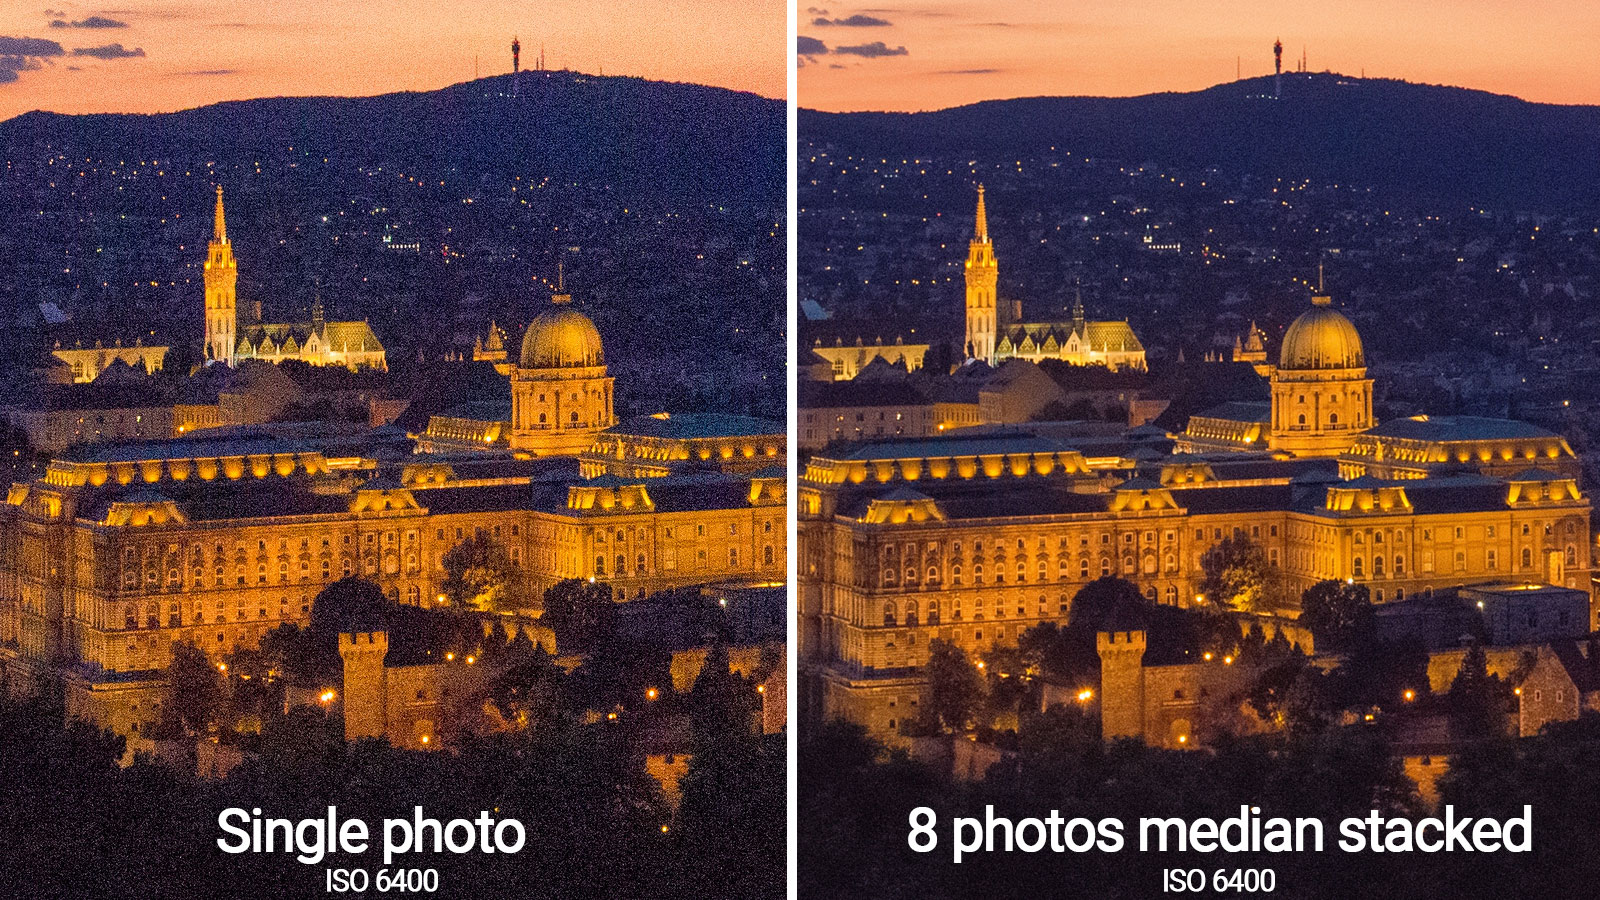
You can clearly see how much noise disappeared, and also how many details came out!
Sample images made with median stacking
I think it was worth it, have a look yourself (click on the images to enlarge).

Useful links
Pat David published an excellent article on Petapixel in 2013
Keepcoding has a good article in which he compares different stacking methods (median vs mean)

 Welcome! I'm Miklós Mayer, a photo tour guide in Hungary. My job is to show fellow photographers around in my home city and teach them everything I know about photography.
Very useful information. I have been using Define 2 (Nik filters) and Photoshop to reduce noise. The result is as the attached photo which was taken by hand. I will try the way you describe. I am sure it is a better. Thank you very much.
Thank you Kelvin!
The photo you uploaded is very well exposed, super sharp, and I think the noise is not that much noticeable there.
Of course, in terms of noise, less is better 🙂