Having an own website these days is a must for every serious photographer!
It shows your style, you own the platform plus you can get out of the Instagram / Facebook grid that people are so used to.
There are many website builders out there, and Pixpa is a relatively new kid on the block.
They promise no less than “photographers no longer need a separate portfolio website plus a WordPress website for blogging, Pixpa can handle all”.
So in this article I’m going to find out if this is really true.
I’m going to review all the relevant features of Pixpa, with which:
- you can have public and non-public galleries,
- you can use as a portfolio site and archive storage too,
- you keep the original photos and lets you download and organize them
- you can showcase your work to clients,
- enables your clients to pick and buy their favourite photos,
- sell prints / physical / downloadable products
- has responsive and clean design
If you want to signup with Pixpa, use this link and you’ll get 10% OFF:
Onto the review !
Disclosure: that’s an affiliate link. This means if you end up buying their services, I get some percentage of that. This supports my family and enables me to write helpful content.
I have to emphasize that only recommend something if I firmly believe in a product, and if I gave it a go myself.
Setting up a Pixpa site: super easy
If you’ve ever created a self-hosted WordPress website, then you know how difficult it can be… You have to figure out everything, and choose from the gazillion of options / plugins.
While with Pixpa, the onboarding is really super easy!
First of all, the Dashboard is very clean looking and easy to understand, everything is organized well with logic.
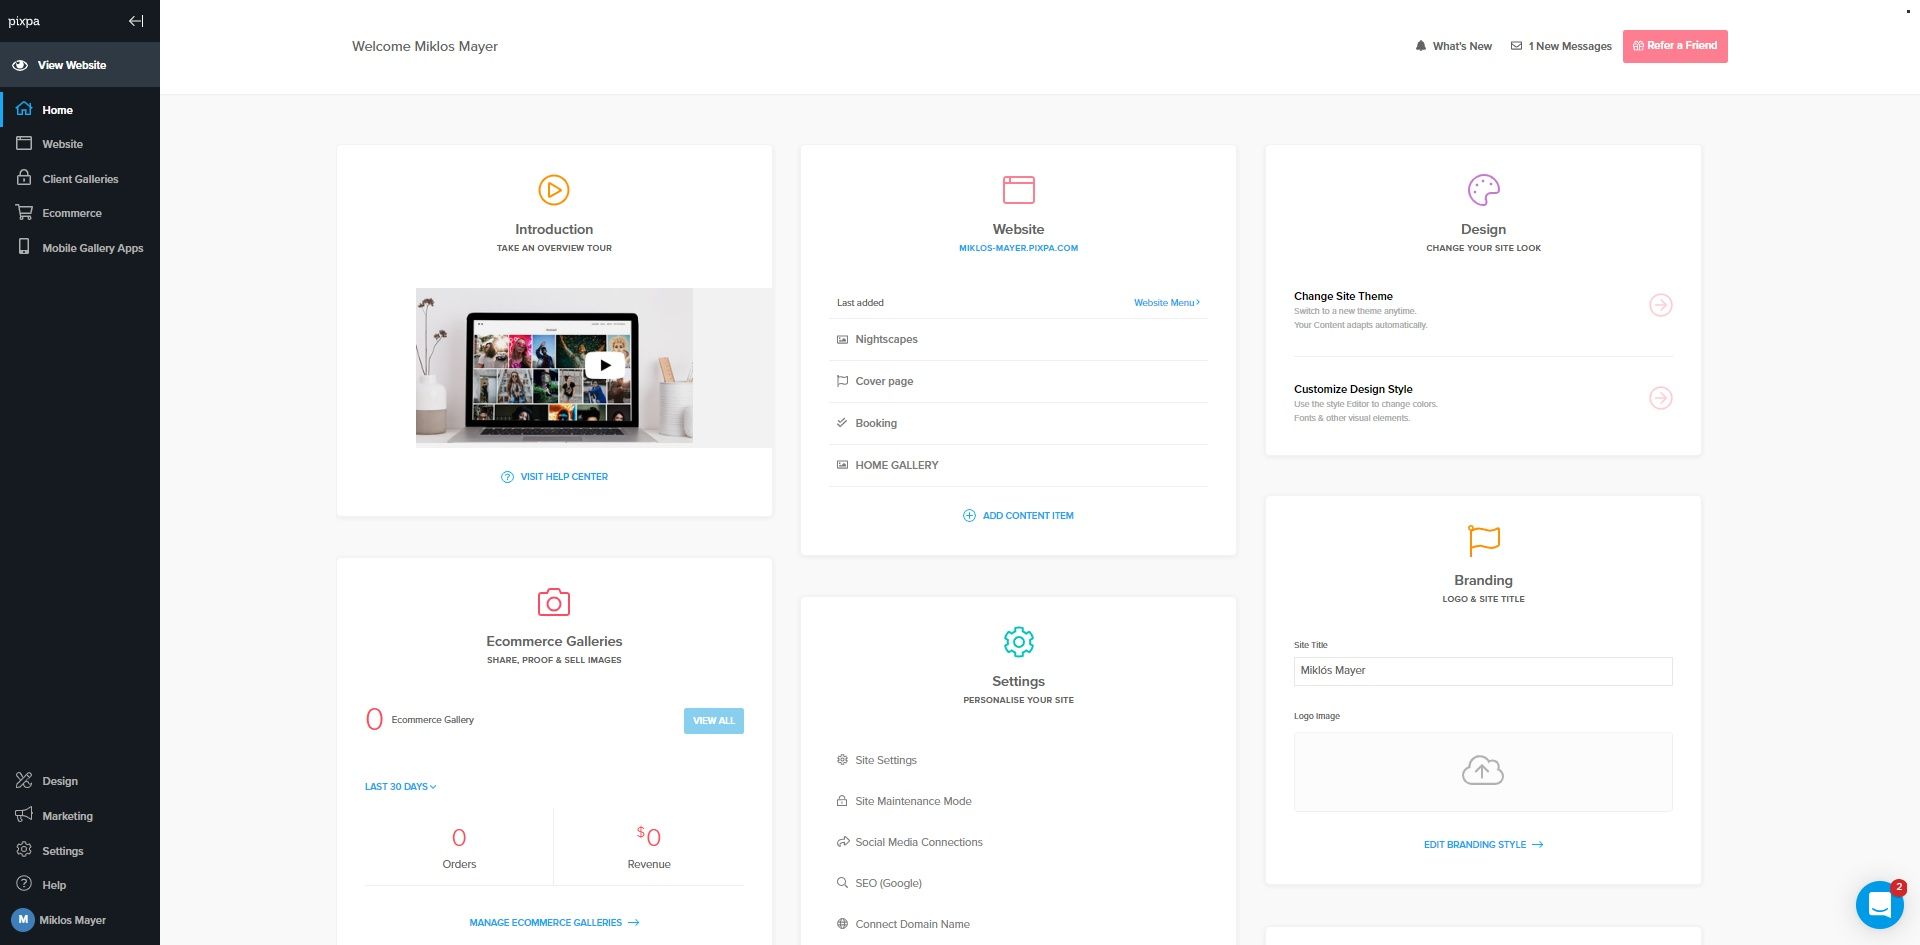
Second, Pixpa automatically gives you demo content to each of their themes.
You already have the bones, you just have to fill them with some flesh and skin.
This way, it’s so much easier to edit the site!
Of course, if you don’t like the demo content, you can simply delete it with a few clicks.
Highly customizable, awesome looking galleries
At the core of Pixpa, there are Pages and Galleries.
Pages are like website pages, that have to built by you (more on that later).
Whereas Galleries are albums that hold together a certain pack of photos. Luckily, at Pixpa they seem to know what we photographers need, so the Galleries are packed with photographer friendly features.
Creating a gallery is as simple as adding a new item in the Menu.
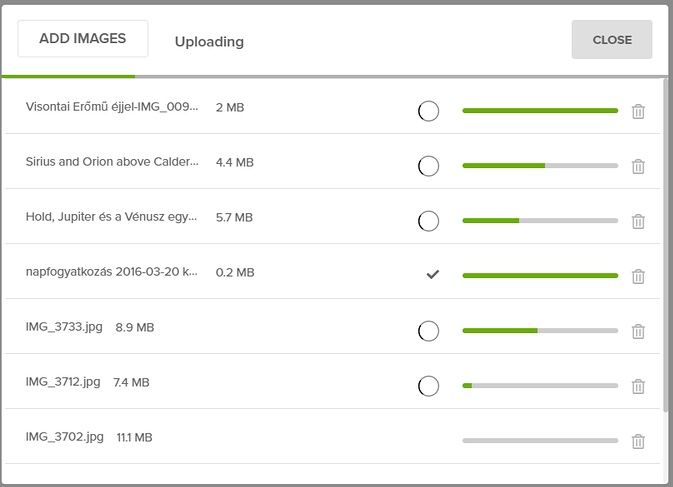
Then just hit Upload, and drag and drop the photos from the computer.
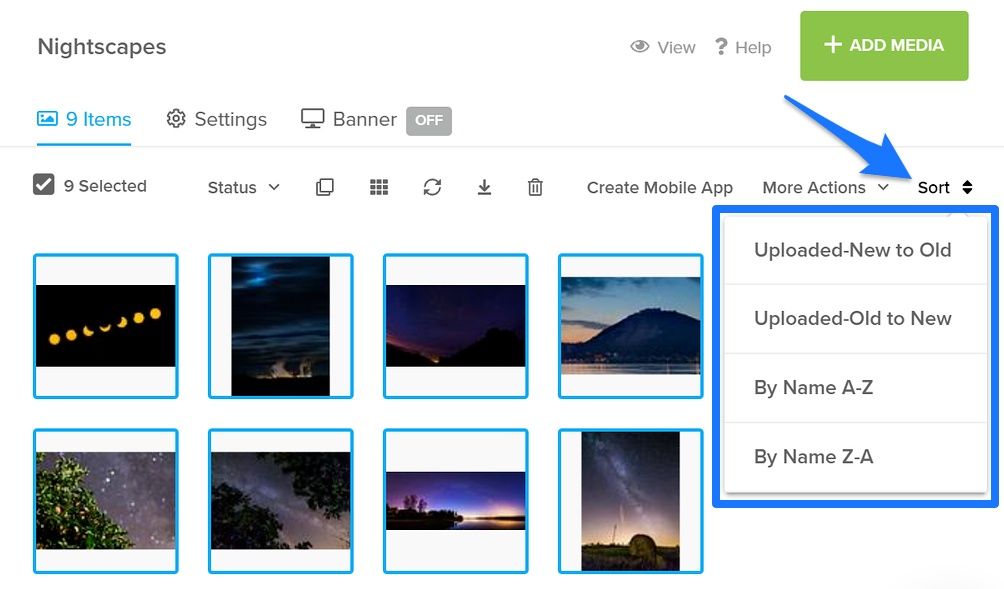
Sorting photos in galleries
Once they are uploaded, you can set the Sorting of the photos:
Editing photo metadata fields
Or you can select multiple images, and add Title / Description / Keyword fields to each and every photo:
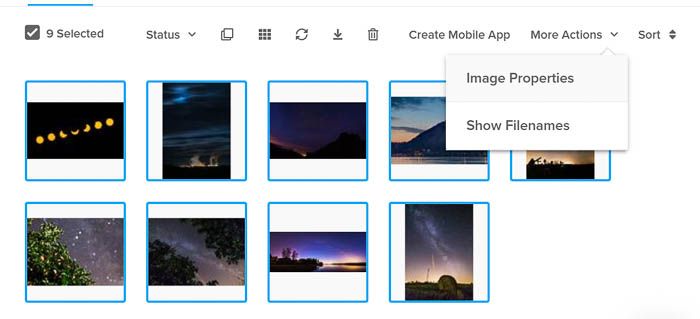
(More on the Image Properties in the Advanced SEO section later)
Downloadable original photos – no recompression here!
This is very important:
Pixpa does not compress the original resolution photos – you can access the original anytime.
They produce many smaller version of the same photo, so that the viewer always sees a photo that suits to their screen.
But the original photo that you upload can always be downloaded and accessed.
According to their support, Pixpa is using Amazon Cloud Services to host the photos. As that’s the industry standard, I believe our pictures are quite safe with them.
Hiding certain photos
Of course, as is standard for photo portfolio sites, you can hide / show photos as well. At Pixpa, they call it “Active / Inactive“.
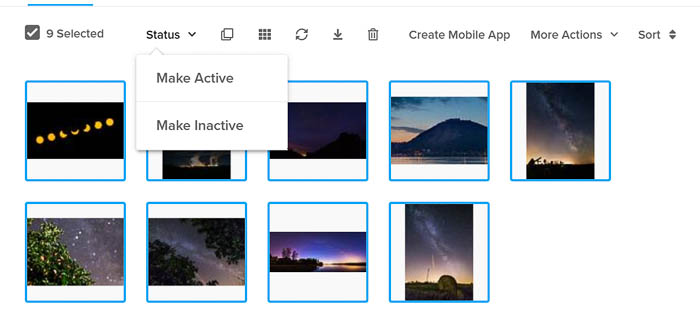
In both cases, the photo is there in the Gallery, but when it’s inactive, the visitors don’t see it.
Contact sheet PDF generation
There’s also a pretty cool function of Galleries: if you select multiple photos, you can download a proofing sheet in PDF format with a single click!
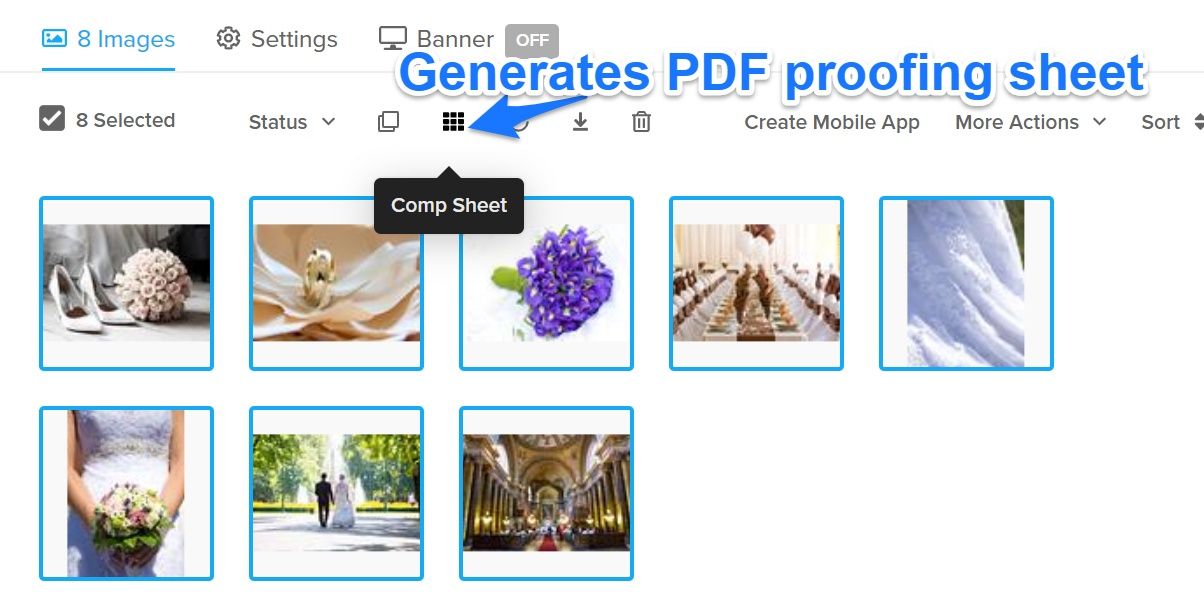
And here’s the proofing sheet PDF you can print for your clients:
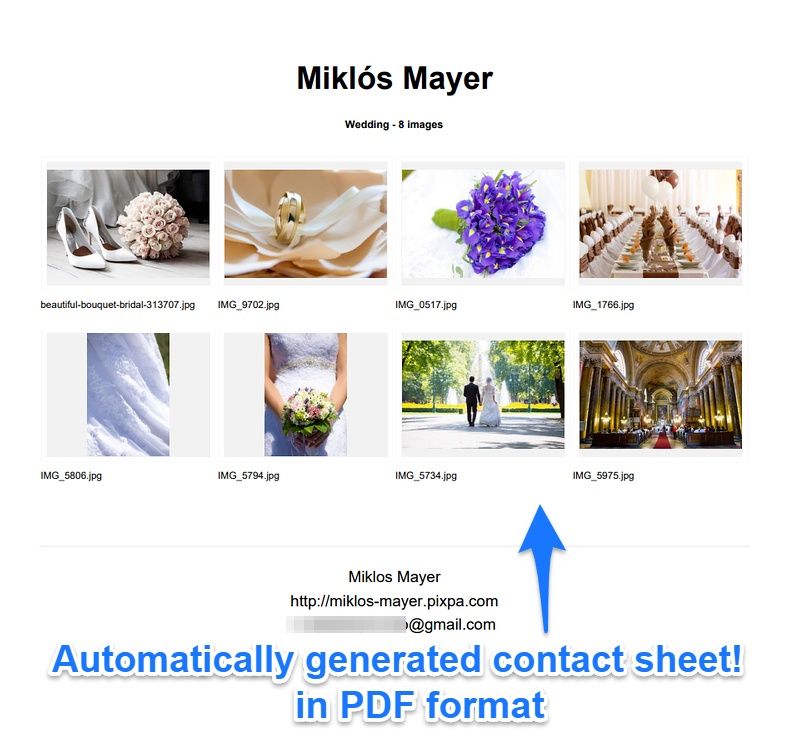
This is a killer feature for those people who shoot for clients!
Overall look and design of galleries
Let’s talk about the looks!
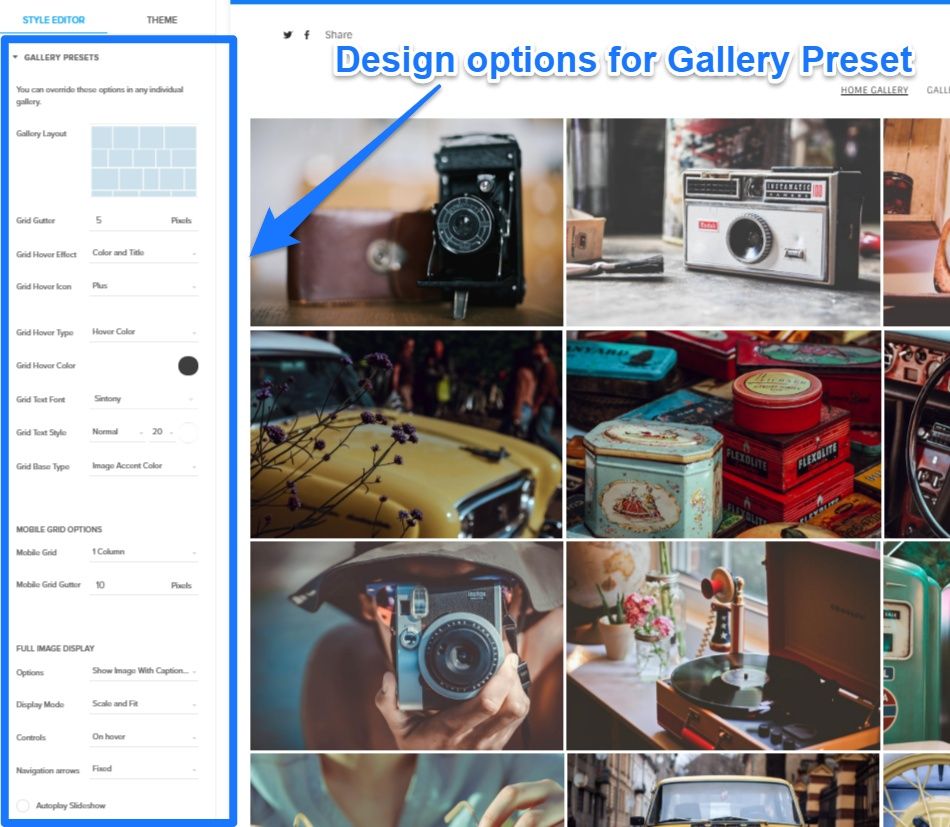
Galleries are stylized according to Gallery Presets (Design – Style Editor – Gallery Presets).
A Gallery Preset is basically a saved design, that will be applied on all galleries on the site. Here if you set a Preset, every gallery on your site will follow this design.
Look how many options you get here:
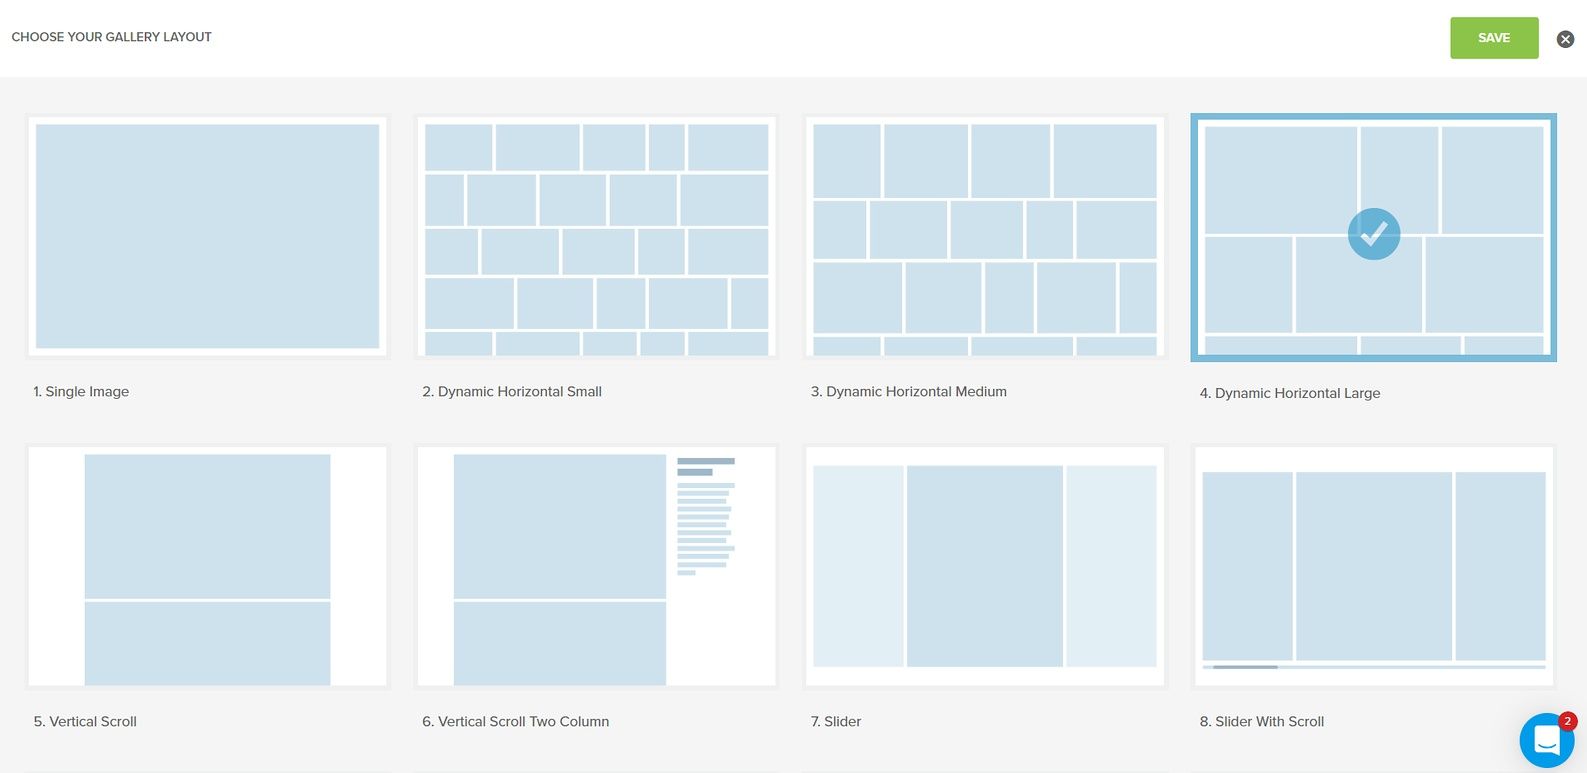
There are several templates to choose, and all of them fill up the screen with smartly arranging the photos.
Also, every parameter can be customized here, from padding / margin values, texts and backgrounds.
Needless to say in 2019, Pixpa sites are all responsive, so they look great on mobile and tablet devices. You can also check the looks on mobile and tablet meanwhile editing your site.
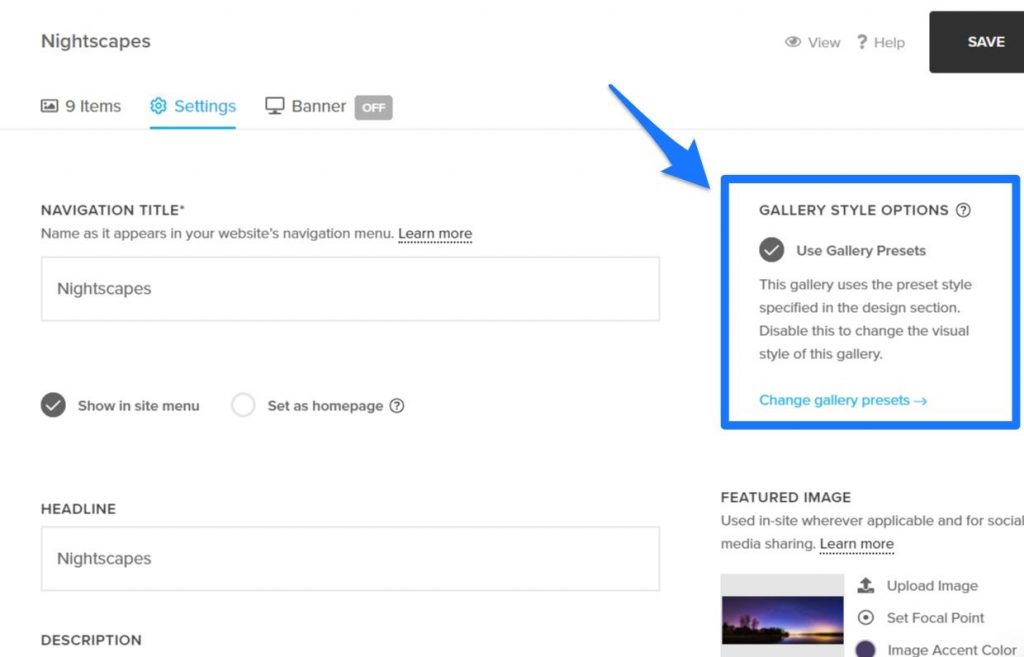
If you want one gallery to look completely different than the others, you can manually override the design for each and every gallery in the Gallery Settings.
Are the photos on Pixpa look sharp?
If you’re long term reader of my blog, you may know that I’m obsessed with sharp photos.
Luckily, the photos that Pixpa shows you appear to be super sharp, there’s no blurry resized images here!
Extremely easy and highly configurable design
At Pixpa, designing the site is extremely straightforward:
- you pick a site “Theme” first
- then edit that from one place (if you need)
Pixpa has a very good approach to design: almost everything can be modified from one single place. Of course, you can see the changes in live action.
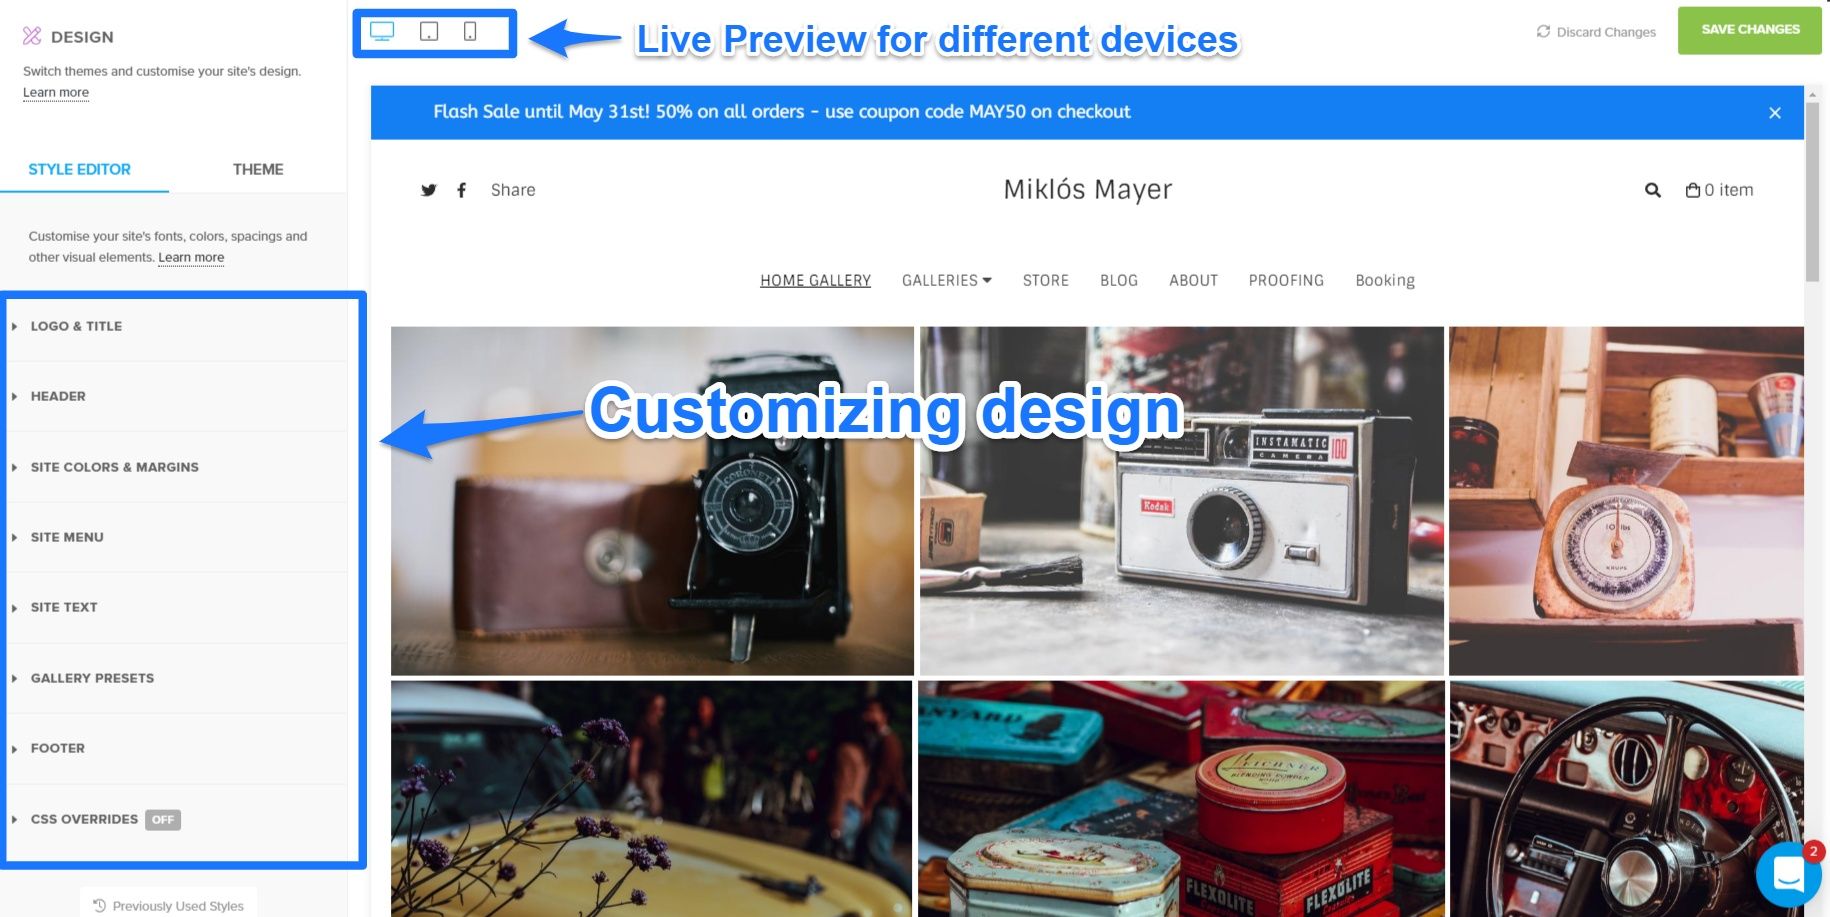
Every panel (like Header, Menu, Text, Footer, etc) can be customized.
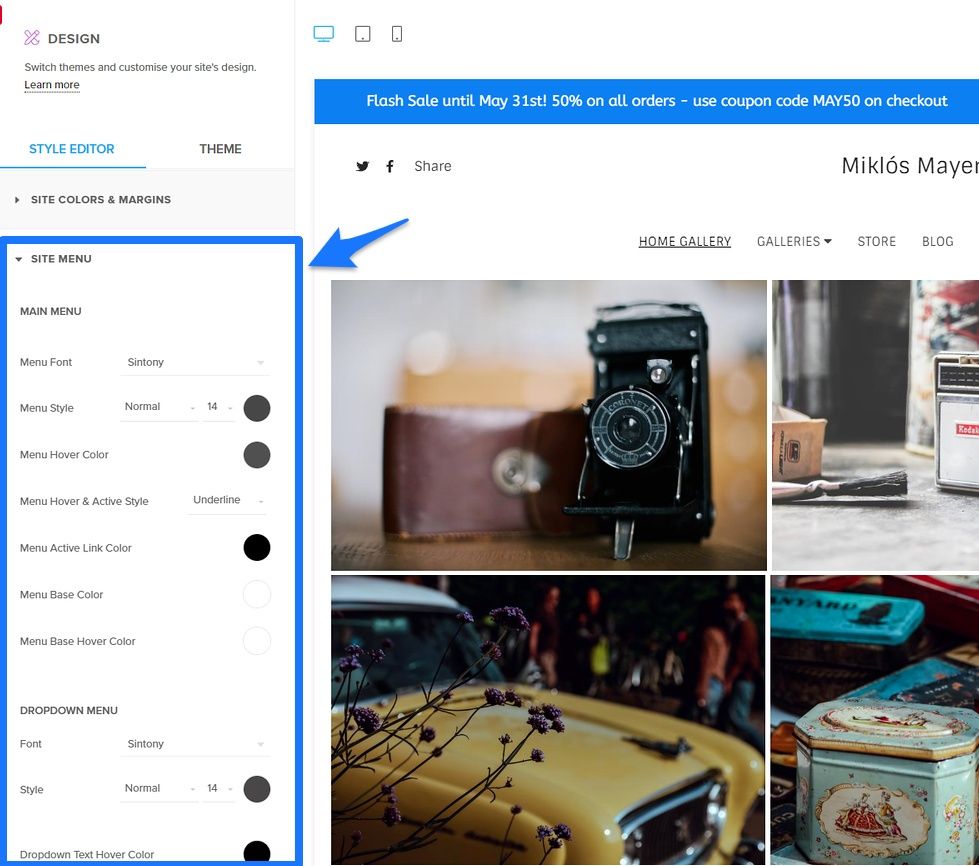
For example, look how many parameters can you tweak in the Site Menu section alone:
Advanced SEO settings
While this may not sound like something important for a photographer, it is VERY important for everyone.
I mean what can be more important than people finding you? Once SEO is done properly, and your photos / content is good, Google will send you the visitors you need.
There’s nothing better than appearing on Google Image search results!
So at Pixpa, every Page / Gallery has advanced SEO settings.
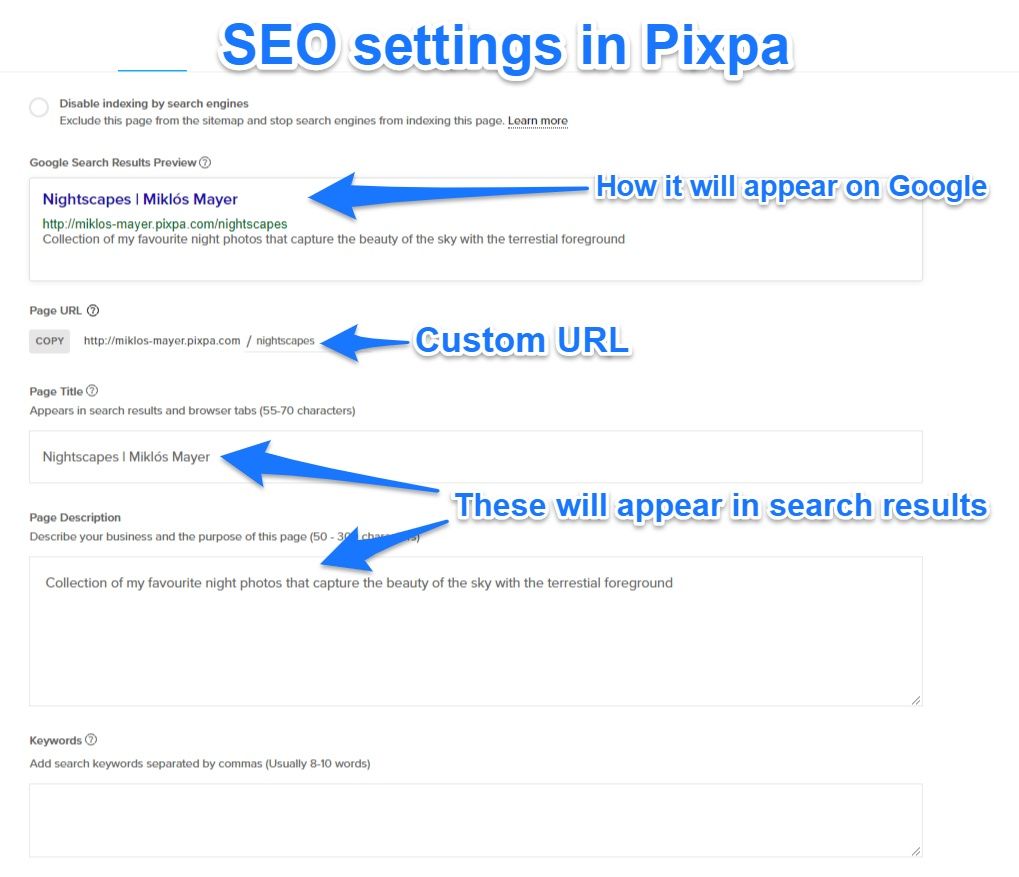
Here you can set the URL or you can even disable indexing that particular Page / Gallery by search engines. This could be beneficial is your goal is to have a “hidden” gallery.
Moreover, not only you can title your Gallery/ Page and add description to it, you can edit the SEO Title and description as well.
Quite like SEO plugins for WordPress, Pixpa shows you in real time how your site will appear in Google searches.
And of course, the featured image for that Page / Gallery can also be set. This is the image that will be displayed by social media sites as a small thumbnail, if you share the URL.
Image SEO settings
You can find advanced SEO settings for the photos as well.
Just select the photos, and go for Image Properties.
Headline/Title field will be displayed as the ALT tag of the image. ALT tag stands for alternate tag, and this is the field that helps search engines and browser to “see” what’s on the photo.
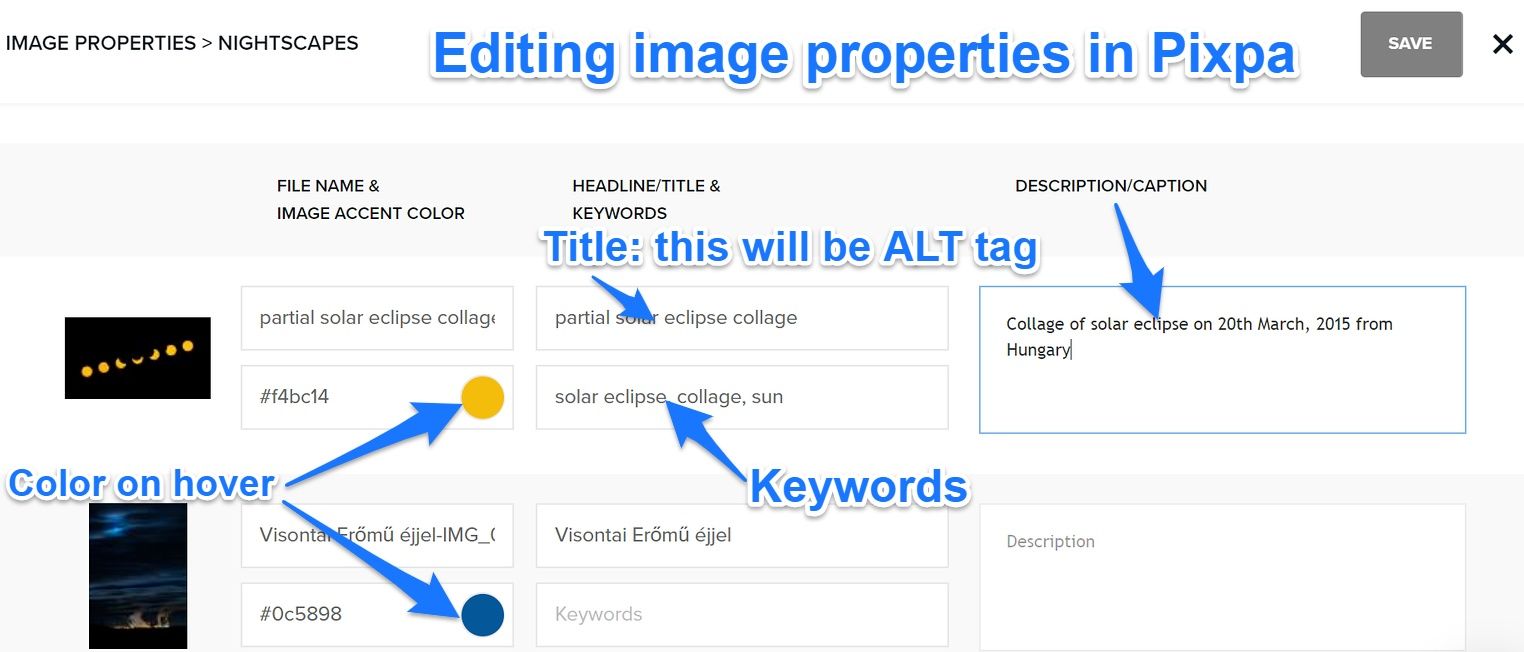
So you want to make sure the Caption fields are filled with relevant stuff, as this will tell Google what can be seen on the photo.
Also, you should have a describing file name when you upload. Although Pixpa offers you to change this field too, the file will be displayed with the original filename.
So to make sure that your photos will be seen by Google, fill in those fields (even the Description too).
My 2 cents: I recommend you fill in the Caption / Description / Keyword fields in Lightroom, it’s just so much easier there. They will be automatically lifted into Pixpa.
Client Galleries – excellent way to deliver photos to clients
This is one of my favorite feature of Pixpa – you’ll see in a minute why!
Client Galleries are different than “normal” galleries at Pixpa.
A Client Album – which can hold several Client Galleries – acts a sub-site within your main site.
This is perfect for putting together photos of a complete event and sharing the work in a way that only the guests can see them. At the same time, it will not be visible for regular visitors on your site.
The sub-site looks differently than your main site: the Menu shows only the galleries the viewers can see, the picked favorites, the Cart, and the account info.
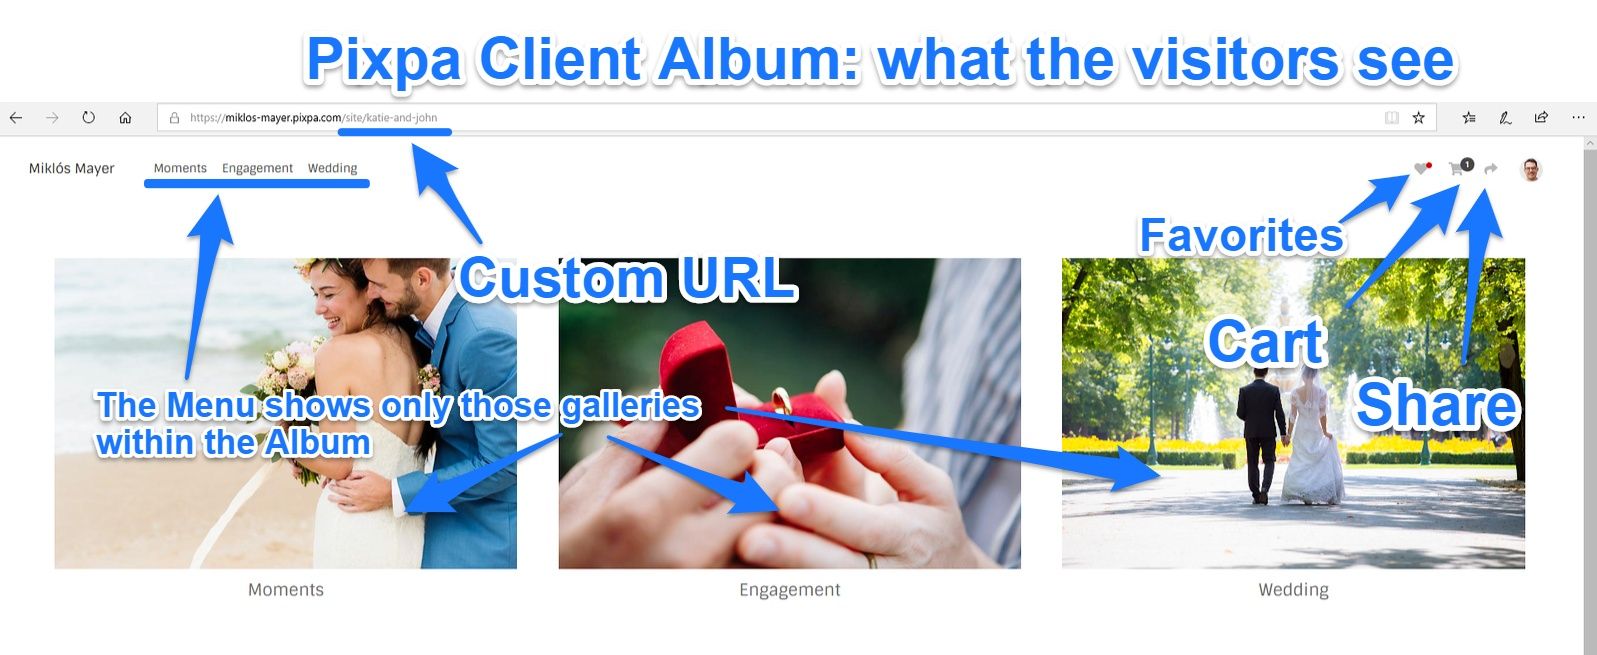
This is a perfect way to make your clients focused on only the photos you want them to see (and to make them order from you).
At Smugmug, there’s a similar function called Sharegroups and Events, but Pixpa’s solution is superior in many respect.
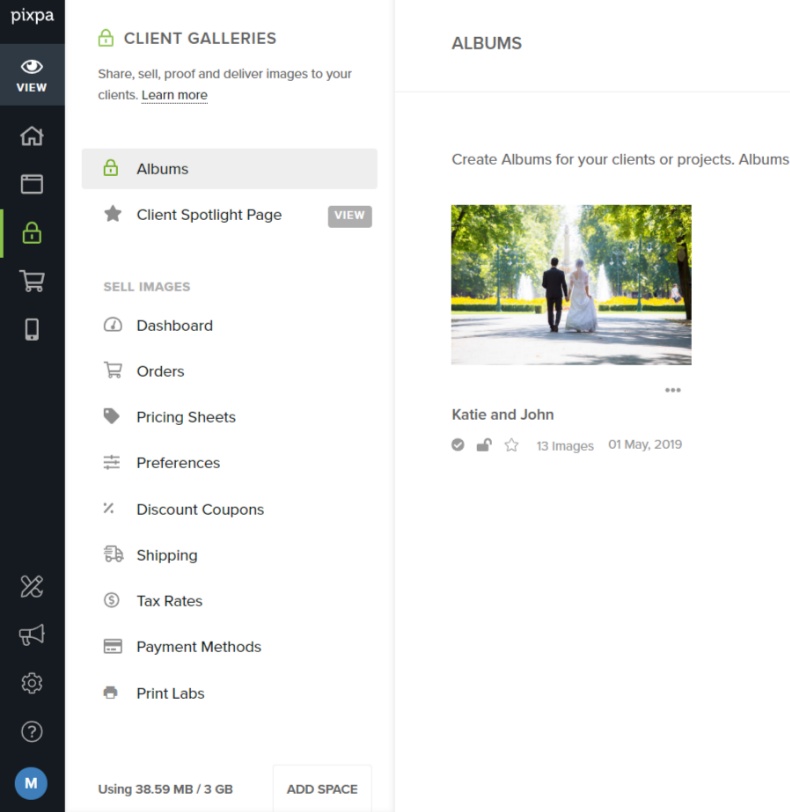
As you can see, this is a core feature of Pixpa, offering a tons of options:
Client Albums from the client’s point of view
Let me show you what visitor sees from a Client Album in a real-life example.
For example, there’s a wedding you shot, and you upload the photos into 3 different galleries, within a Client Album.
Now you’ll just have to send one link to the clients – the URL of that Client Album.
They’ll see an opening screen first (not necessary, it’s an option), with the cover photo that you choose.
Here you have the option to make the viewers automatically opt-in with their email address, so they’ll be able to pick their favorites right away (again, this is not necessary).
Once they are “in”, they will see the galleries you uploaded your photos into.
And they can easily pick the favourites or even order prints of those.
They can easily view and sort their favorites and they can even share their favorites!
Now comes the even more fun part. It’s very easy to sell prints from here on.
Visitors can easily buy prints or digital downloads at the prices you set!
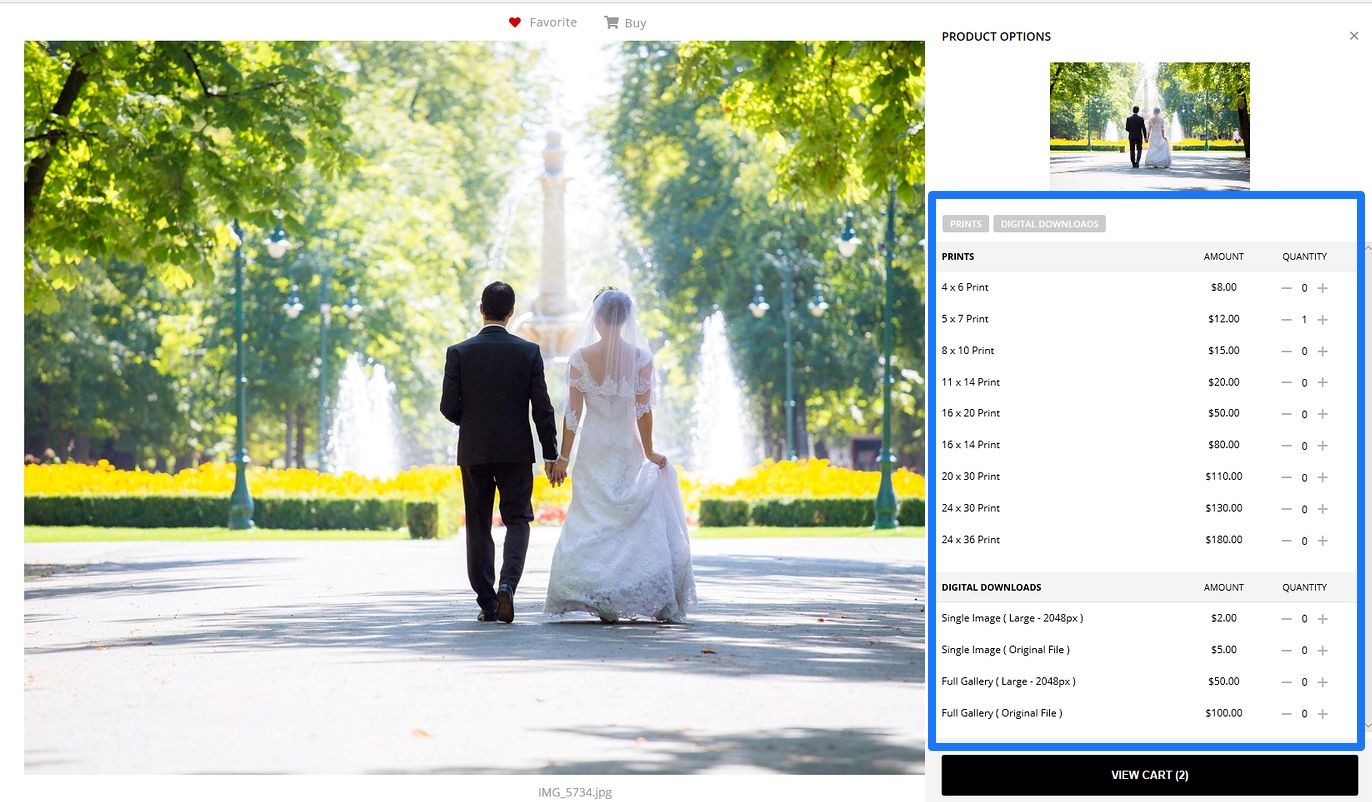
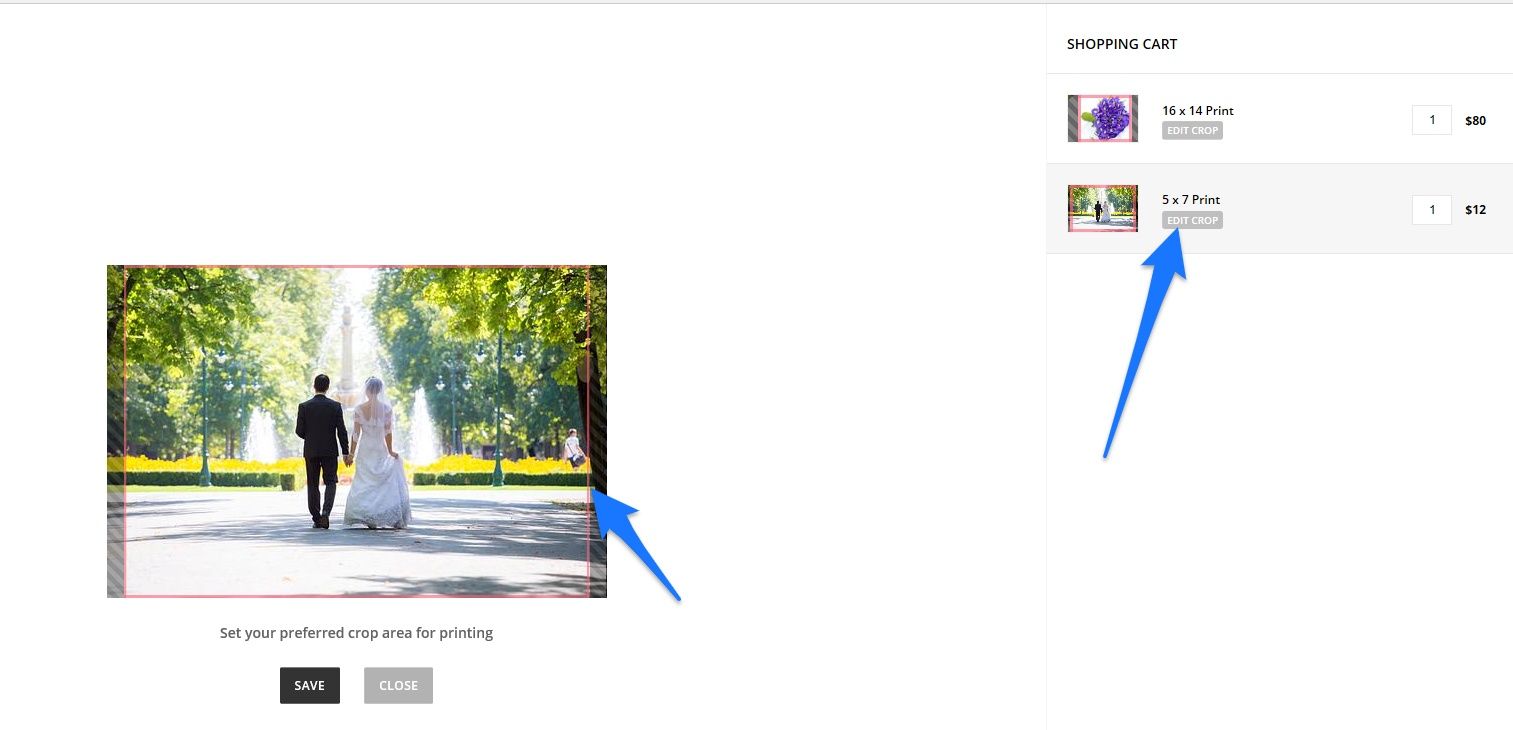
If they buy a print which has different aspect ratio than the photo, they can also adjust the crop in the process:
At checkout, they have the option to pay online with Paypal (or Stripe if you have that enabled), or they can pay you offline, manually.
The manual payment option is so useful! This is something that I always missed from Smugmug.
The customers will be automatically notified via email about their order, and also if the status of their order changes.
Client Albums from the photographer’s point of view
This is how the above process looks from your (the photographer’s) point of view.
You can set Pricing Sheets with the products you want to offer. And again, you set the price!
You can have as many Pricing Sheets as you want, and you can apply different Pricing Sheets to every gallery!
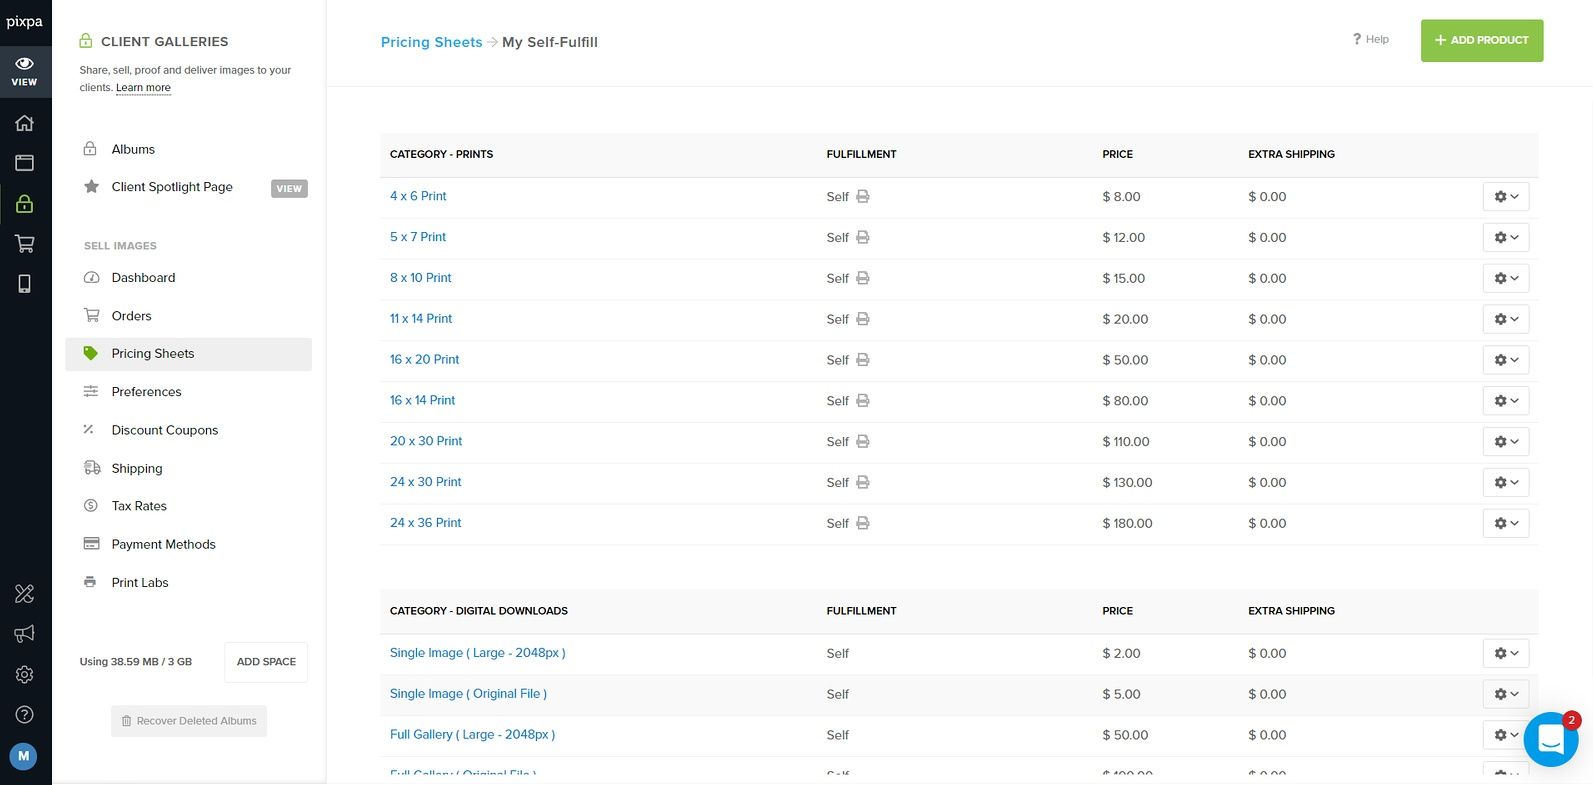
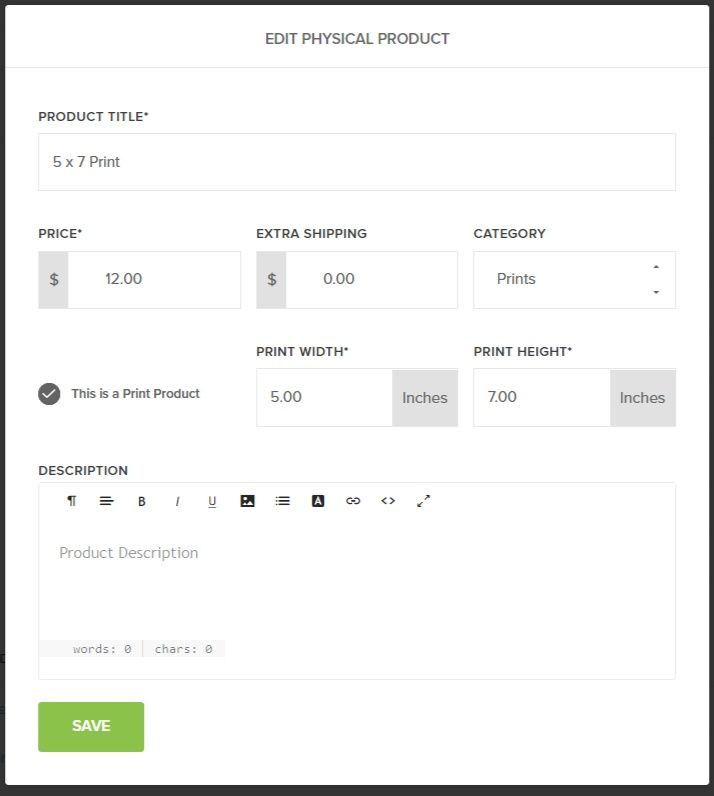
Prints can be auto-fulfilled by a print lab like WHCC, or prints can be manually fulfilled by the photographer.

It’s very important that Pixpa does not stand in the way of payment: there’s no commission here at all, you get to keep 100% of the profit.
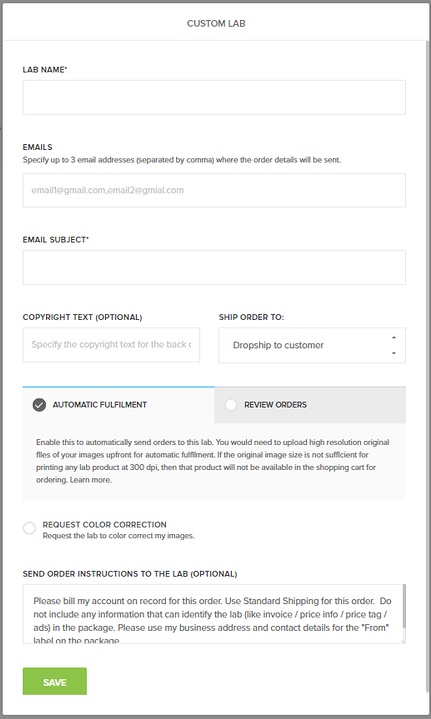
You can also Add Custom Lab: this is useful if you have a print lab where you can have your own account, and they take orders by email:
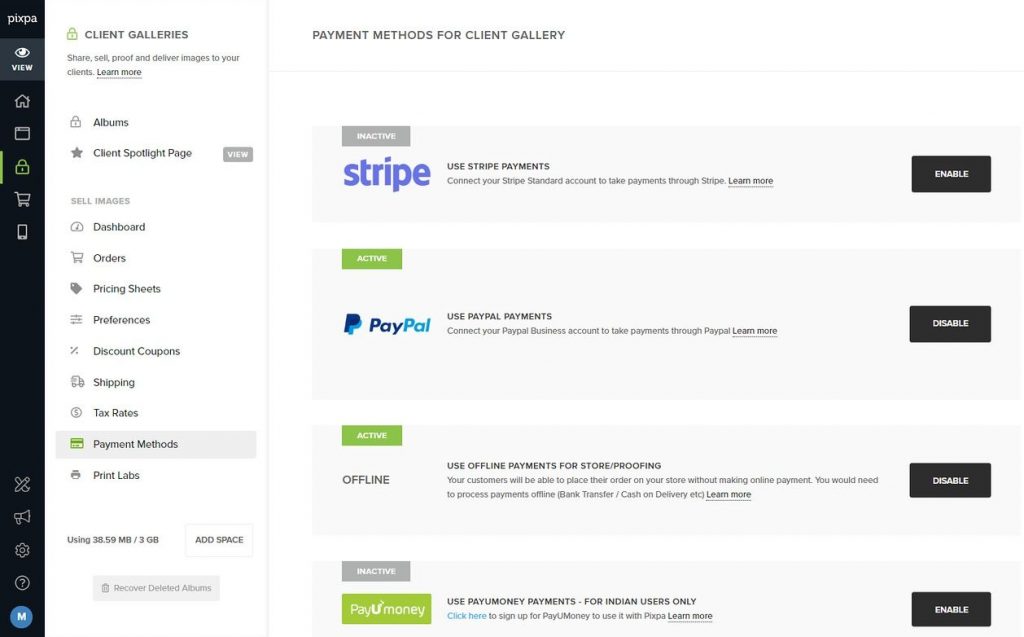
As payment gateway you can activate Stripe / Paypal or a Offline payment.
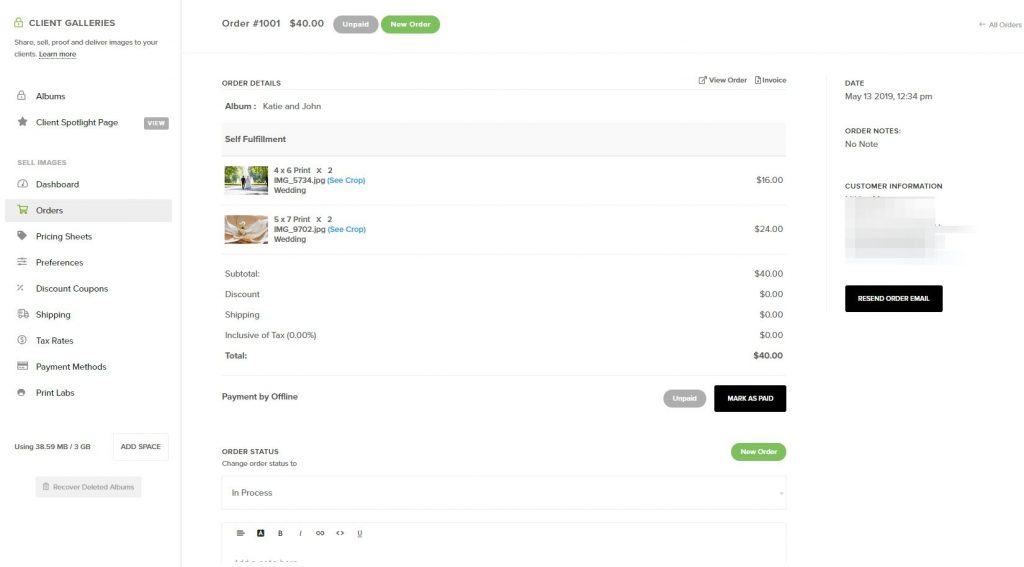
In the backend, you, as the photographer, this is what you see from an order:
Other fancy selling options
You can pick whichever pricing sheets you want for each of the galleries.
You can also apply your custom shipping prices.
You can of course edit your pricing sheet and apply different pricing sheets per gallery basis.
You can create Coupons as well.
Basically, Pixpa acts as a fully powered e-commerce site at this point.
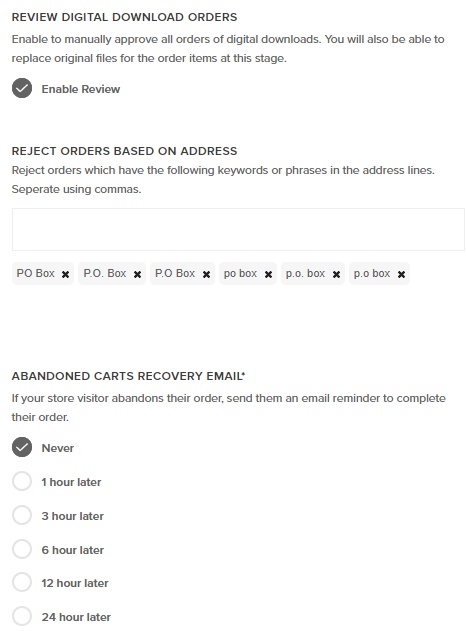
They even have cart abandonment tracking and the ability to reject orders automatically!
Ecommerce – sell prints with self-fulfillment or manually
Pixpa has a separate Ecommerce part as well.
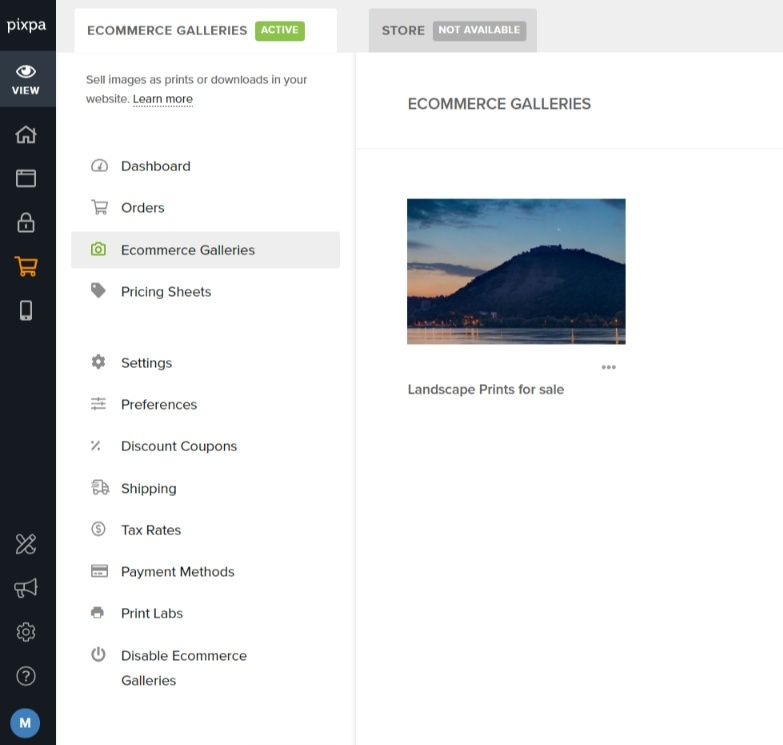
Within the Ecommerce section, you’re able to create Galleries, from where you can sell prints.
The difference between Ecommerce and Client Galleries is that in tthe Ecommerce galleries you can sell your best work to everyone, while with the Client Albums you only sell to those people who attended the event.
Typically, you would put your best works here, that you want all the people to see, and be able to buy.
Basically, you can have a print shop running, that would be visible to anyone.
(In contrast to Client Galleries, where only those people see them, who know the Album URL).
Selling and printing goes exactly the same way as I reviewed the process in the Client Galleries section, so I’m not going to over that again (except there are no favorite-picking feature here).
You can see that the backend looks exactly the same:
Watermarking
You can set automatic watermarking of photos: the watermarks will be added upon downloading, and will be visible for the visitors.
However, the original photos remain intact, those will not be watermarked, neither the prints.
You can set plain text as watermark (different fonts, position, opacity can be tweaked), or use a PNG:
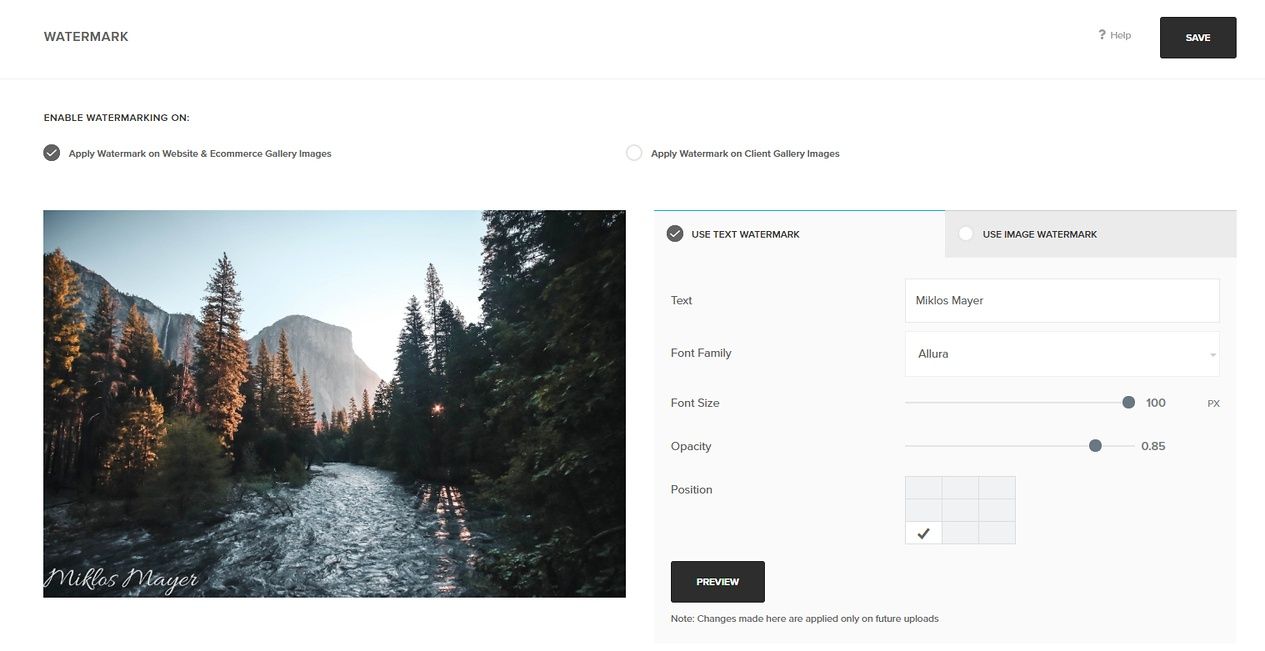
You can also enable / disable watermarking on Client galleries, and Ecommerce galleries.
Super easy to use website page builder
This is the other area where Pixpa really shines!
Besides Galleries, you can have Pages as well.
These are normal webpages that can be built block by block.
To make things even more simple, with Pixpa you can create a Page using full-screen blocks:
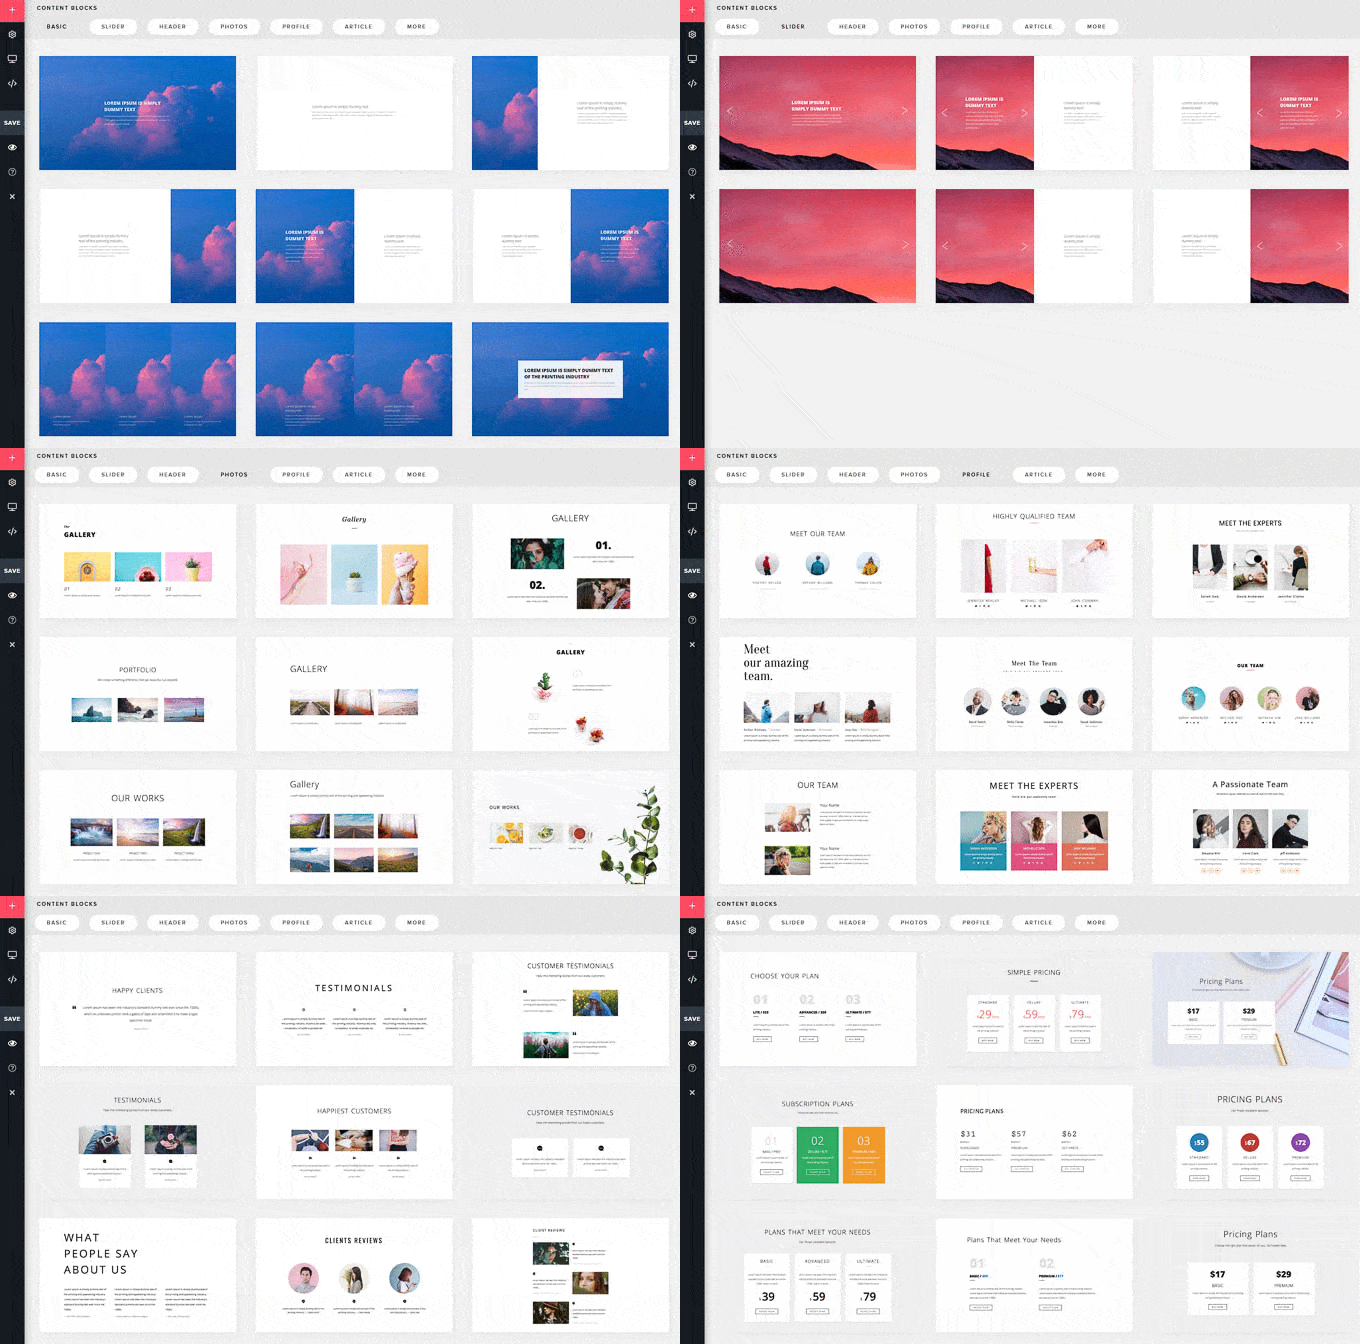
There are a lot of pre-made blocks to choose from:
- Basic
- Header
- Slider
- Photos
- Profile
- Article
- Testimonials
- FAQ
- Pricing tables
- Custom HTML code
- etc
And each of these blocks can be tweaked: you can of course edit its content and its design.
Here’s a short video of me doing a full-width header with Pixpa:
As you can see, building a great looking page is extremely easy!
If you’re someone who likes to tweak code, you can even edit each sections as plain HTML as well.
I could tell you about the Page builder of Pixpa, but it’s so much easier if you try it for yourself:
I think the Page building capabilities at Pixpa are even better than the industry leading Squarespace offers.
Cover pages
Cover pages are full-width pages without the “normal” Menu of the site. They are perfect for:
- as homepage while the site is under construction (“Coming soon”)
- to convey a short message with a strong image (Get on the waiting list)
- or even as standalone homepage, from where you can direct your visitors
(At Squarespace, they call it “Splash page”, or some also call it “Squeeze Page”)
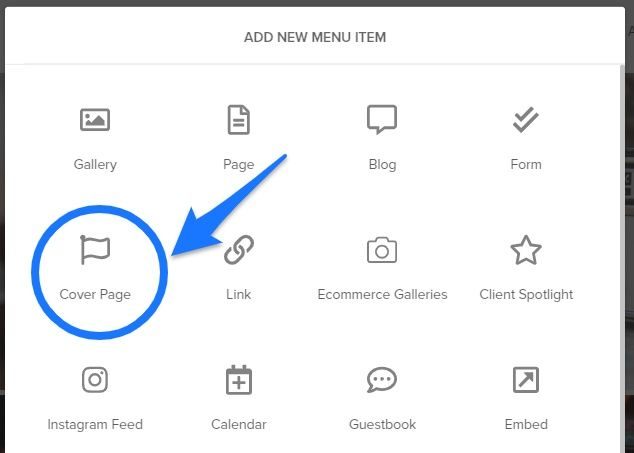
With Pixpa, creating Cover pages is super easy: add a New Menu item, and select Cover Page:
After that it’ll give you different design options:
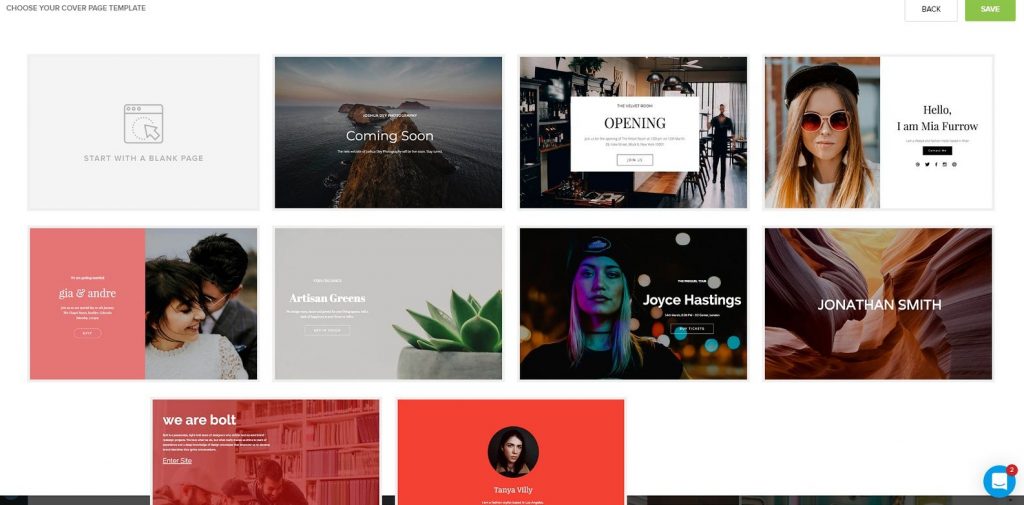
Pick one, and edit that to your style.
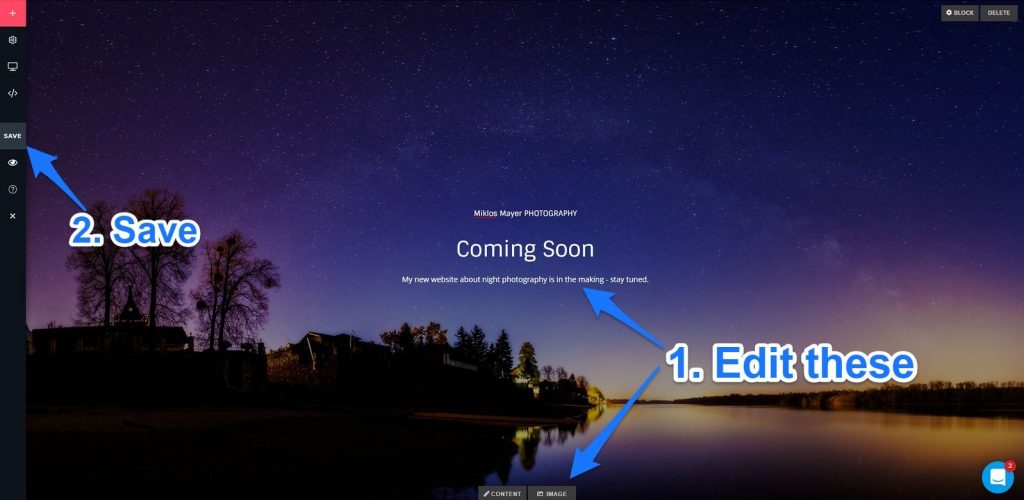
For example, a great looking “Coming Soon” page can be done in 10 seconds.
Again, this is a feature that Smugmug does not offers (neither WordPress by default).
Advanced contact / booking forms
Contact or booking forms are essential to any website where clients have to contact you.
Many people ask: “why isn’t is enough to just put my email address there, and the people would write to me?“
First of all, putting your email address out in the public is a really bad idea. Spam robots will soon find it, and your inbox will be flooded with junk.
And it’s not good for security either: hackers may try to crack your account.
So that’s why having a contact/booking form on the website is crucial.
It hides your email address, and also helps you by prompting the clients to answer specific questions right in the beginning.
For example, if you’re a wedding photographer, the date of the wedding might be crucial for you.
With Pixpa, it’s very easy to create a great looking form with a few clicks:
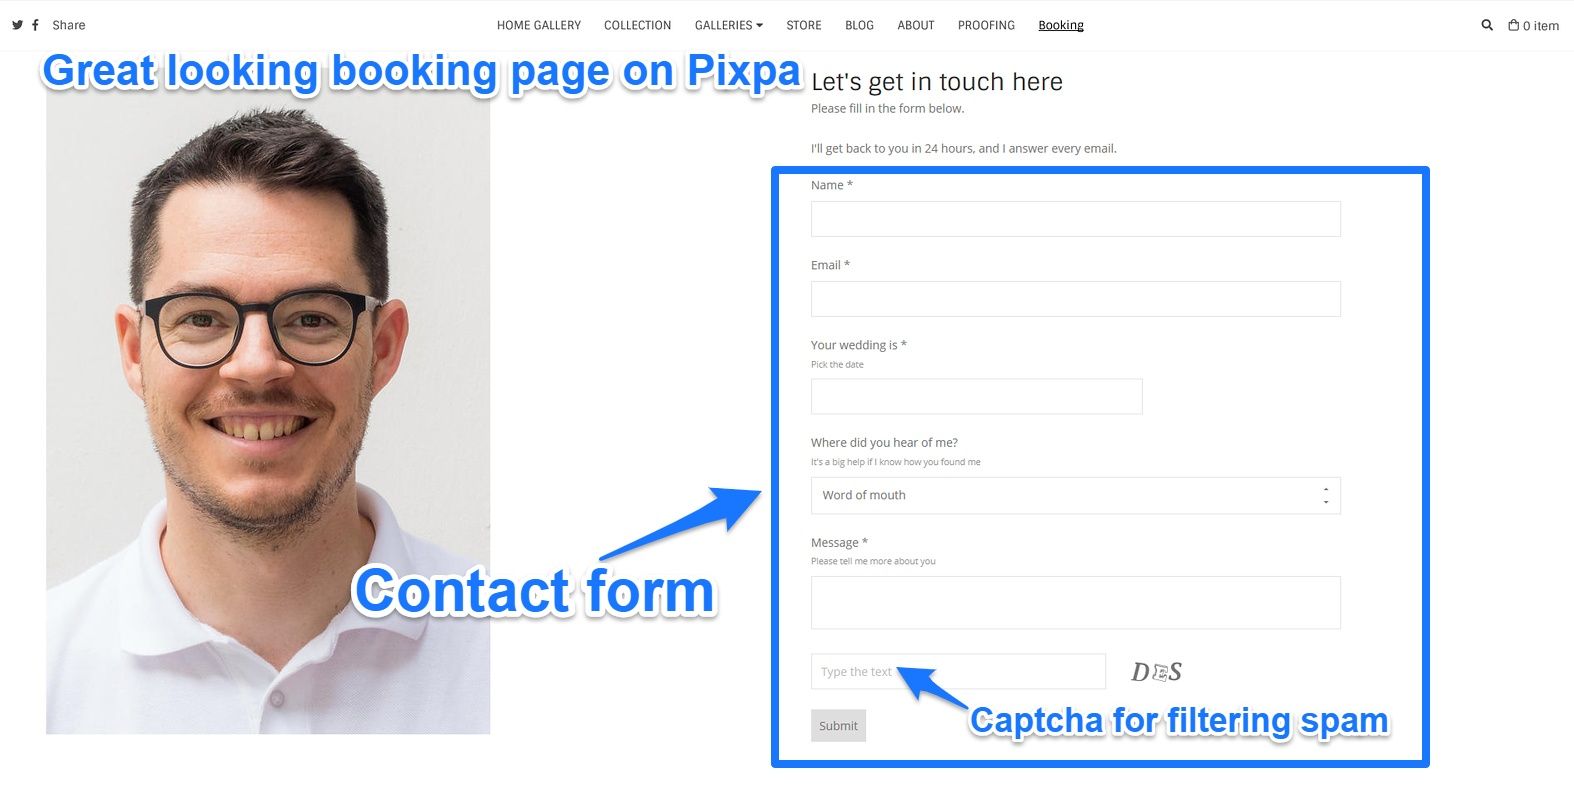
As you can see, it automatically has captcha, which is case-sensitive, you should warn your visitors about that. I’m sure this helps a lot to filter out spams.
To create a form, just add a new item in the Menu, and select Form.
Once there, you can set the layout:
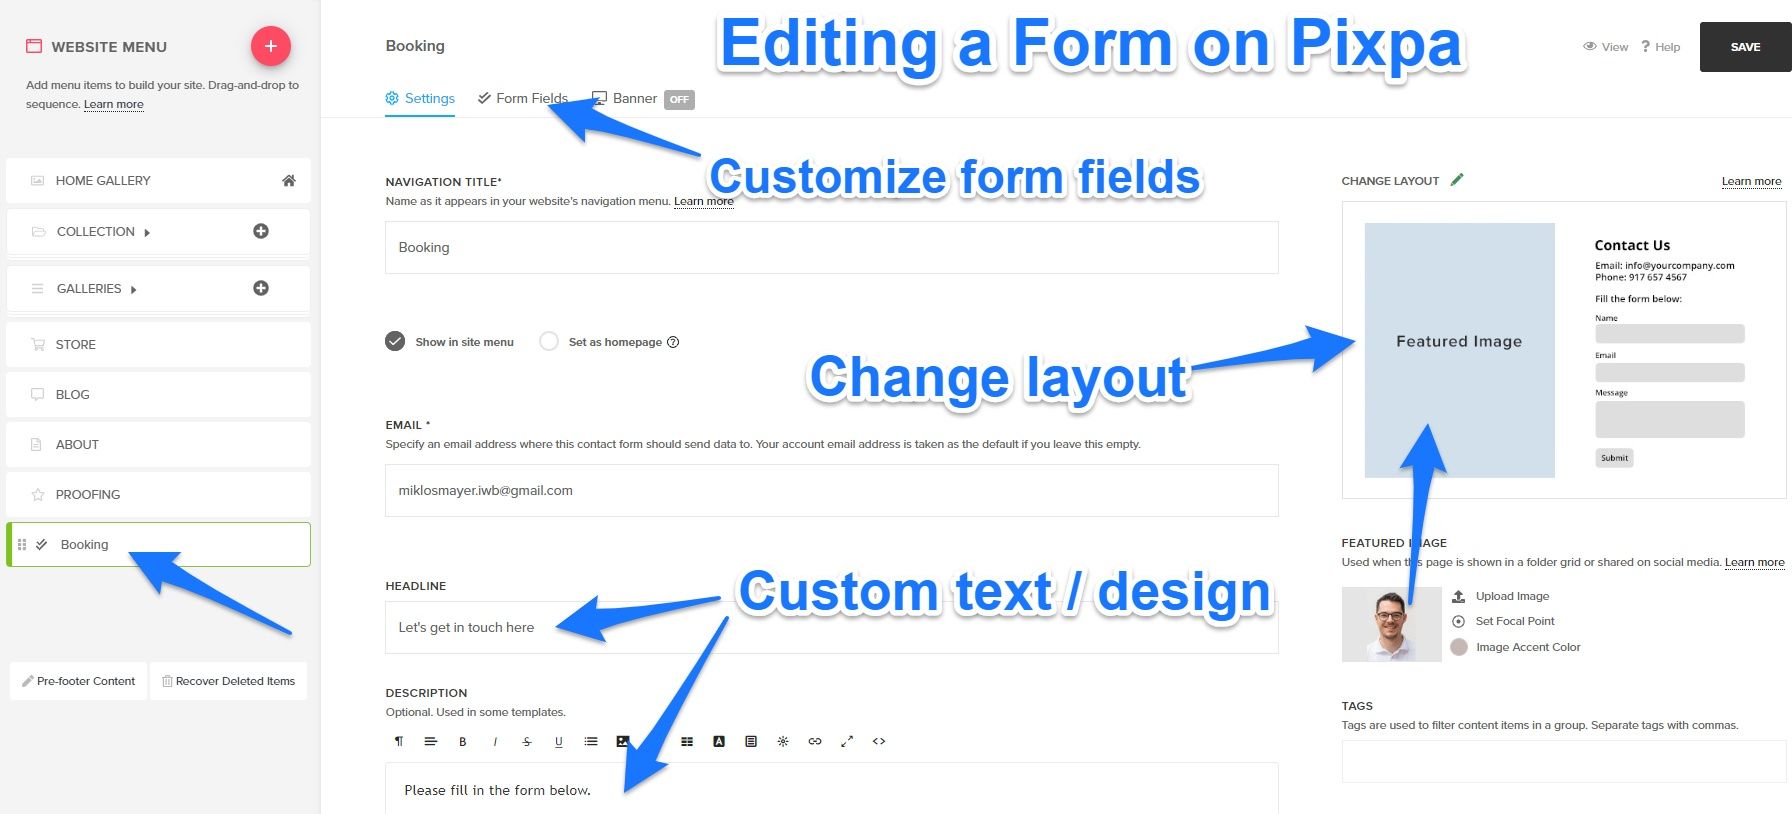
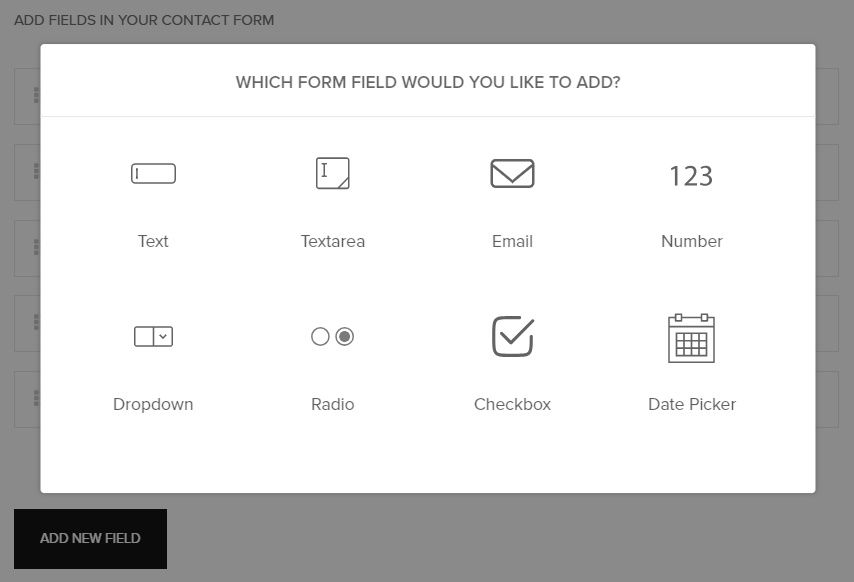
And above the standard fields (name, email, text), you can add custom fields, like:
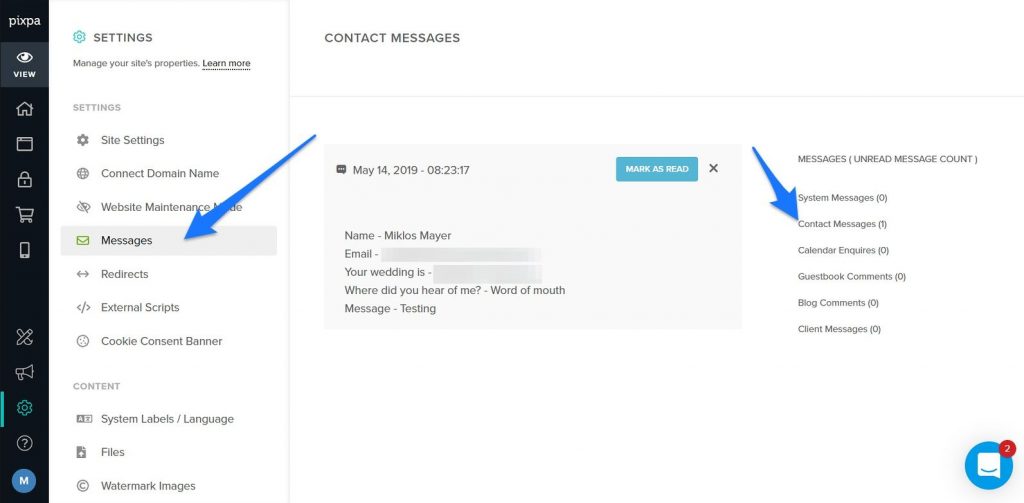
The submissions of the forms are collected under Settings / Messages, where it’s easy to filter them as well:
Translateable to any language
I was surprised to see Pixpa offering this option: you can translate / customize any of the system labels:
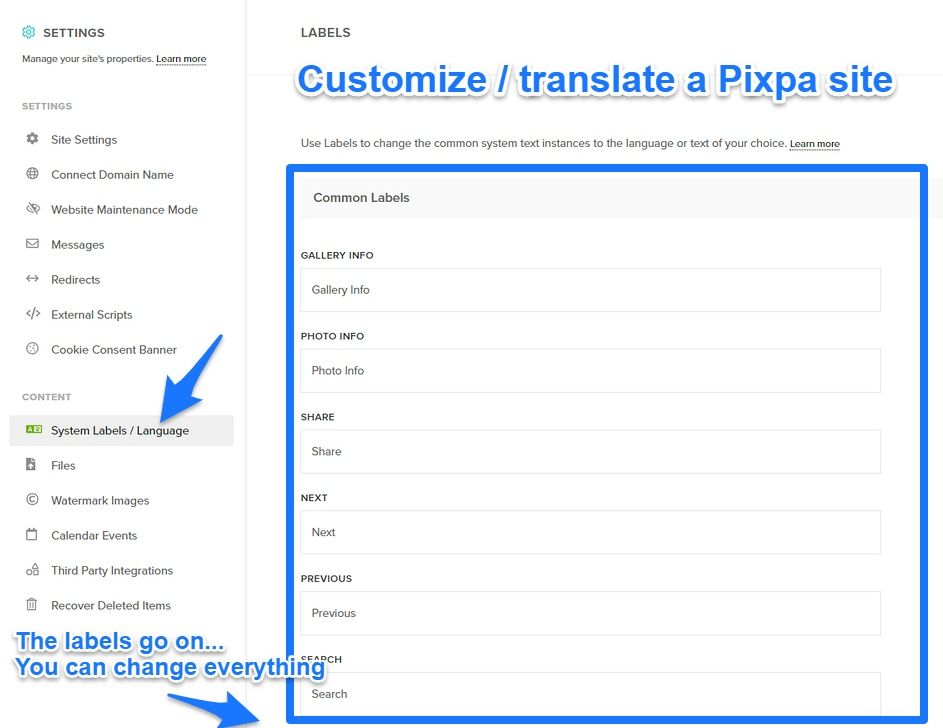
I have counted around 140+ labels that you can name whatever you want.
Plus, you can of course customize any texts found in the automatic emails, store policies as well…
This is fantastic news for non-English photographers!
For example, Smugmug does not offer this feature at all.
Built-in blogging platform
The blogging platform on Pixpa does what it promises: gives you the ability to write blogposts, but doesn’t go any further than that.
There are some limitations here:
- you don’t have control over the sidebar
- there are no categories
- you can’t insert images from your galleries, instead you need to upload them again (this is really frustrating, if you ask me)
But it does the job, the built-in wysiwyg editor is pretty decent and easy to handle.
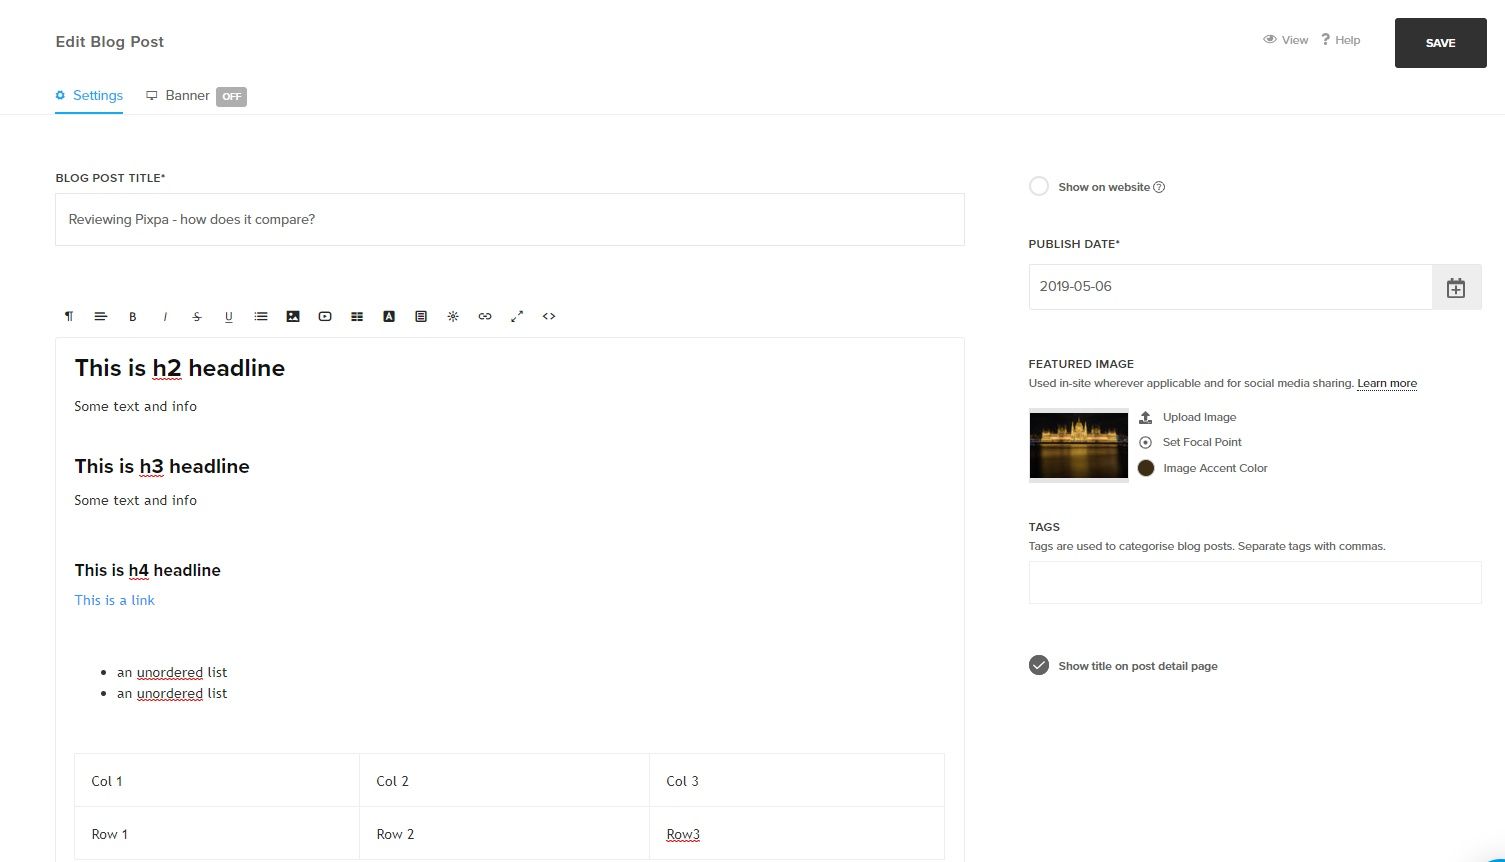
You have the normal paragraph-font options, plus the ability to add:
- images
- videos
- tables
- buttons
- lists
- custom HTML code
Also, I consider it as a big plus, that the toolbar floats with the content – this is useful when your content is very long, and you don’t have to go to the top to access the toolbar everytime.
(For example, on Teachable or Thinkific it’s very annoying that the toolbar doesn’t float).
Helpful 24/7 email support
As I was testing out Pixpa, I had loads of questions, so I emailed the support several times a day (basically, I was a pain in their ass).
But their response was always super helpful and lightning fast!
I even noticed a small bug in one of the features, and they immediately corrected it.
I also complained about a process one day, and the very next day I got this email back:
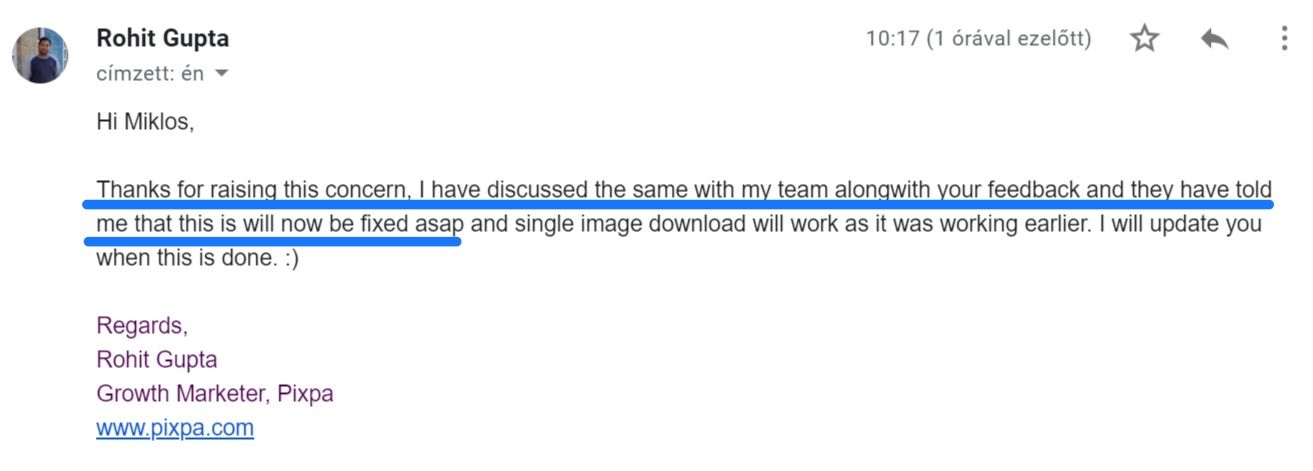
So overall, they have a very good email support system in place.
Also, their documentation is pretty helpful and easy to absorb.
Other advanced website techy stuff
Announcement / mobile information bar
These are quite recently introduced features of Pixpa.
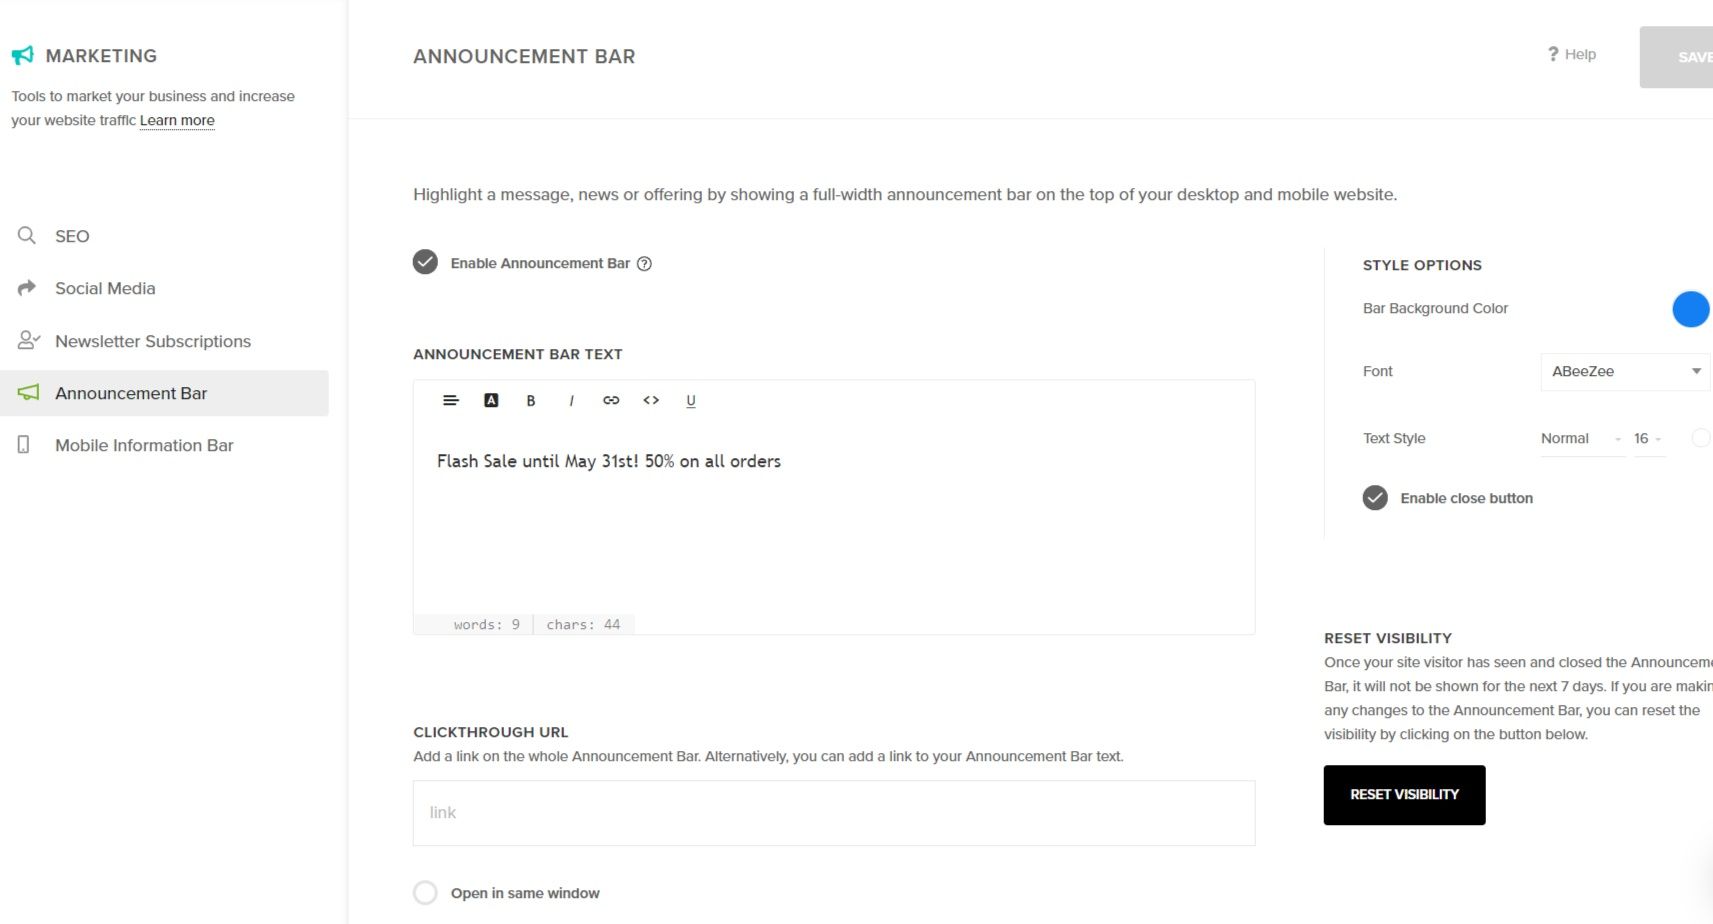
With this, you can add a custom message above your site.
For example, you can let the visitors know that there’s a flash sale:
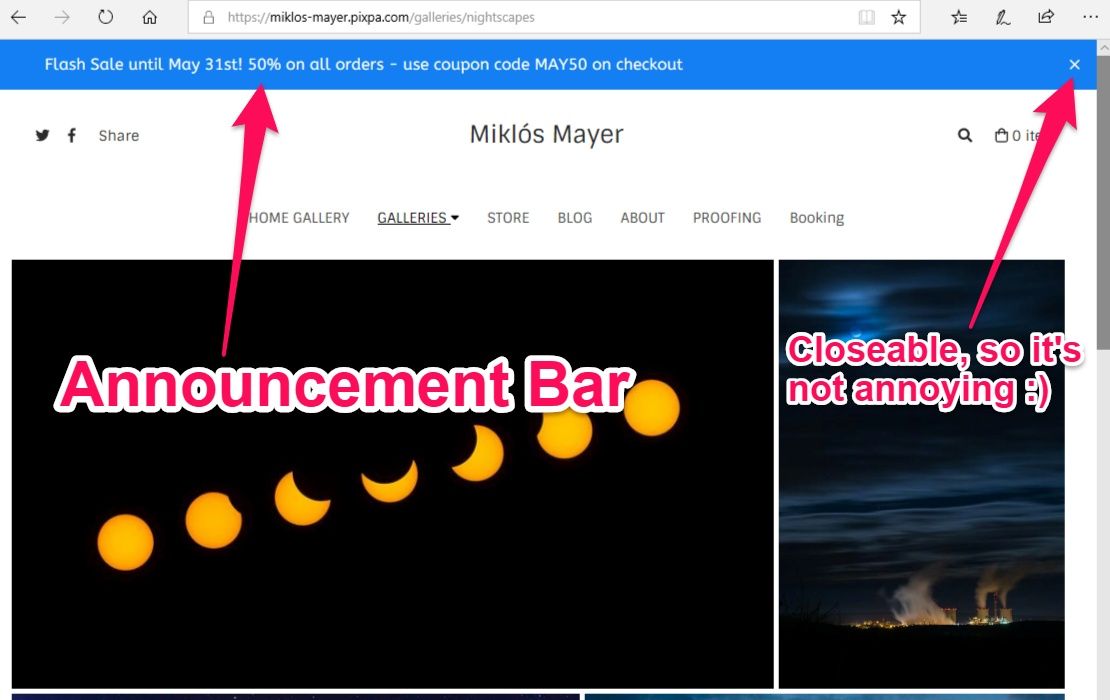
Here’s how it looks on your end:
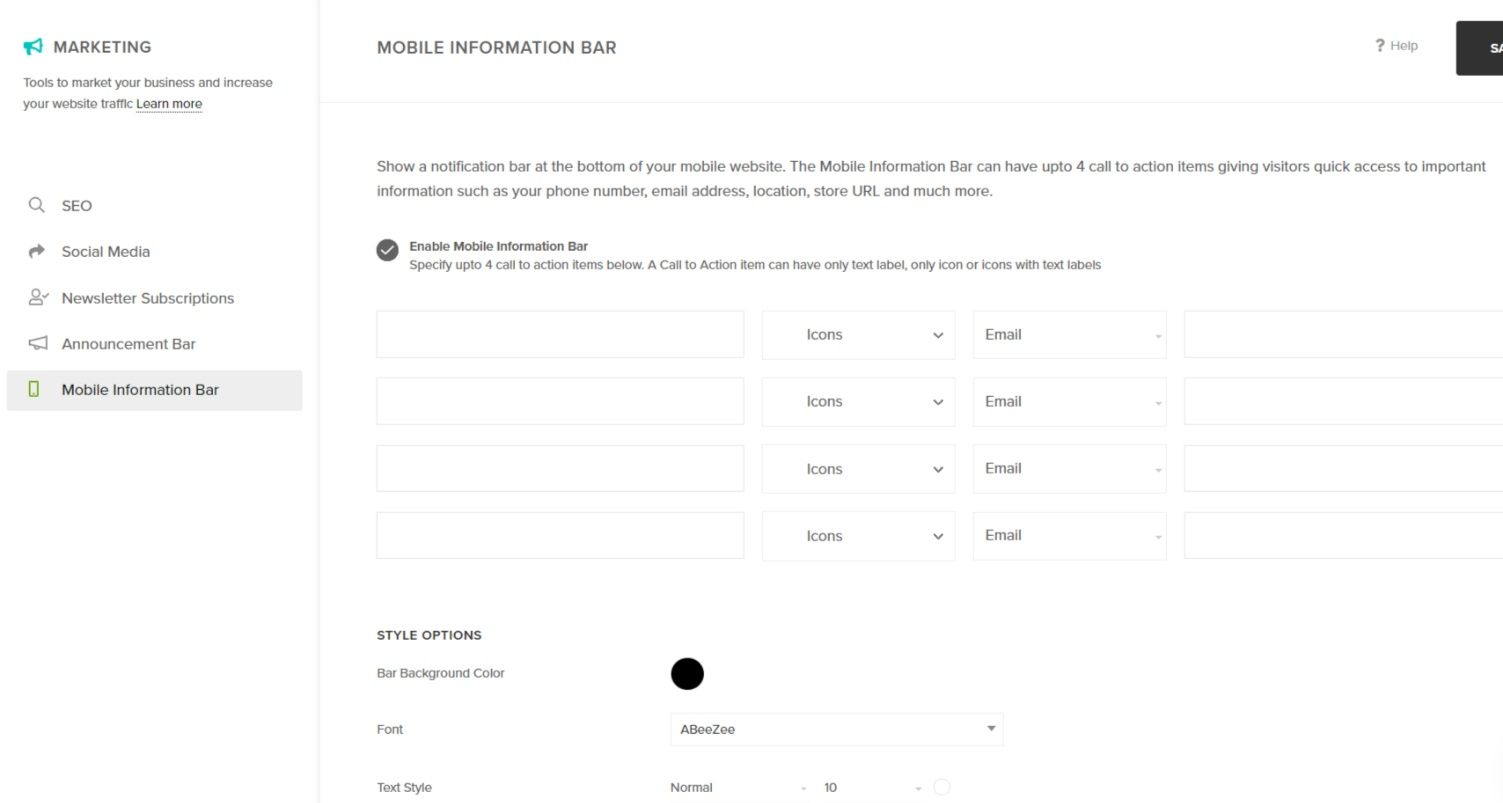
Plus, there can be Mobile Info Bars too. They are shown at the bottom of the page on mobile devices.
Head/body scripts, Google Analytics
Just like with other site builders, you can add your Google Analytics tracking, so you’ll be able to see your traffic in Google Analytics.
Moreover, you can inject custom Javascript code to the Head or Body part of the site (also to Order Success Page).
In contrast, Smugmug does not allow code injection.
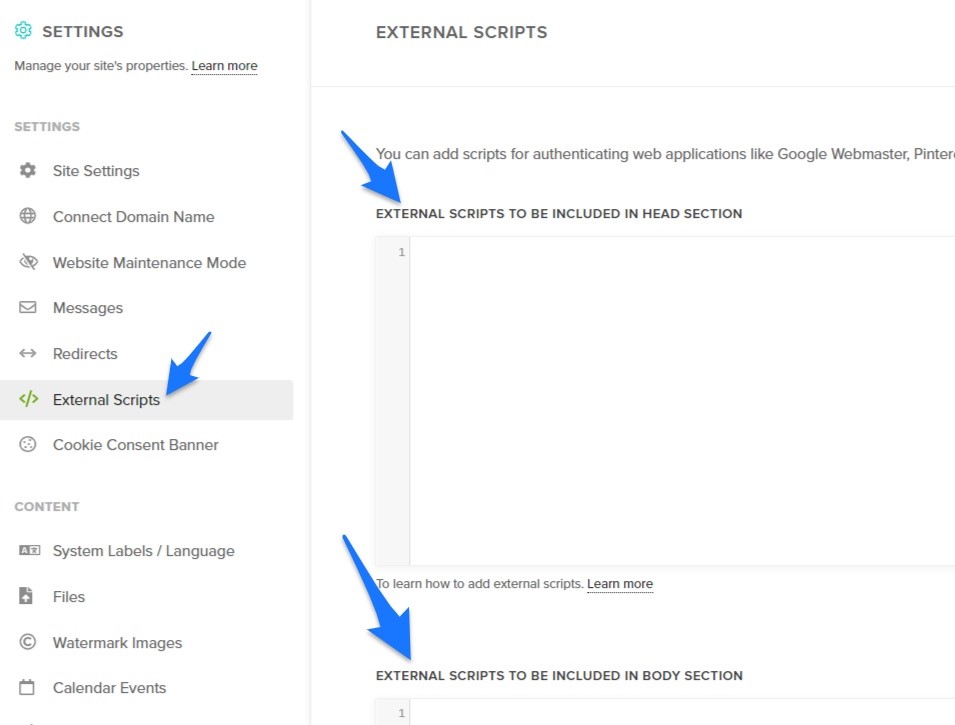
By injecting codes, you can use other 3-rd party services, for example AddThis, which is a great online service that can add Share buttons to the site.
Or you could add Facebook Pixel to run a retargeting ad campaigns.
Redirects
I was surprised to see this rather very advanced function…
Redirect rules guide internet browsers and search engines to access content that had a different URL in the past.
Simply give the old URL and the new URL of your content and add the Redirect.

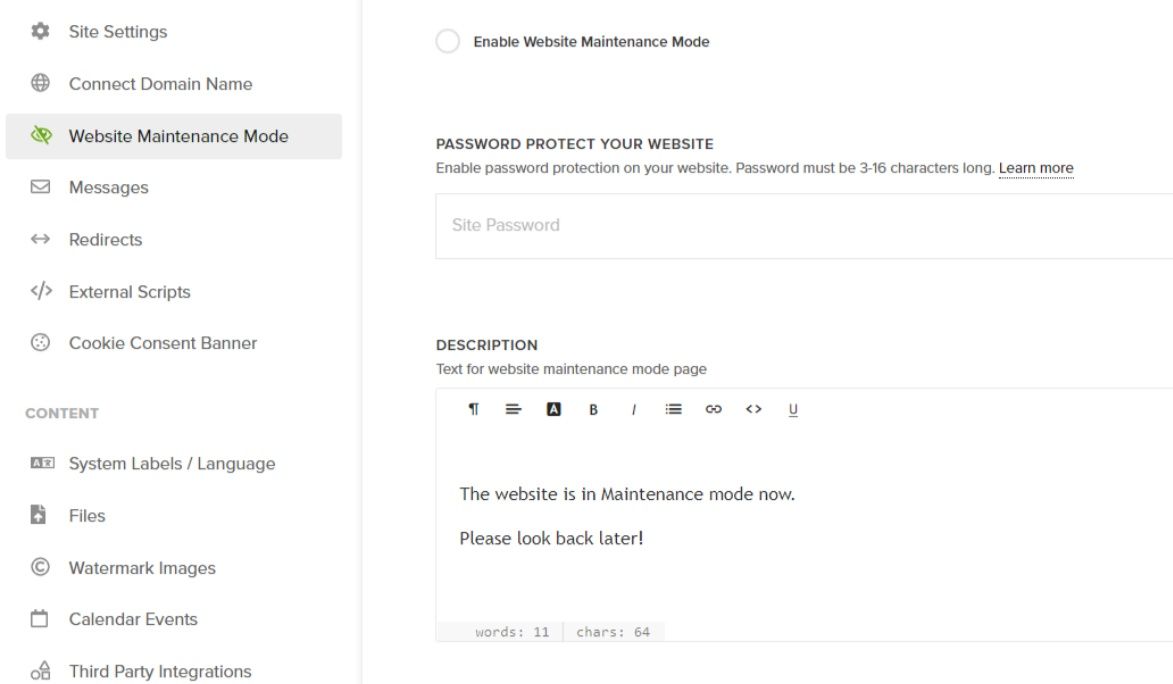
Maintenance mode
Pixpa offers a super easy way to put the website into Maintenance mode. Basically you can quickly craft an opening screen that welcomes the visitors, while you can work on your site
Disqus commenting
Disqus is probably the most widely spread third-party commenting platform on the internet.
With Pixpa, you can simply connect your site to your Disqus account.
Things I don’t like in Pixpa
No review would be complete without the things I do not really like of the service.
Luckily for everyone, with Pixpa, I could not find many things here… The ones listed here are quite minor ones and easy to live with .
#1. Cover images need to be uploaded separately
#2. In blogposts, you cannot insert images from existing galleries, you have to upload them again
#3. There are 4 different kinds of Galleries, depending which part of the site you’re using.
There are:
- “normal” galleries
- Client galleries
- Ecommerce galleries
- Blogpost galleries
There’s nothing wrong with that, but I don’t like that I can’t move a “normal” gallery to the Ecommerce part or to the client part.
Also, the photos of galleries can only be moved within the same section on the site (picture of a normal gallery can only be copied to another normal gallery).
Pixpa compared to other photo website builders
Gallery features compared – Pixpa vs Smugmug vs Squarespace vs WordPress
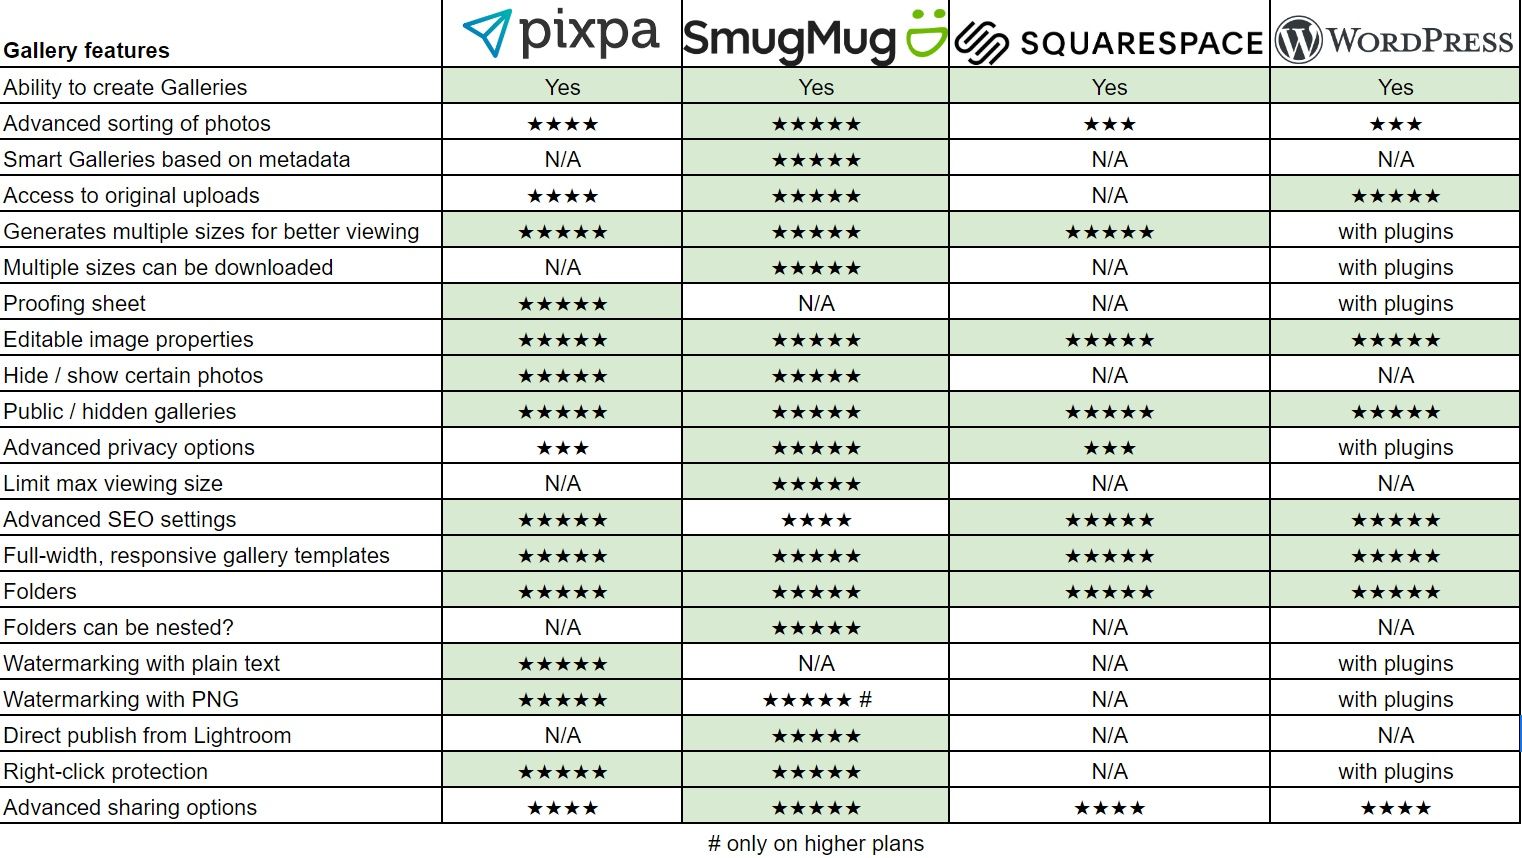
As you can see, Smugmug offers a bit more Gallery and organizing options, but Pixpa is coming very close in every respect.
Website building features compared – Pixpa vs Smugmug vs Squarespace vs WordPress
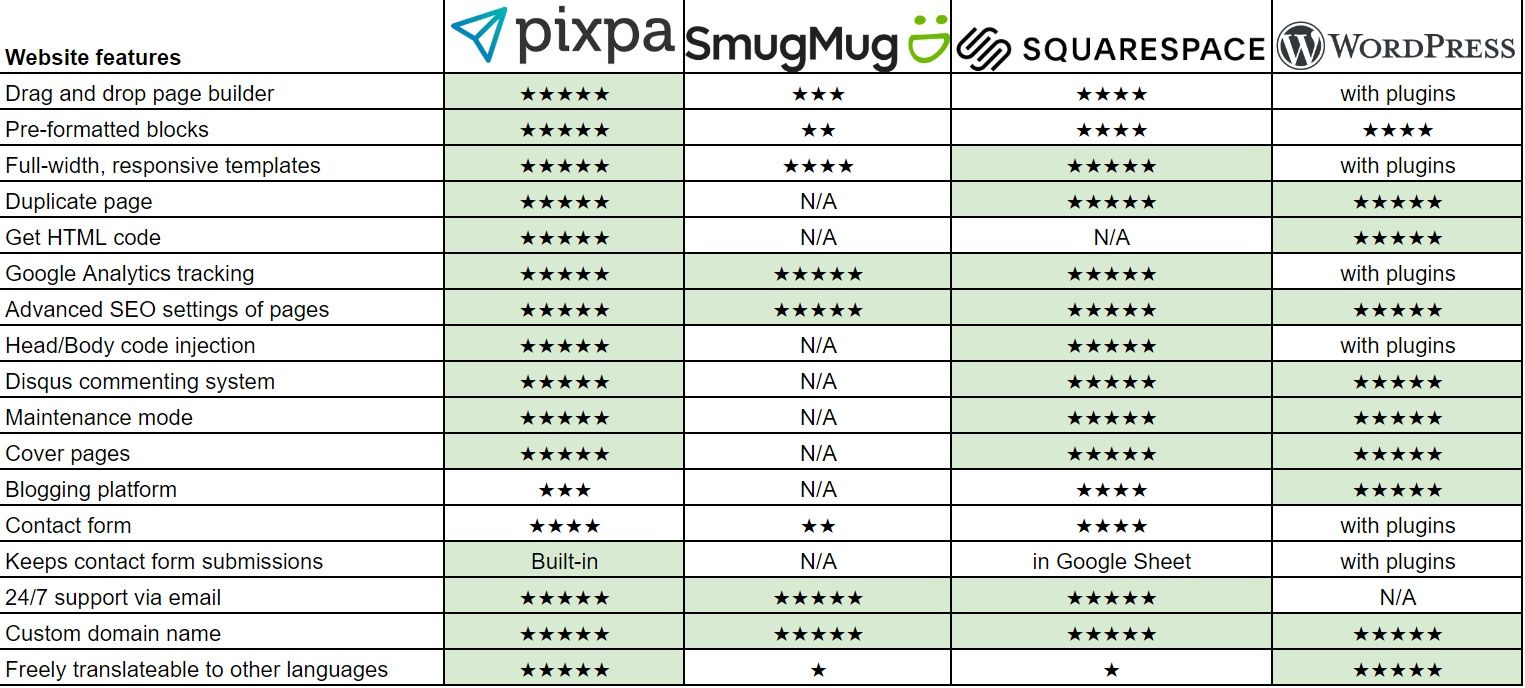
As a website builder, Pixpa easily wins over Smugmug, especially in the easiness of setting and building up a site!
Of course, it will not beat WordPress, but bear in my mind, that in WordPress everything needs to be done by different plugins, and setting them up requires advanced skills.
Squraspace is the leading drag-and-drop website making service, and in my opinion, Pixpa beats Squarespace in many features. Especially if your language is not English.
Ecommerce features compared – Pixpa vs Smugmug vs Squarespace vs WordPress

As an Ecommerce platform for photographers, Pixpa wins over Smugmug by letting you fulfill orders manually, and by offering Client Galleries / Pricing sheets at lower packages as well (at Smugmug they are only available for higher packages).
On a WordPress site you’d need something like Envira Gallery + Woocommerce to do that, which is no easy to set up, and there’s no support there.
Things I like in Pixpa, and make it stand out
#1 The ease of designing the site
None of the competitors offer such an interface where all design elements are there, and you can see the changes in live mode.
#2 Drag and drop Page builder with preformatted blocks
Having several types of pre-formatted blocks are so helpful, especially beginners!
#3 Client Galleries
A perfect way to deliver photos to a group of people. I love that it acts as a sub-site, and visitors can pick favorites and even buy prints / downloads of them in a very easy way.
Especially useful for wedding / portrait photographers.
#3 Built-in cart system that enables self-fulfilling or manual-fulfilled orders
It is so great that I’m not tied to labs that are in the States… Because I’m in Hungary, and so are my clients!
#4 Fully translateable front-end
Again, this is crucial if your clients don’t know English.
My personal take: who is Pixpa recommended for?
From the weeks I’ve tested Pixpa, one thing stood out to me.
This platform is clearly aimed at people who actually sell something. Either prints/downloads or physcial products.
And these people want a hassle-free, relatively low cost site, with awesome looking design.
So I would definitely recommend it to wedding and portrait photographers, who make a living from selling prints / downloads to customers. Because their life will be simplified a lot.
Pixpa also stands out with its built-in cart system, and it’s easy to use block-based page building system.
Therefore I would also recommend it for creative agencies, where having an image-based site is crucial.
Try Pixpa for FREE
Don’t take my word for granted, everybody has different taste.
Taking Pixpa on a test ride does not cost you anything, no credit card is needed to make a trial site.
Useful links worth visiting
- Try Pixpa (gives you 10% off, if you signup)
- Documentation / support of Pixpa
- My review on Smugmug.com, Pixpa’s competitor

 Welcome! I'm Miklós Mayer, a photo tour guide in Hungary. My job is to show fellow photographers around in my home city and teach them everything I know about photography.
Great articles and videos Miklos and very timely from my point of view as a start a 5-week fly, drive, boat tour of Central and Eastern Europe in less than a week.
I’m more of a morning blue hour travel photographer and saw some interesting screen in your gally of the Budapest area where I’ll be spending 4 mornings on “walkabouts” before starting a weeks riverboat cruise up the Danube than visiting Poland and Berlin. Before Budapest, I would have been in Romaine for a week plus
Here is a picture I took in Japan last year which I like very much as the Bullet train was going in excess of 100 MPH and was a chance shoot of Mt Fuji with my smartphone
Again thank you for all the information
ps Will be looking into the PixPa website builder you are an affiliate with when I return
Thank you Hank for the nice feedback, I’m happy to hear my website helped you.
If you’ll be in Budapest, I recommend to check out my private night photo tours in Budapest. It has a separate website over here:
https://hungaryphototours.com/
In Budapest, the city looks a lot better in the evenings, because all the highlights (Castle, the bridges) are lit up until 1 AM.
In the morning, of course, it also has a special atmosphere, but the highlights are not lit up. But you can have great sunrises from the vantage points in Buda.
Miklos, Thanks for the 1 AM tip, That along with the direction of the Sunrise is going to have an impact on my “walkabout”. This picture was taken at about 3:45 am in Venice while scouting sunrise locations.
You’re very welcome Hank.
That’s a great photo, well composed and exposed!
Good luck in Budapest!
Thank you for your review. I am trying out Pixpa now and your detailed writeup is very helpful as I’m trying to build my own website for my photography. I appreciate all the detail and screenshots you included as well as the table of contents. Your review is the most helpful one that I’ve come across. Many thanks!
I’m very happy to hear that Cheryl, you’re welcome 🙂
I think Pixpa is making a good job here, that’s why I dedicated a bit more time to review their features – I do think they can make a photographers life easier.
Hi,
I’m trialling the software at the moment and so far am very impressed versus my current provider, Zenfolio.
I am using the client galleries as intended but am interested to know if it’s possible to create a similar style gallery for landscape photos? Example: main landscape gallery with sub galleries for colour, B&W, panorama, drone etc. That is how I currently have Zenfolio setup.
I hope I have explained this clearly.
Thanks.
Hi Anthony,
For landscape photos, I wouldn’t use the Client Gallery feature.
Although you could use it, but the “normal” galleries would be just fine for that. I would just nest the subcategories within the main, “landscape” category.
And you can stylize every gallery or page differently if you want to.
I hope I could help you, let me know if you have more questions!
By the way, the Pixpa support is very good and fast.