My guests often ask me: ‘how do you make your images pop?’
Of course, there’s no single answer for this, but I know that SHARPNESS plays a big role in that. A photograph sharpened the right way always pops out.
Many people don’t know that every photo needs to be resharpened every time its size is changed.
Also, many don’t know that in Lightroom it’s super easy to get sharpness right.
I’ll show you my method for sharpening RAW files in Lightroom.
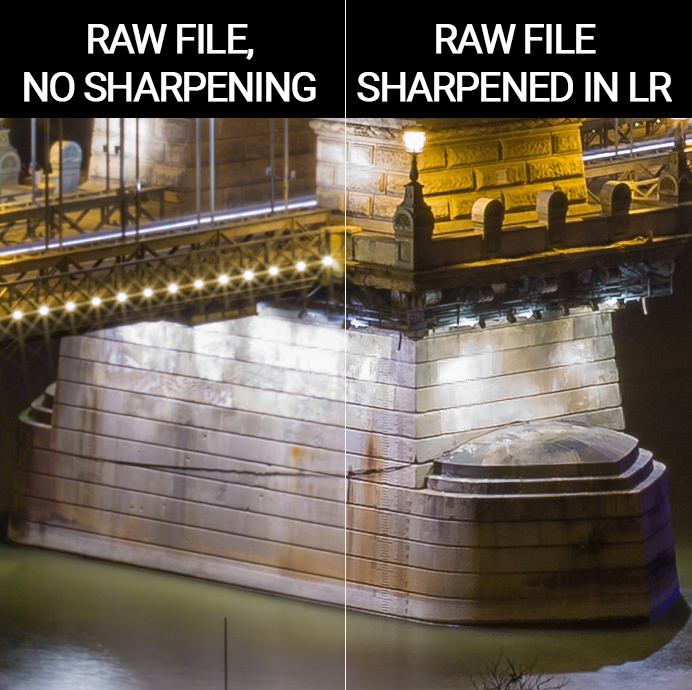
You may know that RAW files are inherently soft, as the camera applies no sharpening at all. Everything has to be done in post process.
Here’s how the above picture looks like at 1:1 view with and without sharpening:
I use Adobe Lightroom all the time, so I’m going to show you that (no matter if you use the CC or Classic version).
Sharpening in Lightroom the right way
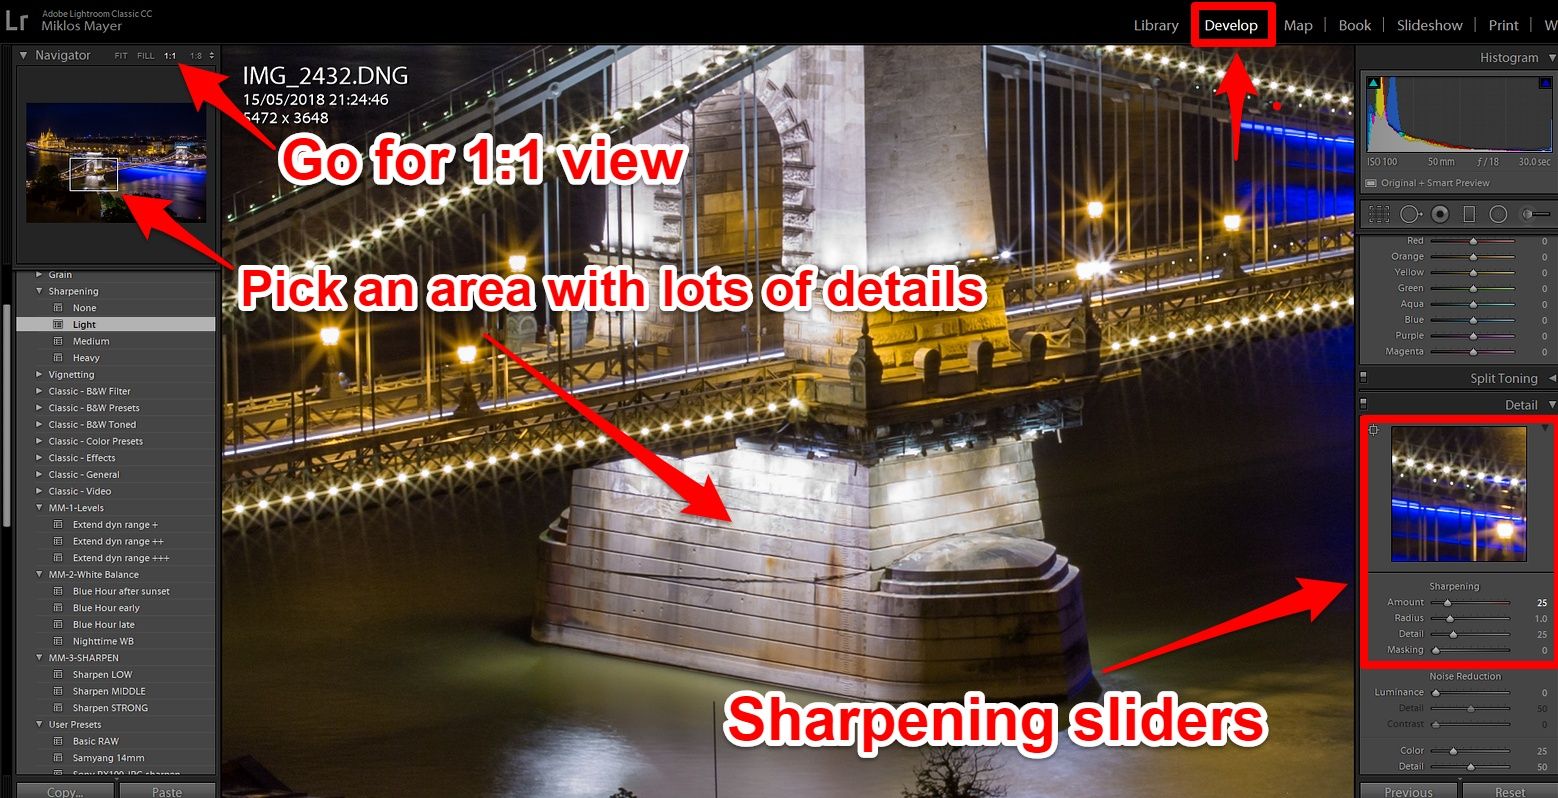
This is the sharpening tab in Lightroom’s Develop module, with 4 different sharpening sliders.
When setting the sharpness always look at the picture in 1:1 view (100%). This way each pixel on the picture corresponds to one pixel on your screen.
What most people do is that they just apply the basic LR sharpening. And if they want to get sharper, they just increase the Amount slider.
I used to do this too, wrongly…
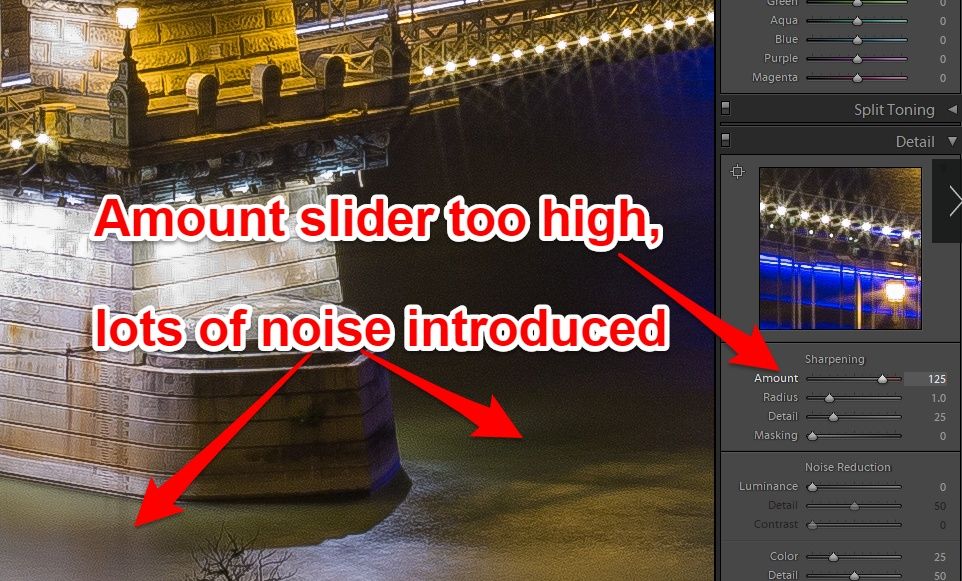
The problem with using the Amount slider only is that as you crank it up, noise will start appearing in homogenous areas of the image.
Noise is NOT our friend in this case…
Luckily there’s a slider called Masking
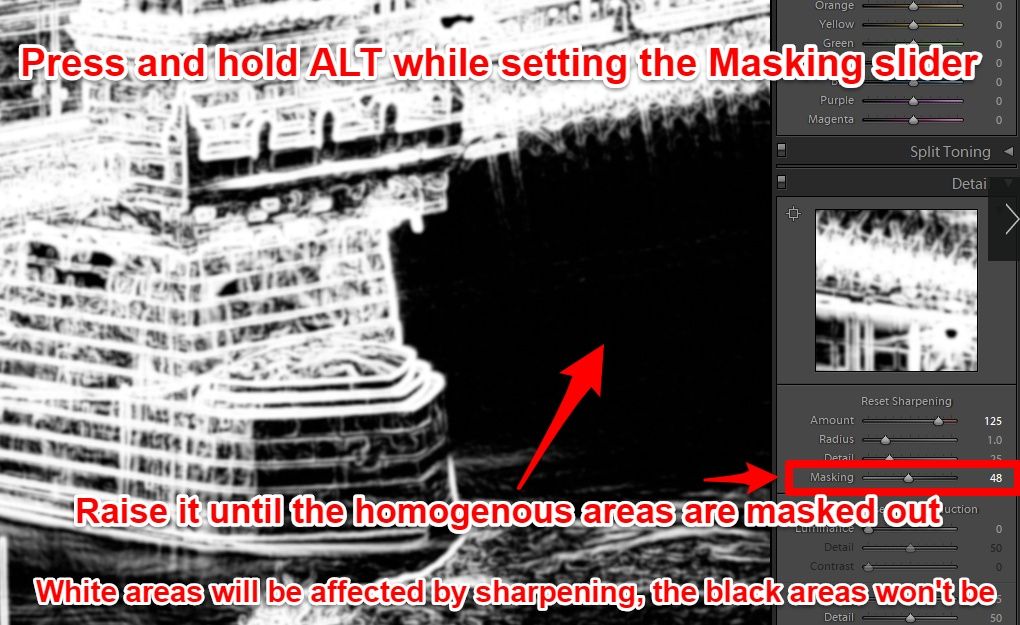
Press and hold the ALT key while changing the Masking slider, and you’ll see what it does (this ALT key trick works with every slider, BTW).
It will mask out homogenous areas, so that they will be not affected by sharpening (the black areas are NOT sharpened, only the white ones).
This is exactly what we want now.
The goal is to mask out the blue / black şkies or the blurry backgrounds. After all, why would we sharpen the blue sky?
So these areas should be black when tweaking the Masking slider (black means that sharpening is NOT applied there).
In this case I set a value around 50.
What about the other sliders, Radius and Detail?
Yes, I’ve deliberately jumped through the Radius and Detail slider. For Radius, leave it on put 1 pixel, and for Details, well, it’s absolutely your taste.
My recommendation is that sharpening should never be overdone. After all, this is just a mathematical tweaking with the pixels, and as such it introduces artifacts into the picture.
If you’d like to know what exactly these slider mathematically mean, I highly recommend you check out Cambridge in Colour’s article on sharpness.
So my workflow for sharpening in Lightroom:
1. Set the Amount / Detail slider around 50
2. Leave the Radius on 1 pixel (this may vary if you print, but 1 pixel is a good start)
3. Press and hold ALT key and play with the Masking slider until the sky and other homogenous areas are masked out
4. Fine tune Amount / Detail slider with ALT key if necessary
My proven settings for my Canon 6D, a 20 megapixel camera, for landscapes:
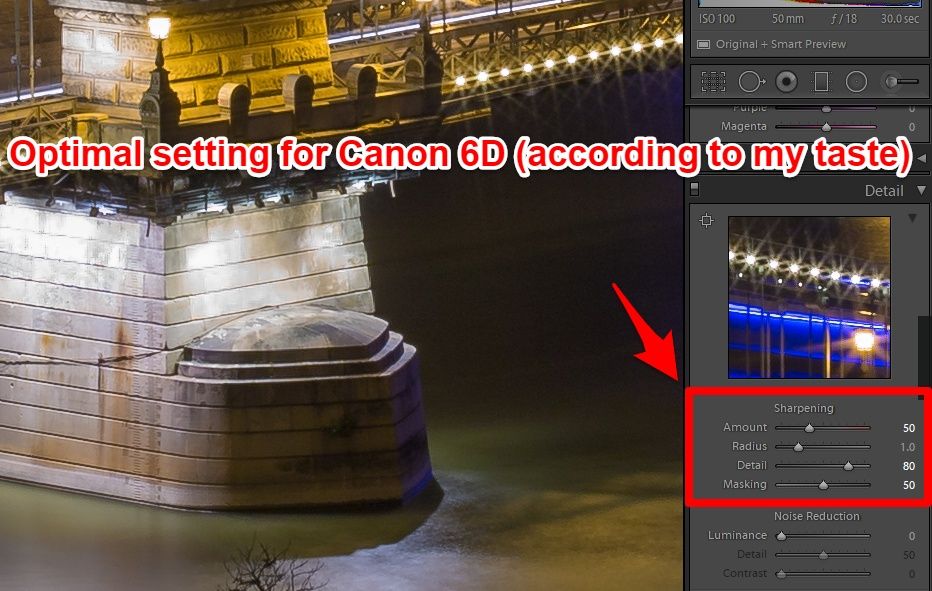
Amount: 50
Radius: 1
Detail: 80
Masking: 50
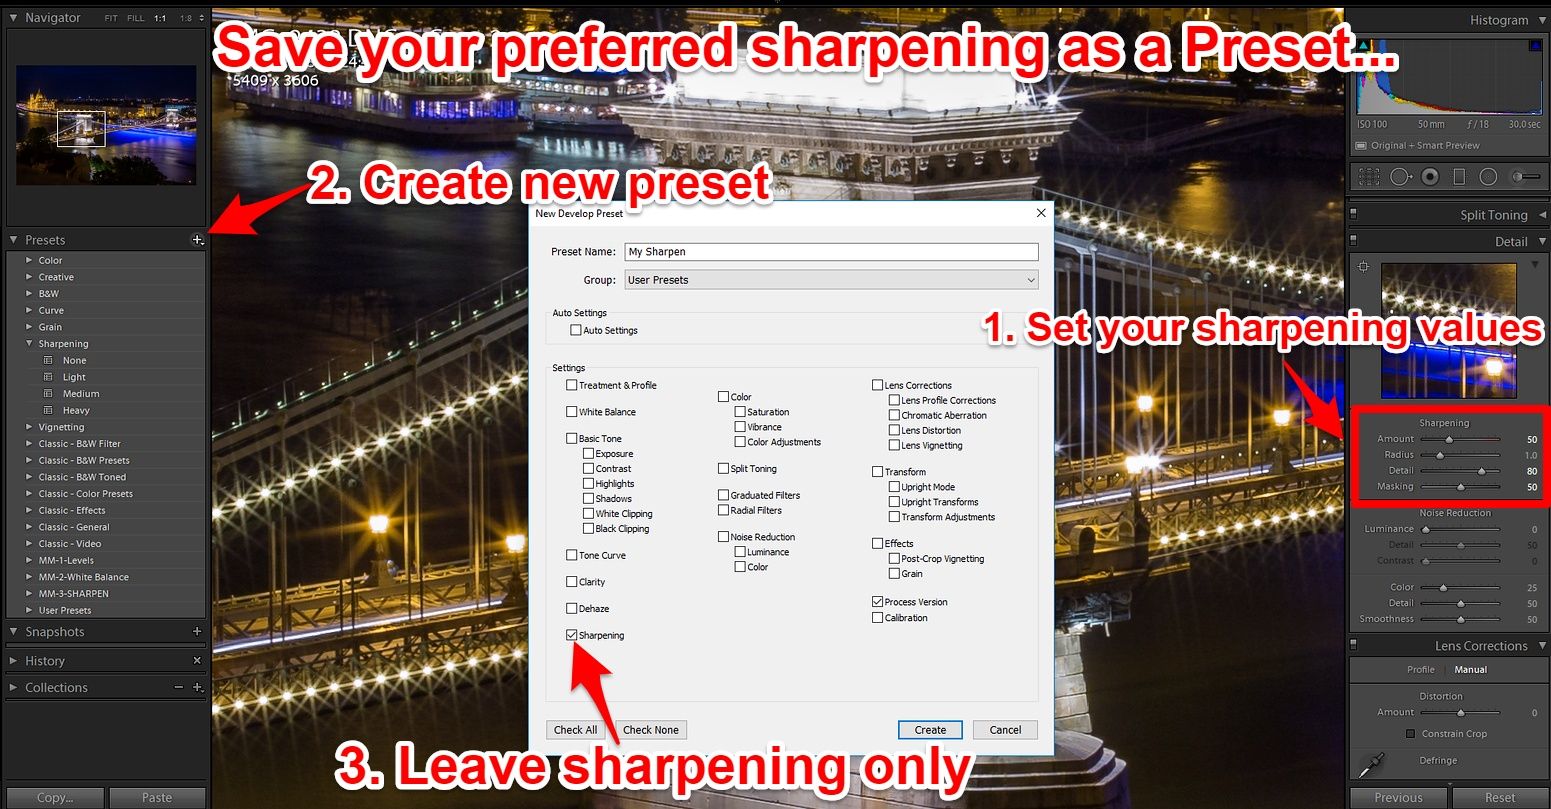
Now let’s save these settings, so that you can apply them with a single click, or apply it upon Importing.
Turn it into a sharpening Lightroom preset
Just apply the sharpening settings you want to save, click on new preset, uncheck all the boxes but the Sharpening, and name it.
Voilá! Now, you have your own sharpening preset (I have 3 of them, with different values).
Crucial last step many people forget
We’re not done yet… Time to export the picture!
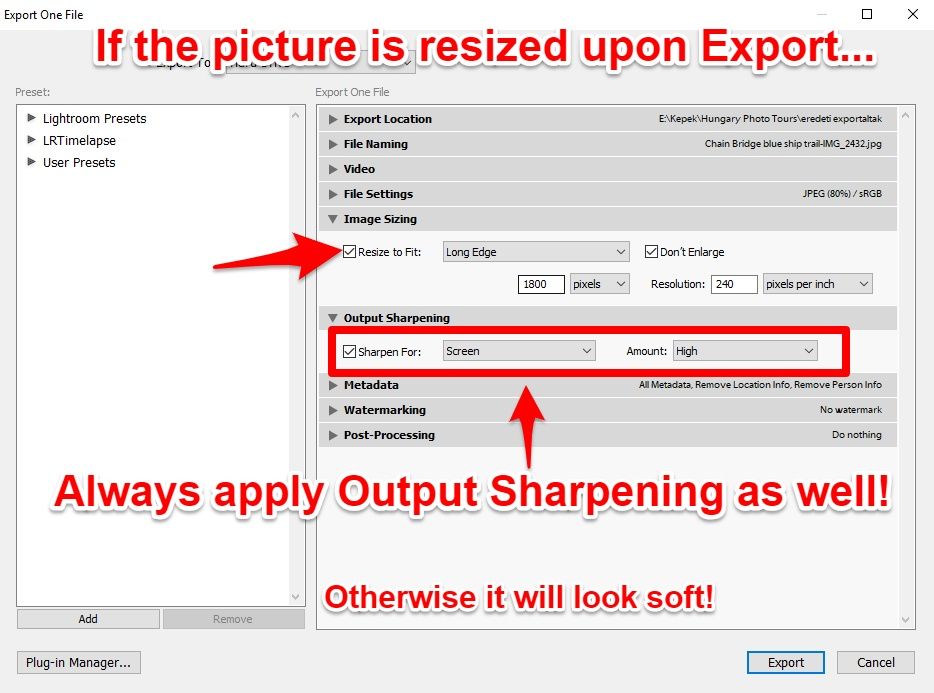
For example they want to upload their pic to Facebook, so they resize it to 1800px wide. But they forget to sharpen it again.
Becase sharpening has to be applied again on the resized image!
Luckily the Export panel in Lightroom makes this step simple.
Just enable Output sharpening, and select Screen, and pick the amount. I like to go for High.
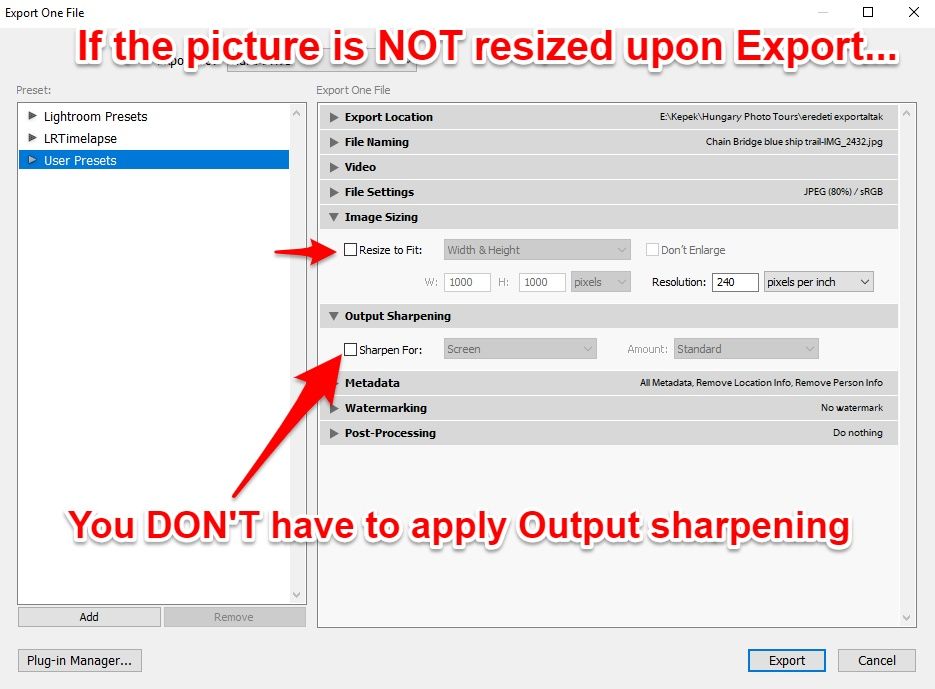
Important: if you’re not resizing the image, then output sharpening does not have to be applied. Because in this case the original image remains, and for that we already did sharpening
How to achieve sharpness in Lightroom – Summary
1. Have a blur free RAW image
2. In Develop module of Lightroom, go for 1:1 view
3. Play with the Masking slider while pressing and holding the ALT key
4. Raise it up until the sky and other homogenous areas are masked out (black)
4. Leave radius at 1 pixel
5. Adjust Amount and Detail, but don’t overdo them (values above 80 are “over”)
6. If you resize the picture upon exporting, apply output sharpening
7. If there’s no resize, don’t apply output sharpening
That’s it! 🙂
Enjoy the crispy clear images in your social media feed!
Which is the slider that was new to you? Tell me in the comments!
I spent 6 years without knowing about the aim of Masking slider…

 Welcome! I'm Miklós Mayer, a photo tour guide in Hungary. My job is to show fellow photographers around in my home city and teach them everything I know about photography.
Leave a Reply