The coolest feature of any great night cityscape photo is the lighttrails of cars and ships.
What are lighttrails? They are caused by the head and taillights of cars and ships and are caused by long exposures that are several seconds long.
I’ll show you in this post the exact technique of long lighttrails from setting up the camera to post-processing.
And it’s not just taking a long exposure: you can stack multiple long exposures to have longer light-streaks!
But how do you create very long lighttrails?
With one very long exposure? (almost)
By using an ND filter? (wrong)
Let me show you my workflow.
An example with Chain Bridge in Budapest
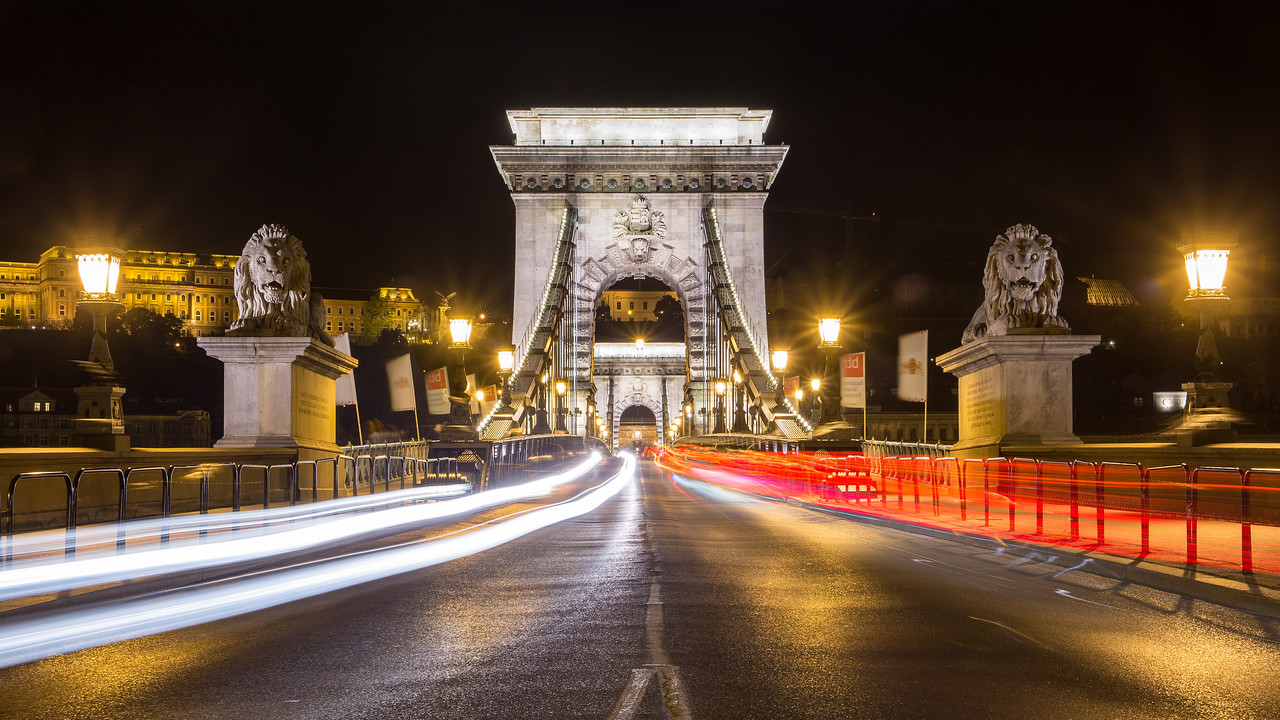
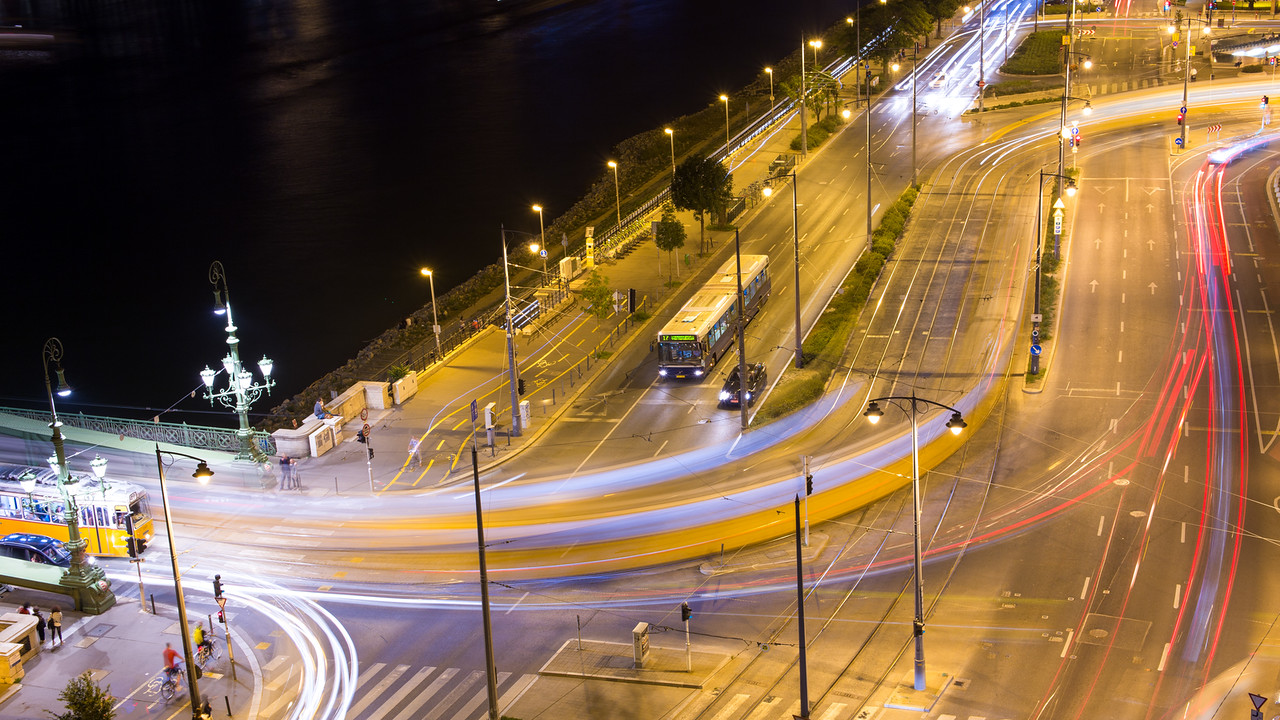
This is a picture I took of Chain Bridge, with rich lighttrails. I’m going to show you the whole workflow that went into this one:
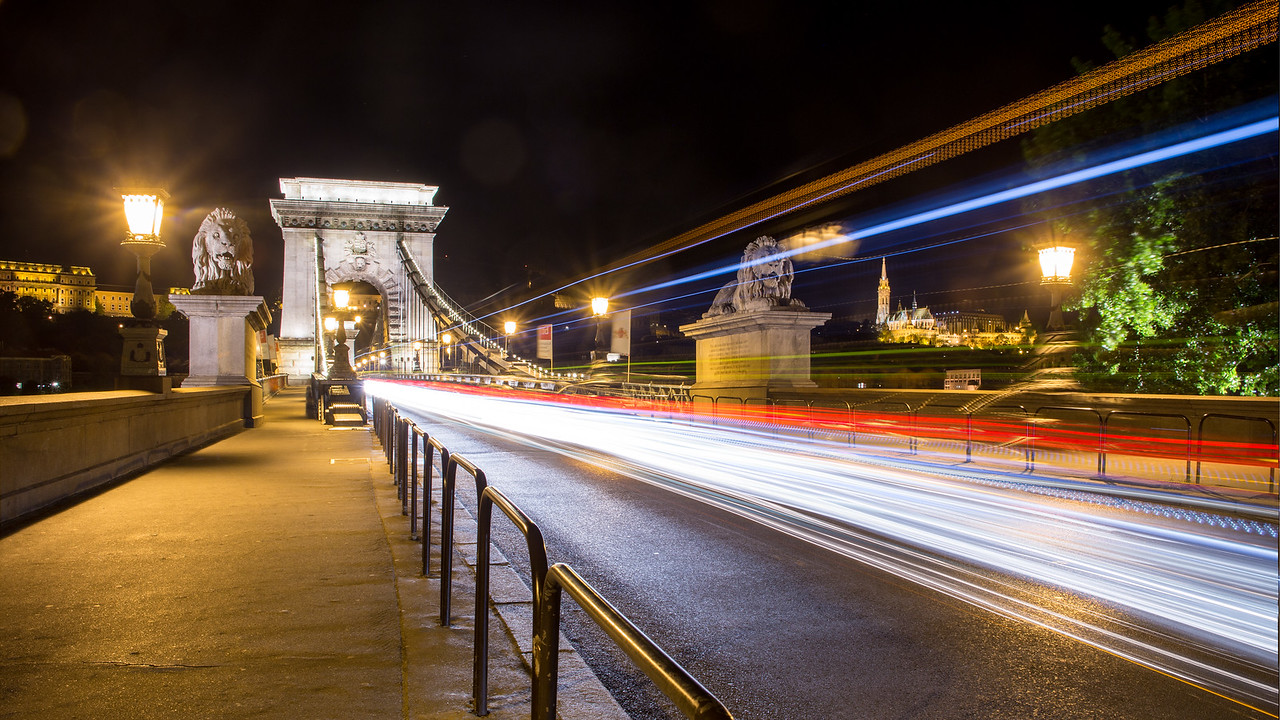
It wasn’t like this, originally…
The secret: I took five 13 second long exposures consecutively and then merged the lighttrails in Photoshop.
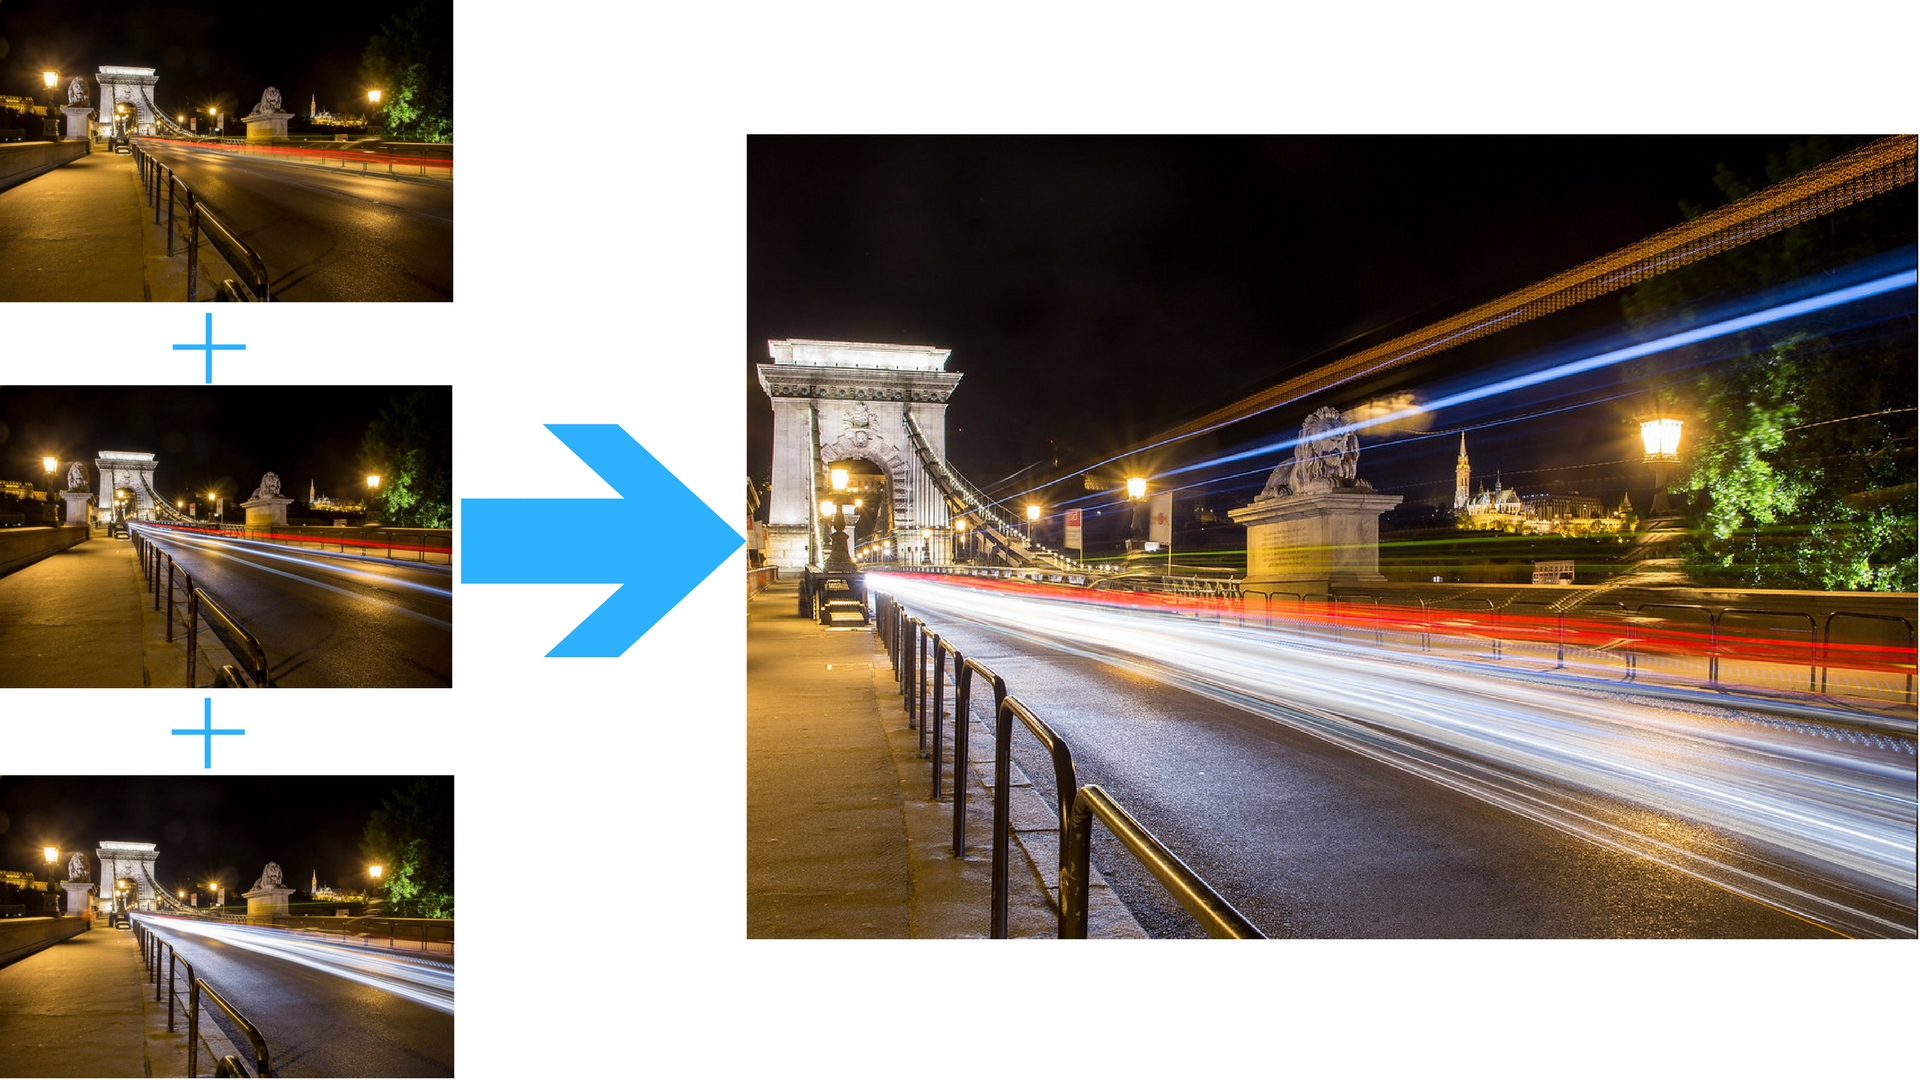
So this is not one very long exposure, otherwise the Chain Bridge would have burnt out completely (I was already at f/16 and ISO100)
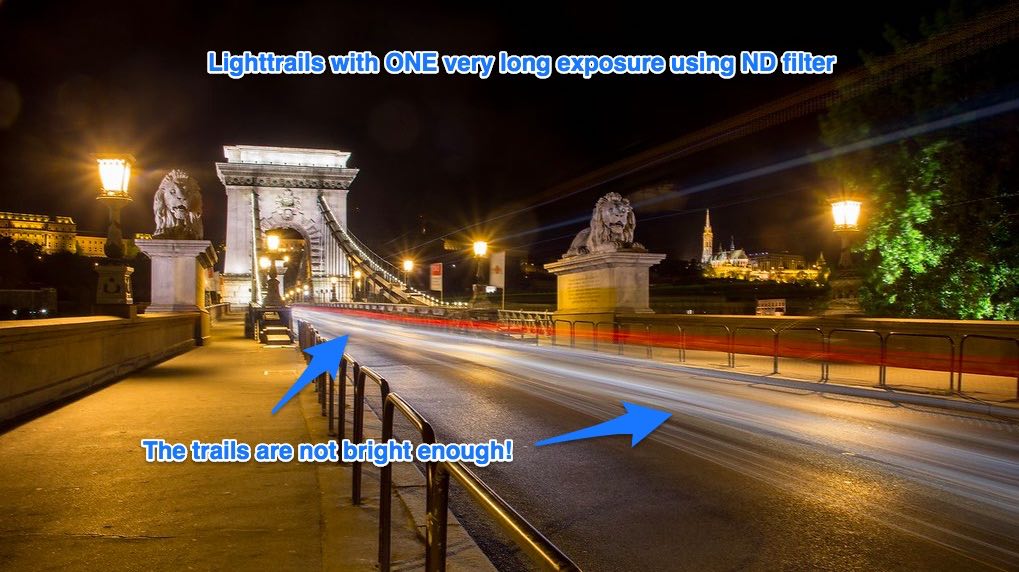
‘But why haven’t you used an ND filter and just did one exposure? Then you’d have the same long lighttrails!‘ – you may say.
Because an ND filter would have weakened the lighttrails. There would be the same length of trails, but a lot fainter. And I didn’t want that:
How exactly was it shot?
I put my Canon 6D on a tripod, The lens was a really old one, a 28-105mm f/3.5-4.5 USM.
As always when shooting night pics, I switch into Live View mode, and composed with the aid of the built-in level.
I switched the lens into Manual focus (MF).
I focused manually by magnifying 10x into the Live View mode, so I could be really accurate
The camera was in Manual (M) exposure mode.
File format was RAW. (But it could have been JPG as well)
My goal was to have as long shutter speed as possible, so f/16 and ISO100 was set.
Note: on full-frame cameras with approx 20 megapixel pixel count going above f/16 causes diffraction which softens the image (eg. it will not be sharp). With cameras having a smaller sensor (like 4/3 bodies), this number is even lower, around f/11.
Then I adjusted the shutter speed accordingly. A 13 sec exposure time gave the best results.
Until now, the usual settings I use for night city shots…
Here comes the trick!
I set the drive mode to continuous, and I locked the exposure button of my remote controller.
This way, the camera was going to take 13 sec long frames just one after each other, with just a fraction of a second of pause between them.
Note that before I started the frame burst, I quit Live View mode. Because in Live View, the DSLRs flip up and and down the mirror between frames, causing increased dead time between frames.
After 5 pictures were taken, I was pretty sure that it’s going to be enough.
Voilá, there I have 5 nice frames to work with:

Advanced tips on shooting
#1. Where to stand?
It’s best to stand above the plain of the movement: therefore if you’re shooting lighttrails of cars, you should be well above 1-1.5meter, so you’re looking down at the traffic
#2 Remote controller: with or without?
If you don’t have a remote, but your camera has timelapse mode, just start a timelapse with the minimum interval time (1 sec). If you don’t have timelapse mode either, you can just put your camera into 2 second self-timer, and keep exposing until you have enough frames.
The post-processing workflow: Adobe Lightroom + Photoshop
1. Importing into Lightroom
Note: you don’t have to use Lightroom at all. But this is the RAW converter software I use all the time, and I think it’s pretty decent. If I had JPG files, I could go straight to the Photoshop step.
I import them into Adobe Lightroom (Shift+Ctrl-i, Shift+Cmd-i on Mac), and upon importing I apply the Sharpen Scenic preset from Lightroom General Presets. This way the pics will be sharpened upon importing:
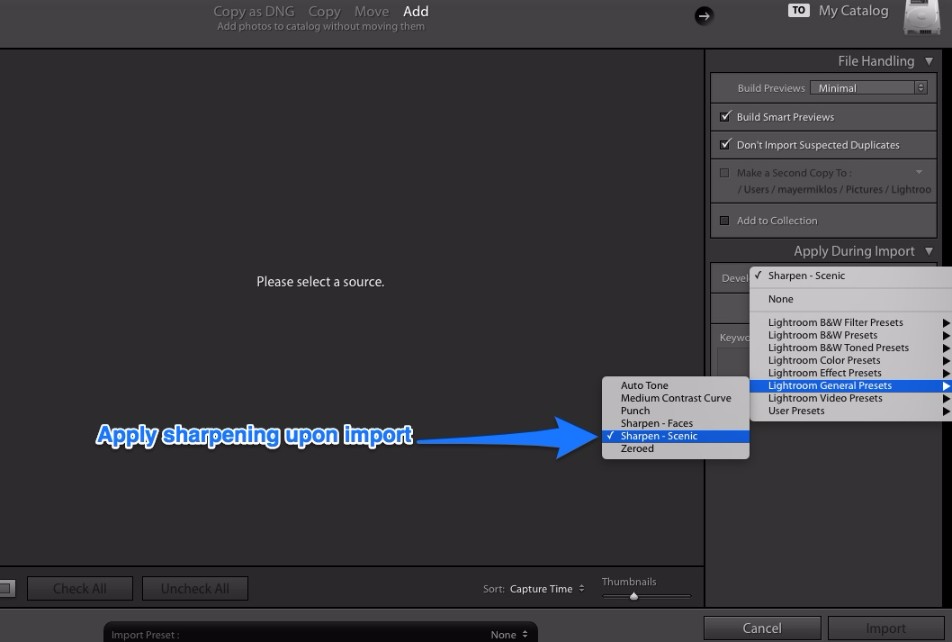
This is a must-have step when shooting in RAW, because they are not sharpened at all.
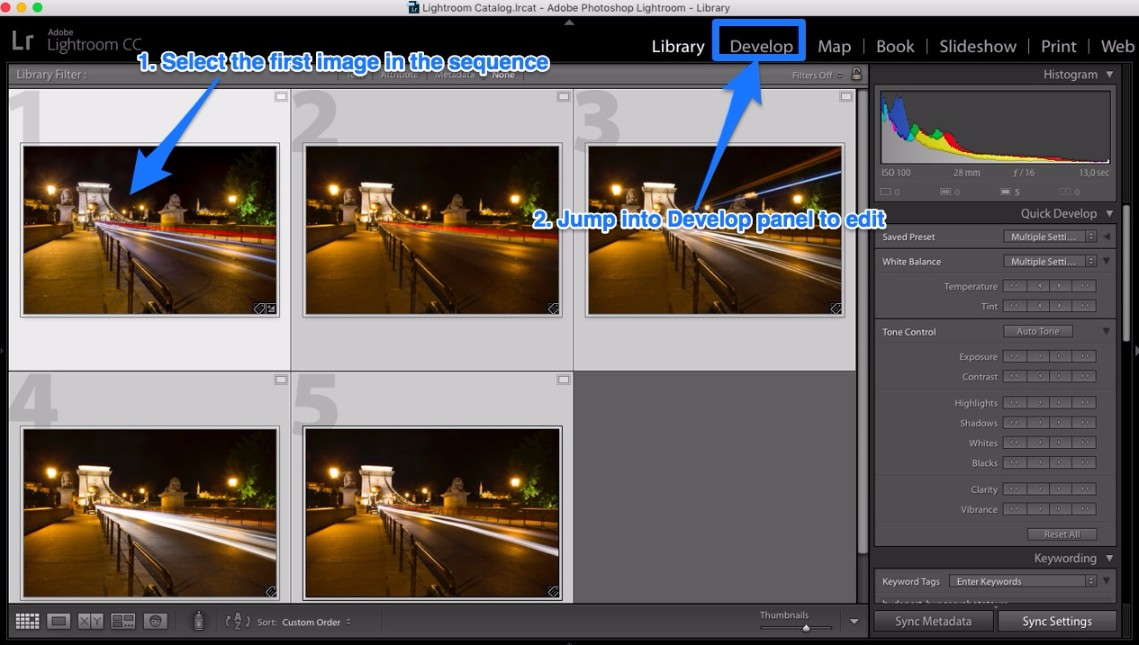
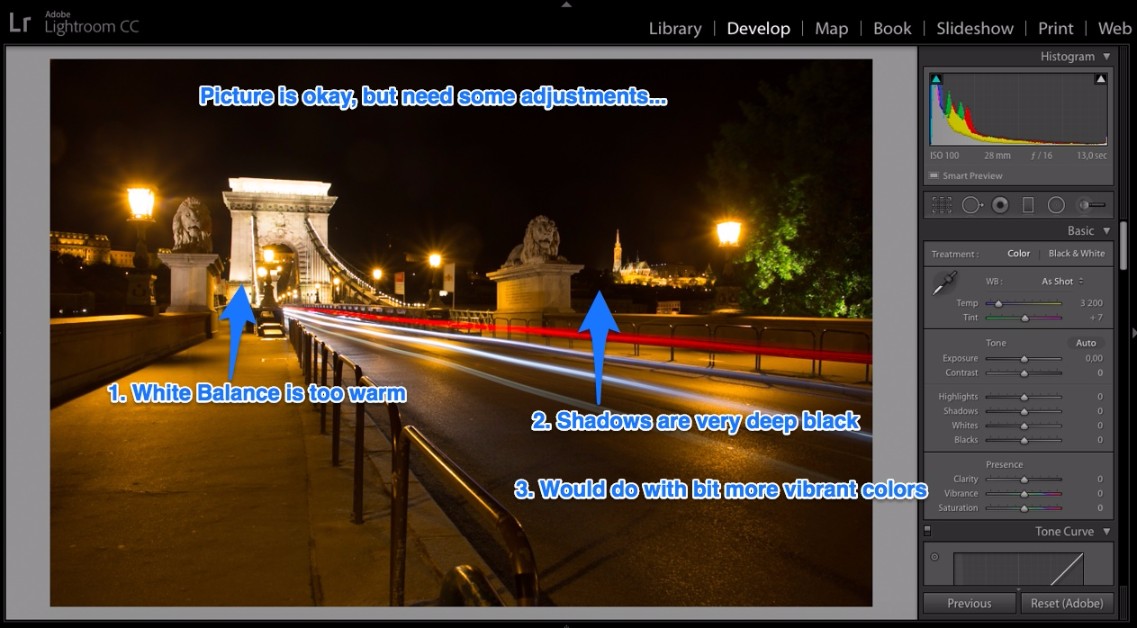
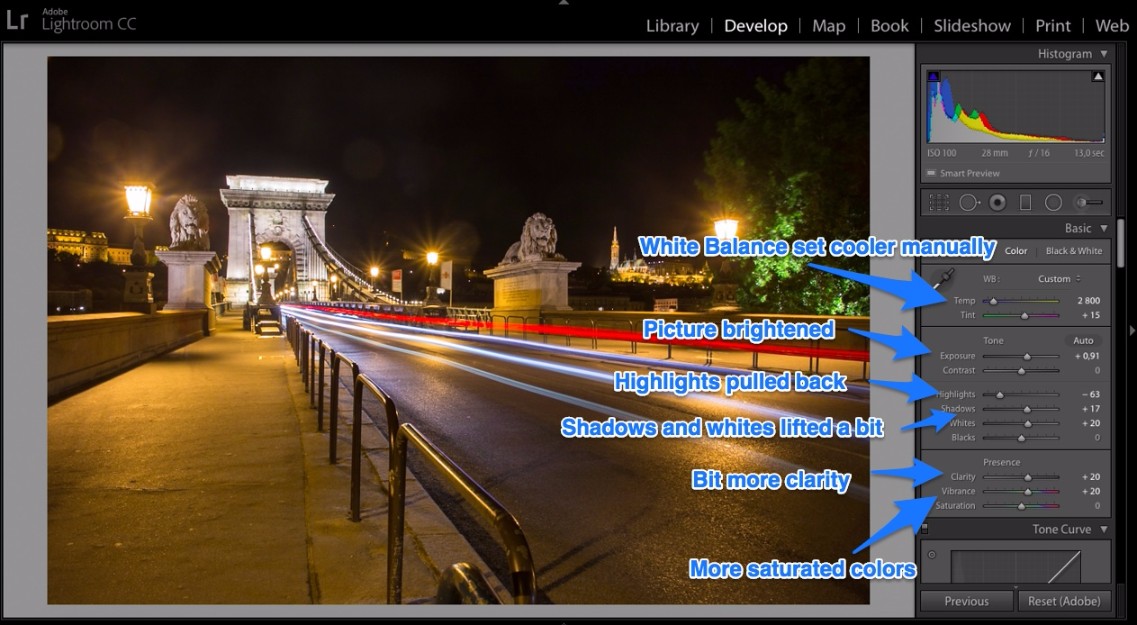
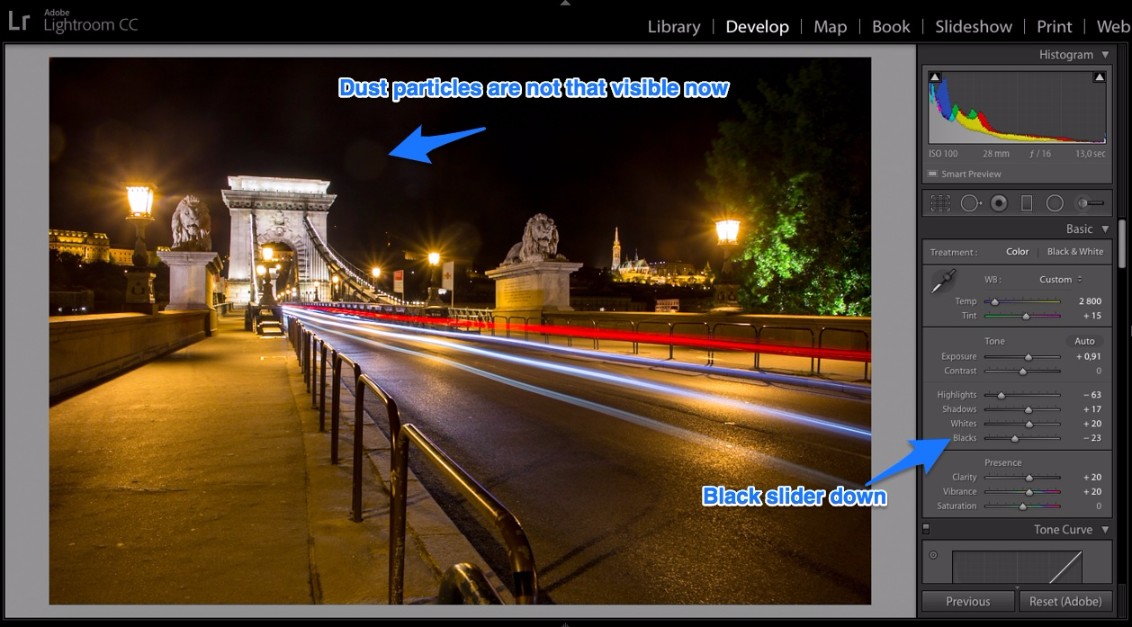
2. Editing in the Develop panel
Then I select the first frame, and edit it to my taste in the Develop panel (D).
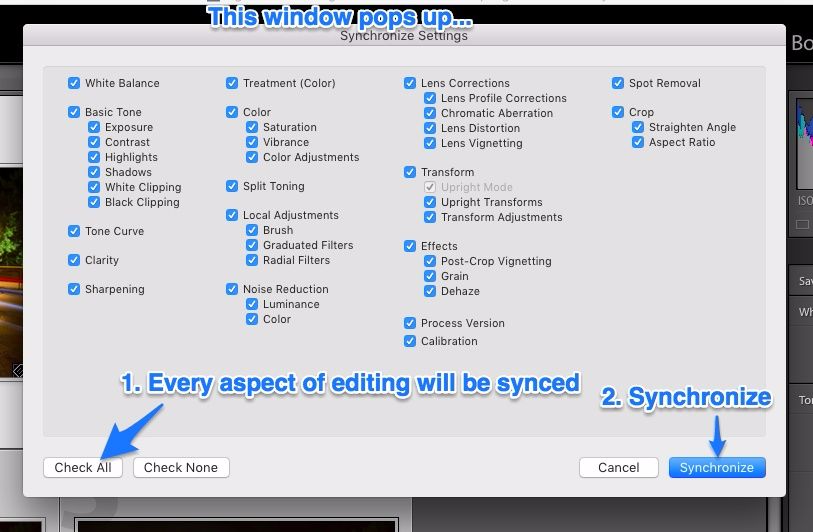
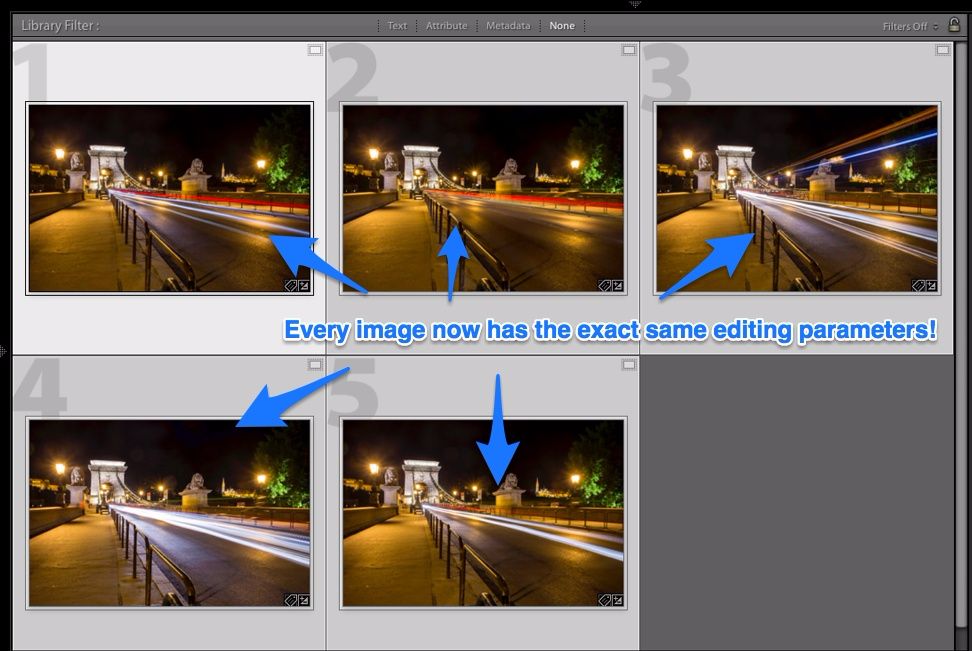
3. Synchonize settings
This is a very cool feature I use all the time. After editing a frame, the exact editing parameters can be copied onto another frames with just a click.
It’s vital here that the edited image is selected as active, while the other non-edited images are just simply selected.
Like this:

So far it’s been a normal Lightroom editing workflow. Now comes the fun part!
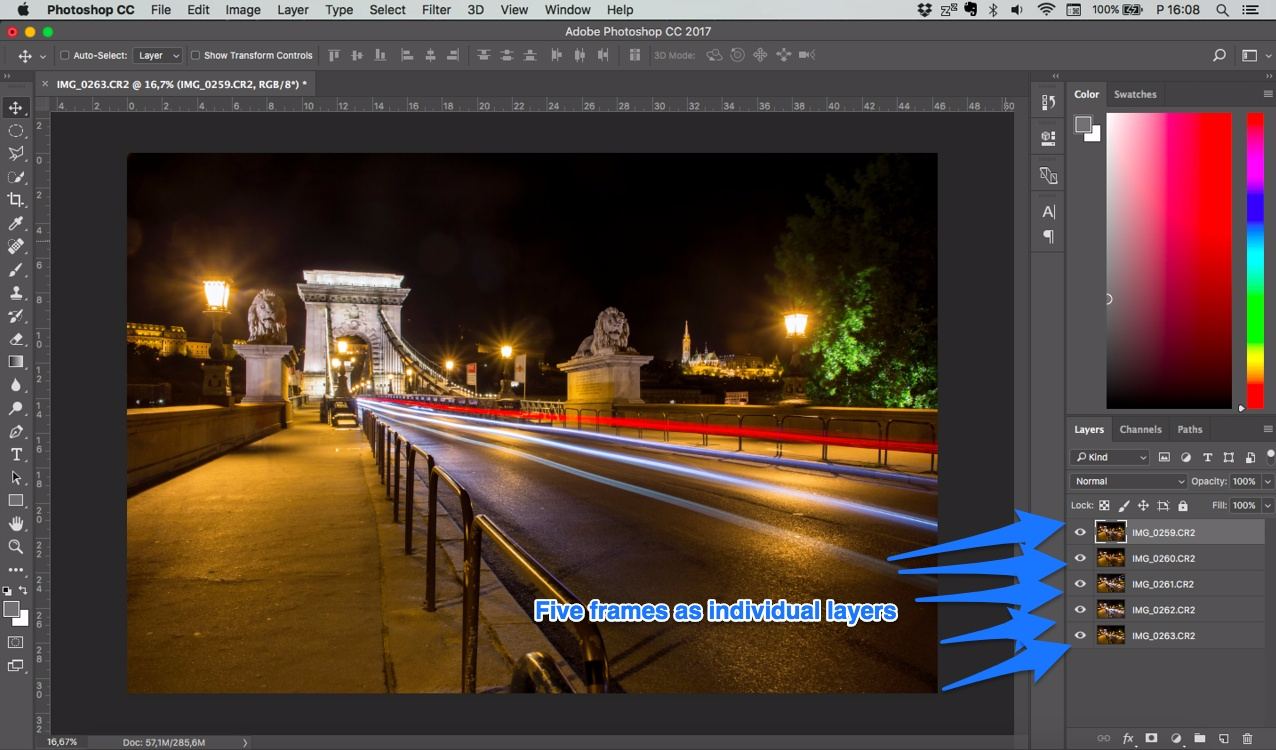
4. Open as Layers in Photoshop
In the next steps I will open each pictures as individual layers in PS:

Photoshop fires up, and there I have the 5 frames as layers:
5. Align layers
Though I was using a tripod, the pics may be a bit misaligned compared to each other. PS comes to rescue.
So select all layers and then, go Edit – Auto Align Layers.
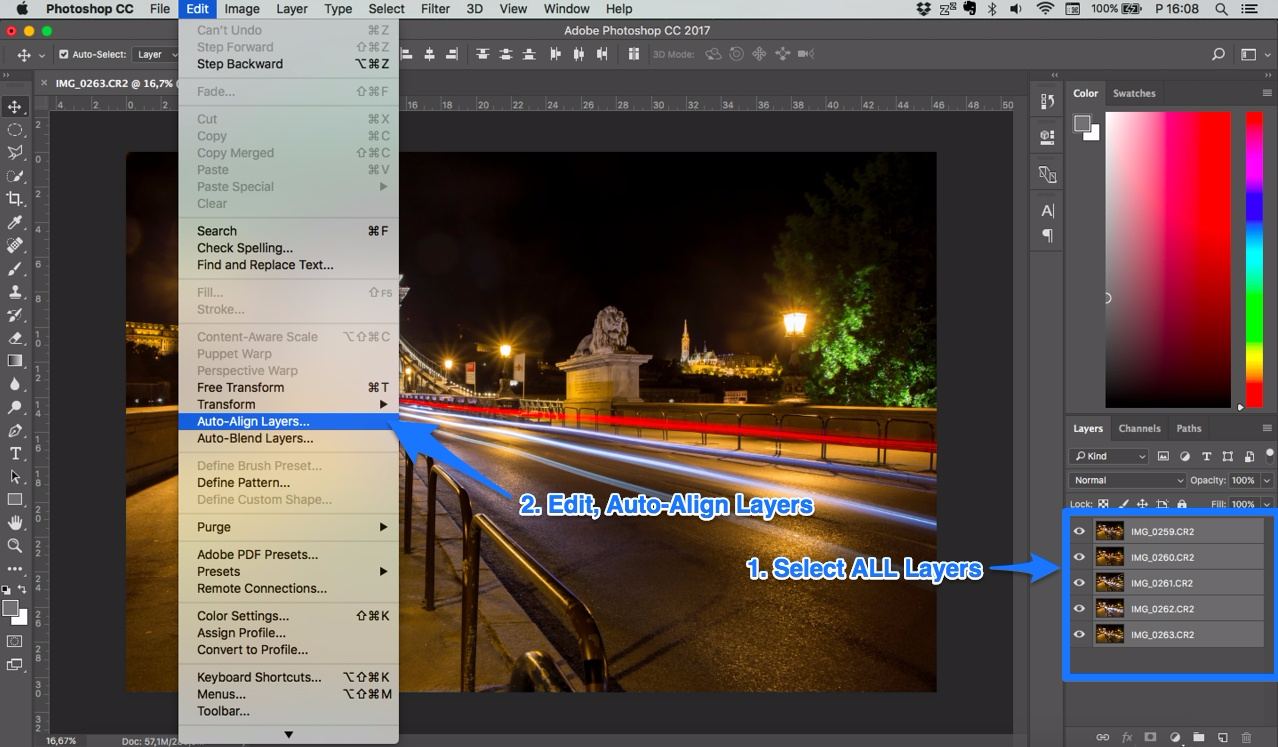
Now all layers are perfectly aligned to each other. If you press Alt and click into the layers, you can see just the selected layers
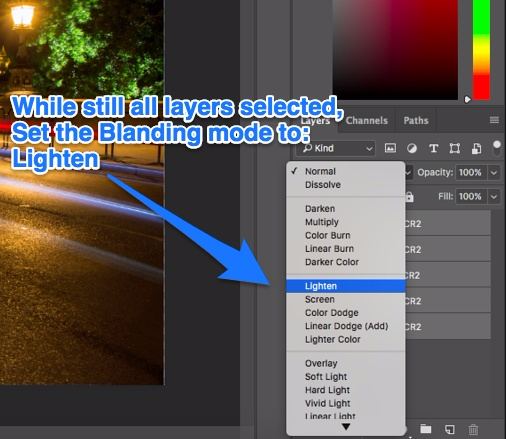
6. Set Blending mode to lighten
While all layers still selected all layers with Shift+click, and then select the blend mode to lighten.
And the image is ready!
7. But let’s take a look what does Photoshop’s lighten mode do!
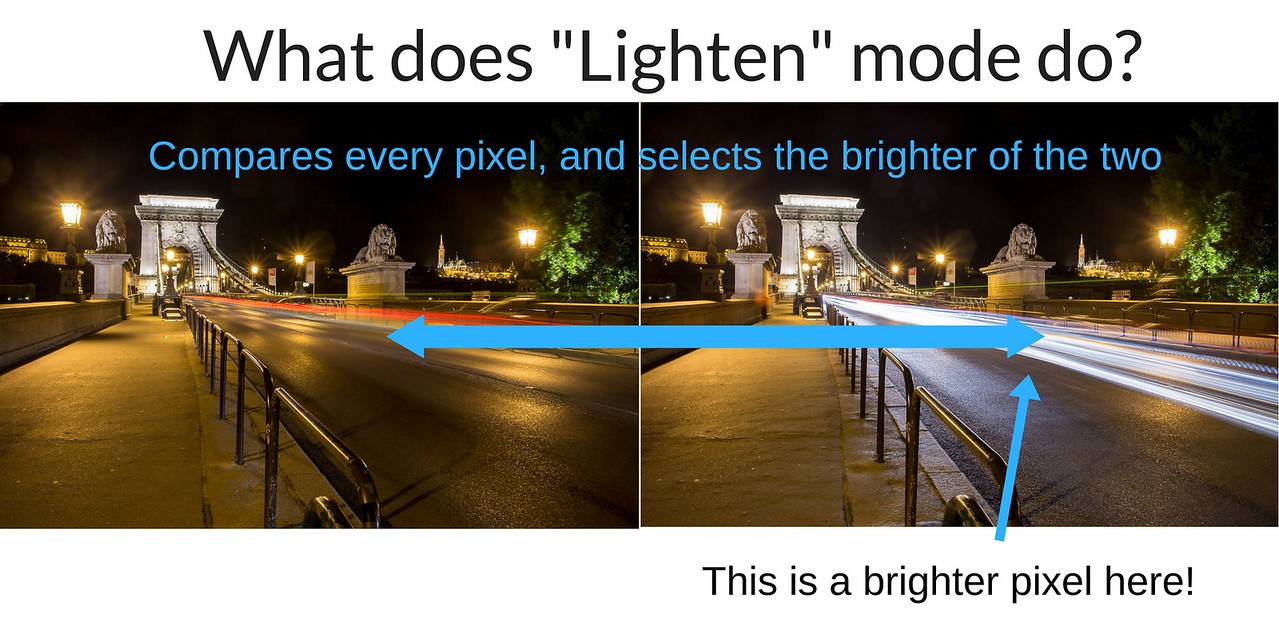
So basically it compares the each pixel and selects the brighter only. So it will not affect those parts where “nothing” happened.
Also, the overall exposure of the stacked image and the source images will be roughly the same.
Olympus cameras have a cool feature called Live Composite, it does exactly the same, but in-camera.
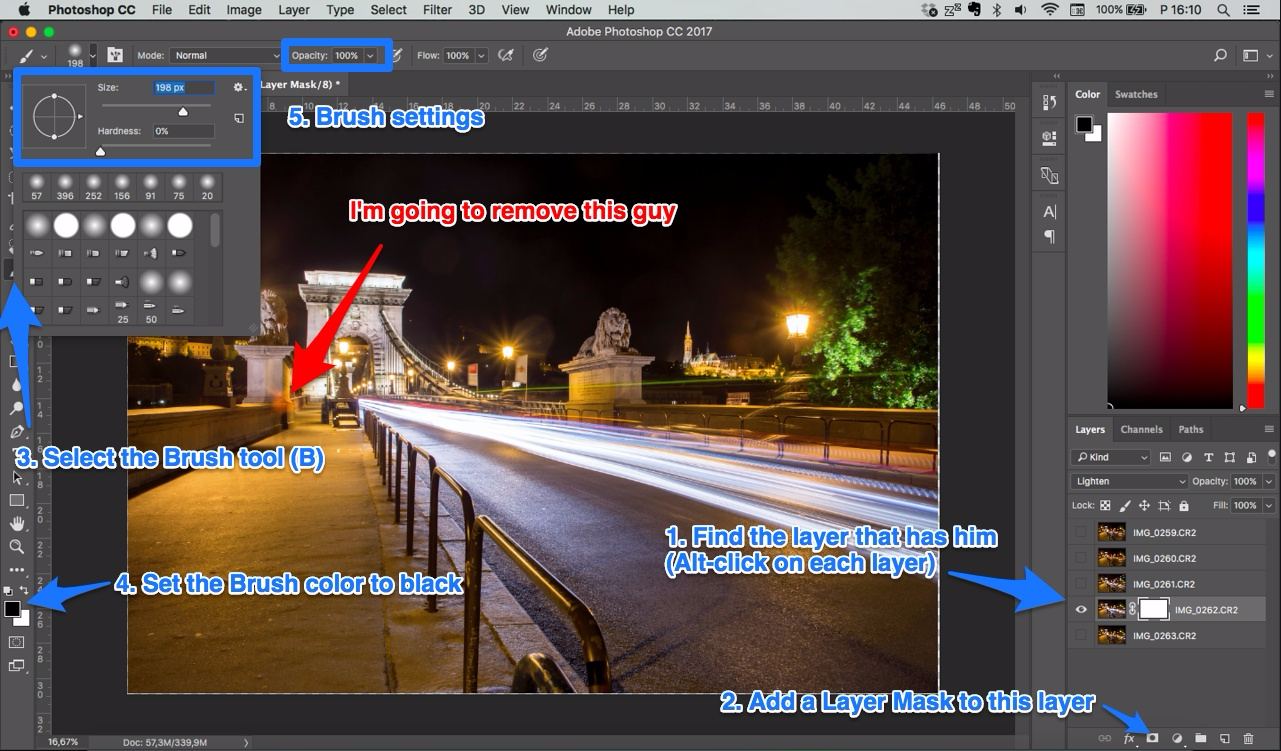
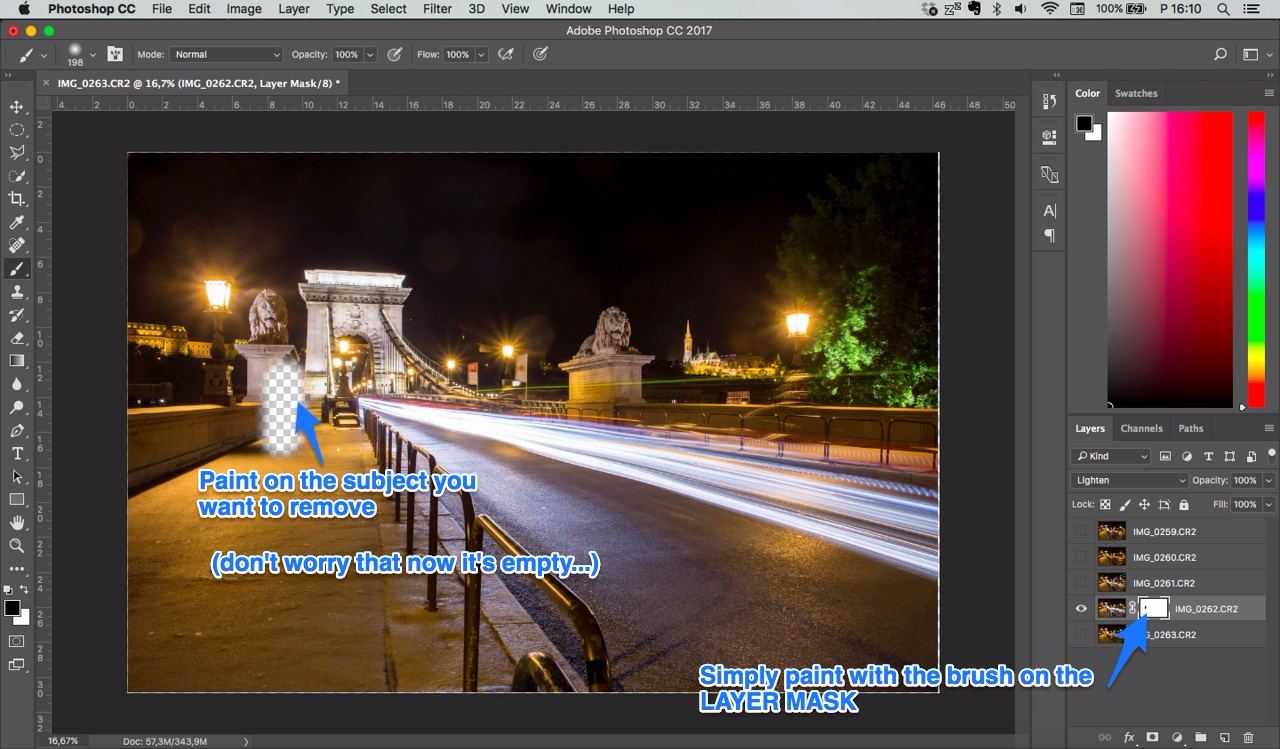
8. Get rid of unwanted things by masking
On this example I didn’t like that reddish looking someone on the left sideways.
So with Alt-clicking on each layer, I find which layer contains that.
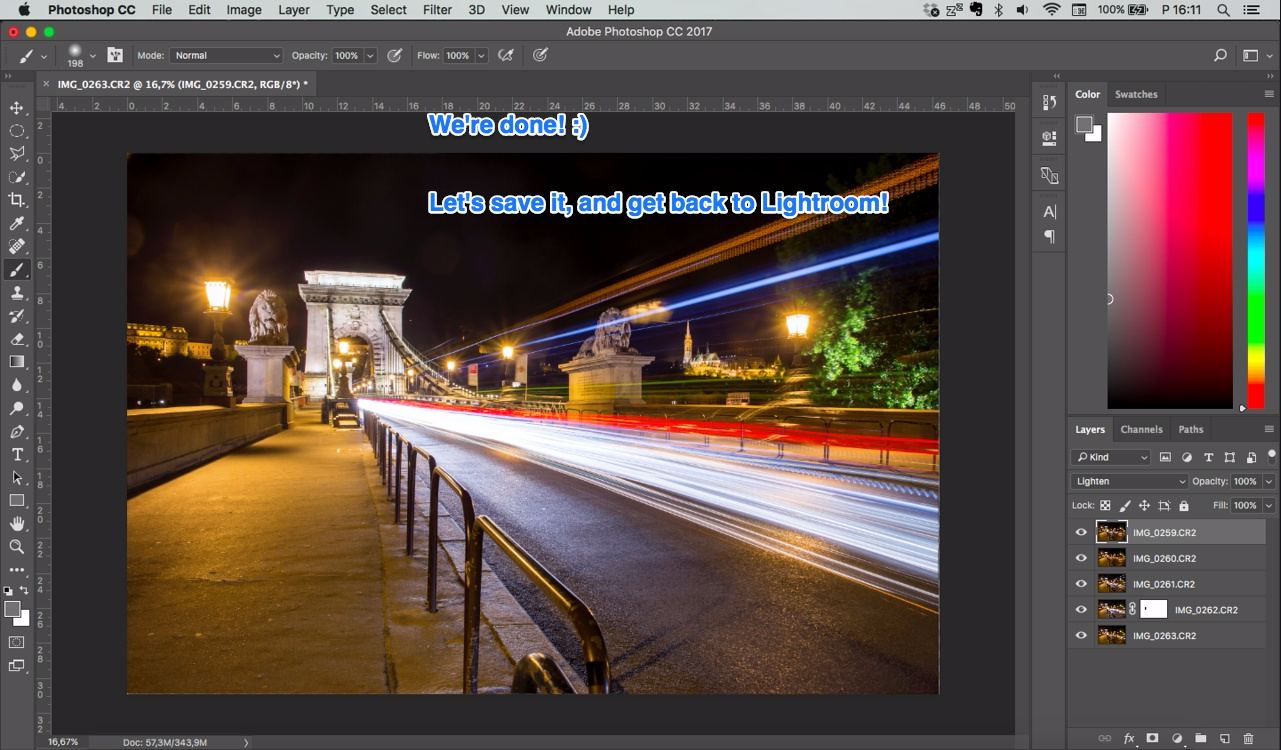
Done! Time to save it by Ctrl + S (Cmd+S).
Tip: if you have many layers these PS files can get very BIG… So I always merge all layers into one. For this select all the layers and press Ctrl+Shift+Alt+E. This creates a merged layer of all the visible layers on top. Then you can discard those layers you don’t need anymore.
9. Save, back to LR, adjust to taste
I close PS, and go back to Lightroom. The stacked image is next to the original ones.
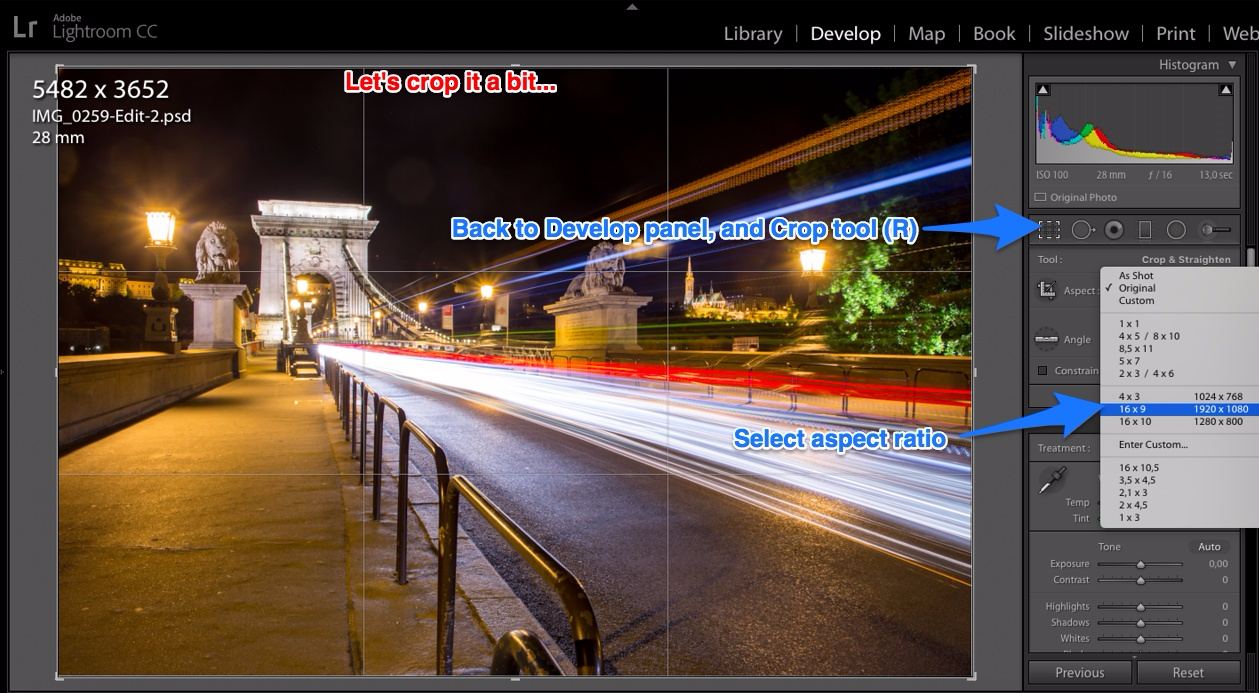
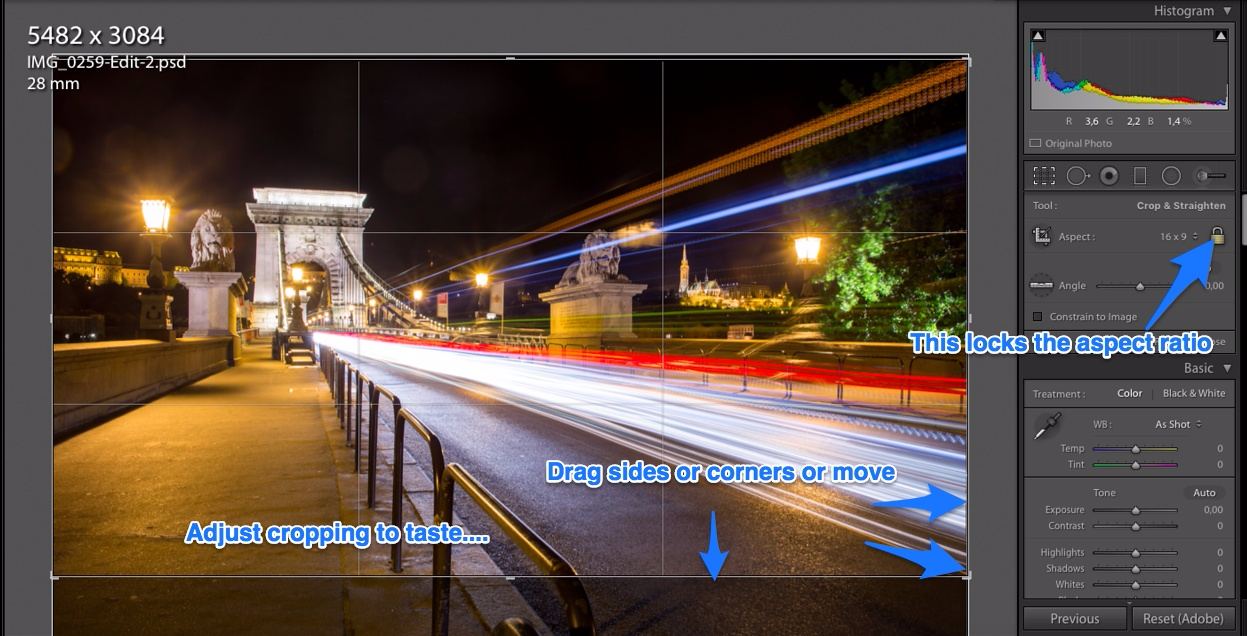
A little cropping would be good, so I press R to activate cropping (or go into Develop panel and click on the Crop tool).
When I’m done I usually mark the picture with green color (press 8).
And now only exporting has to be done. I always upload my pics onto Smugmug, so I export in original size (no resizing and 80% JPG, and no additional sharpening).
Again, the final image:
What if you don’t have Photoshop?
PS is ridiculously slow when it comes to performing mathematically simple things on many layers. 
Luckily there’s a software called Starstax. It’s FREE and awesome!
Say HELLO to Markus Enzweiler, the developer of this awesome tool!
By the way, the technique I’ve shown above is the same that startrails photos are created…
Unfortunately Starstax cannot align the layers, but it makes up for it by having a lot more features.
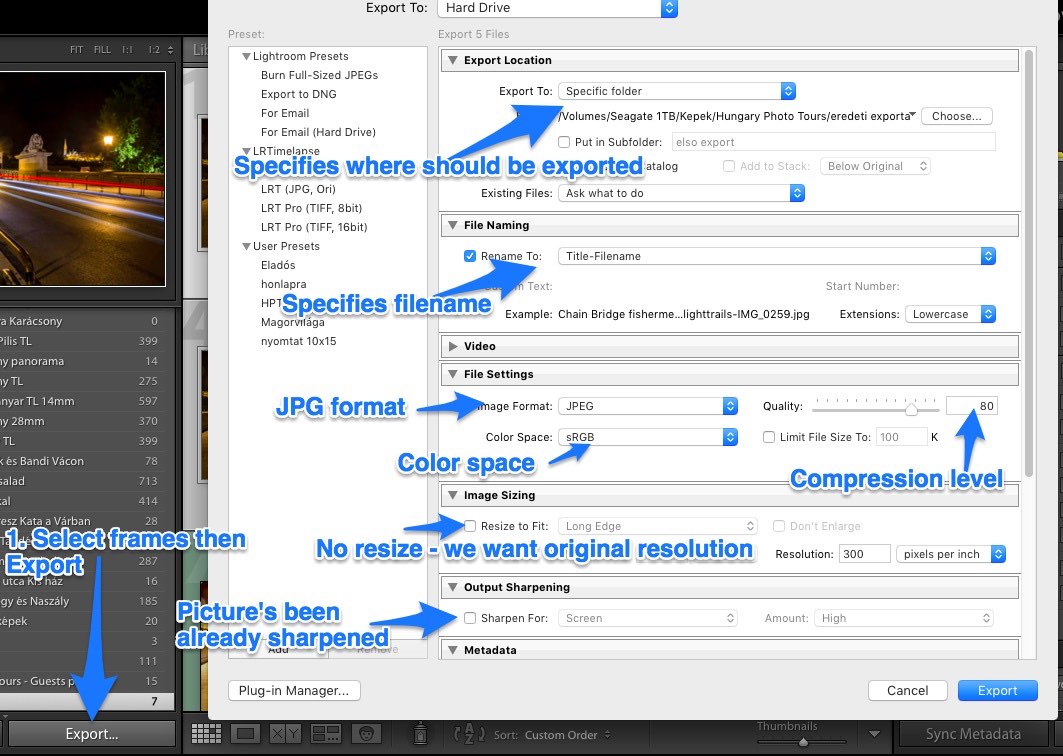
To start in Starstax, you’ll need the frames as JPGs. For this, first export the selected files by Lightroom.
Select the frames, click Export, then export the pics at original resolution, without extra sharpening:
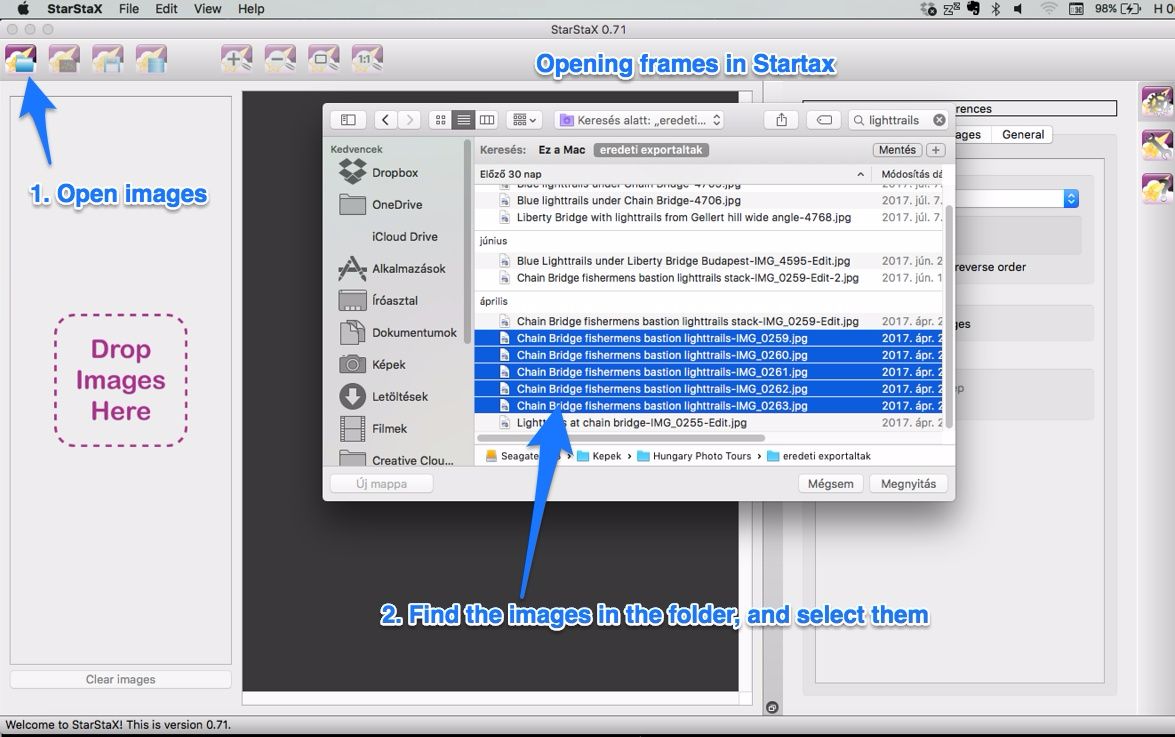
Launch Starstax and open the frames
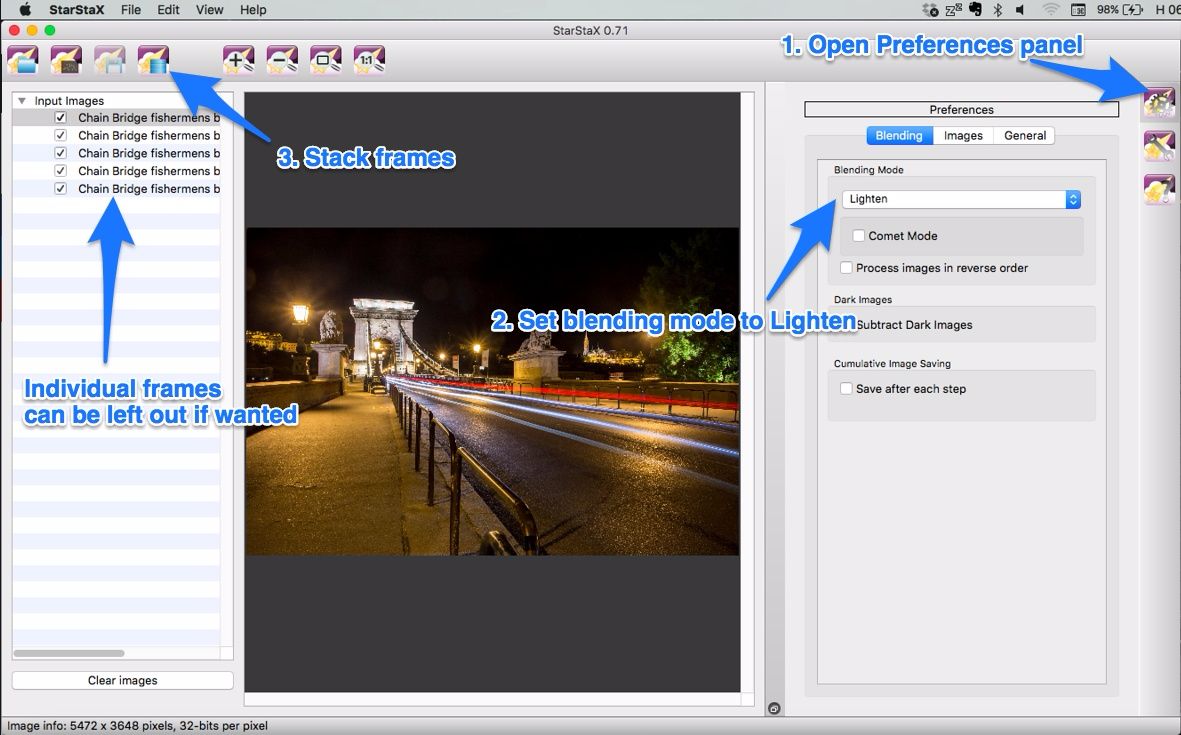
Then on the right side, open the preferences tab, set the blending to Lighten, then click on Stack.
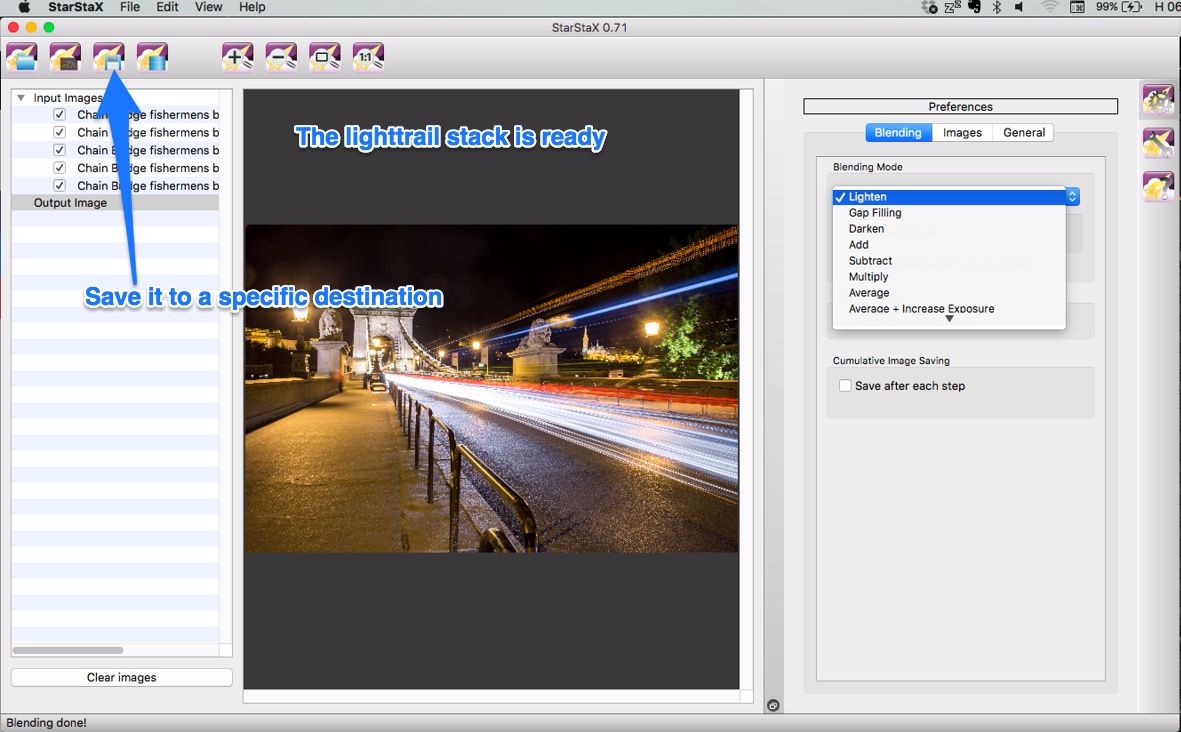
The stacked image was saved into the given folder.
A quick explanation what the different blending modes of Starstax do:
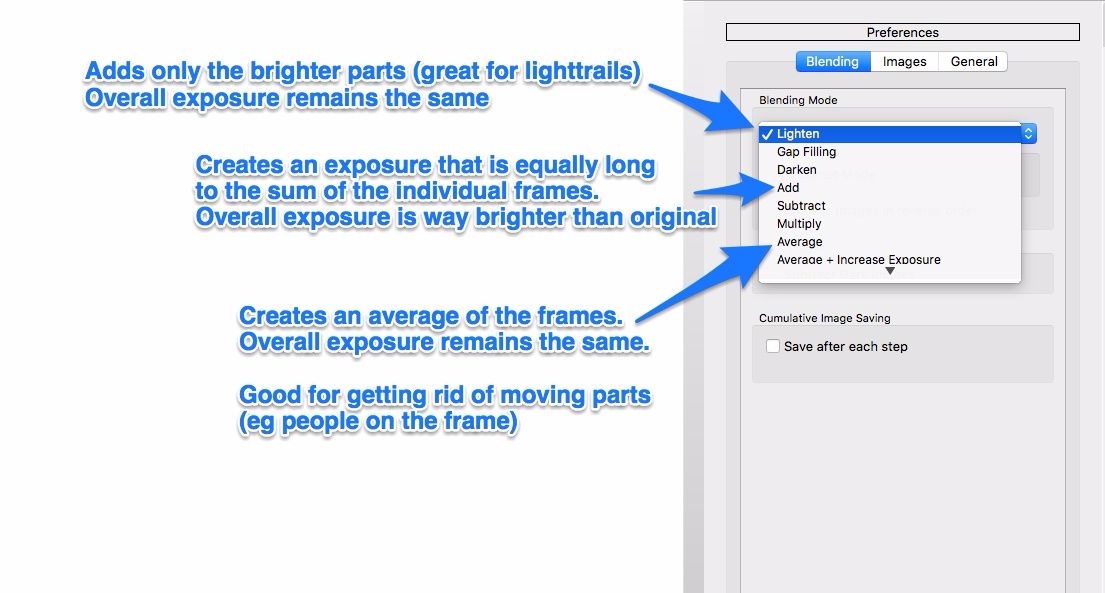
Done! 🙂
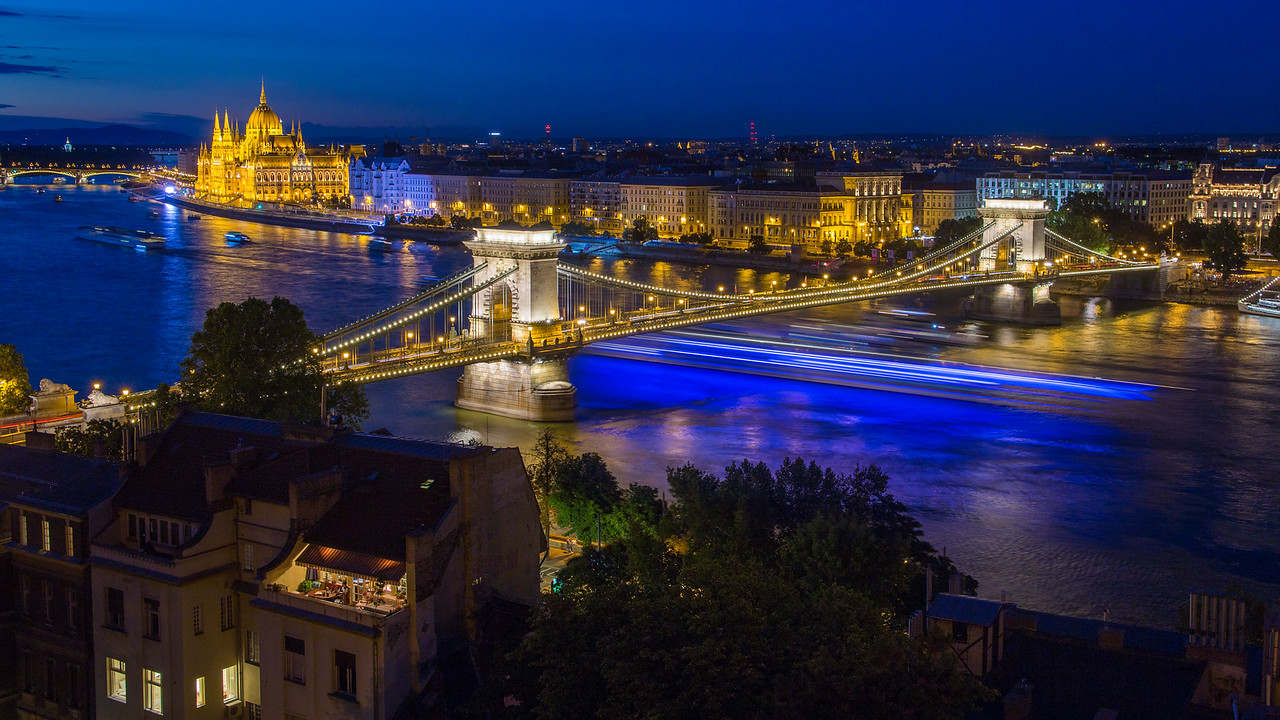
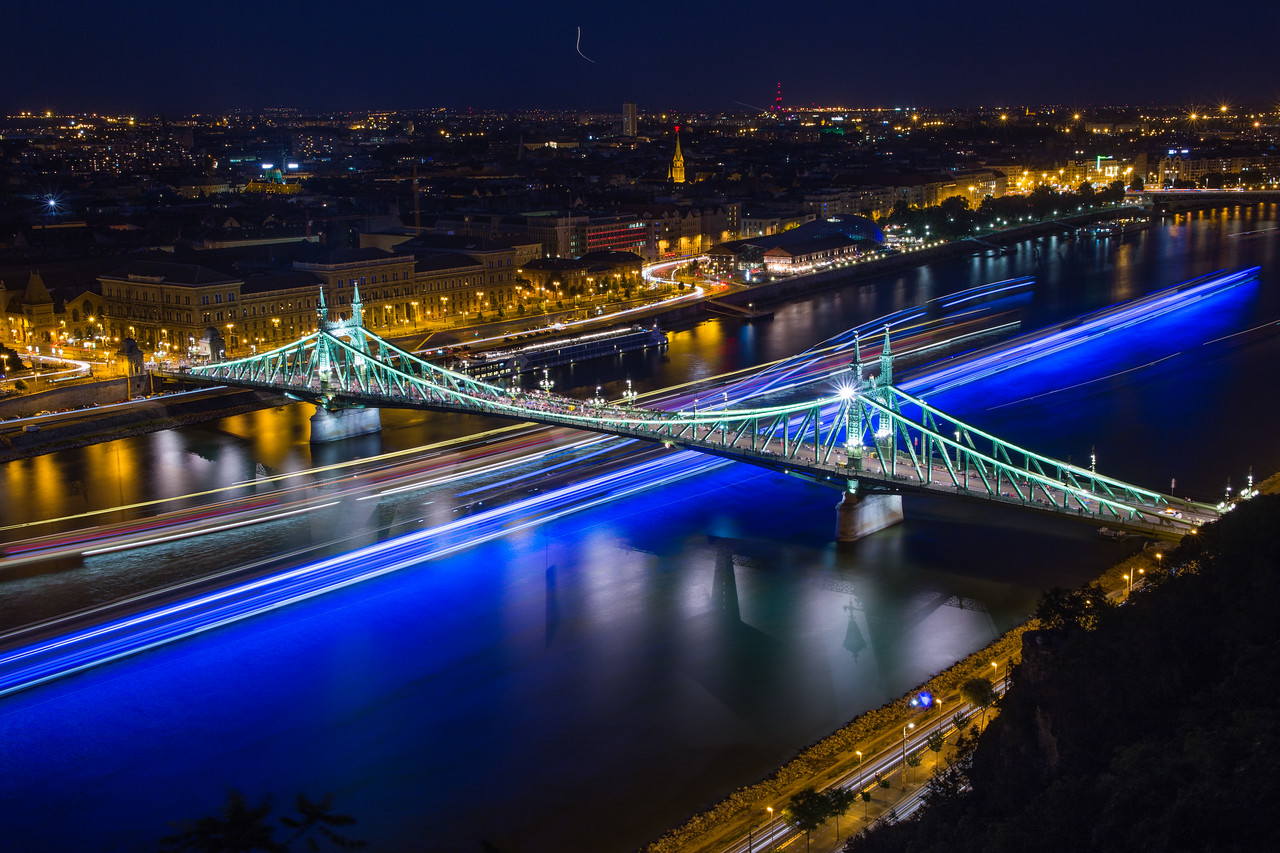
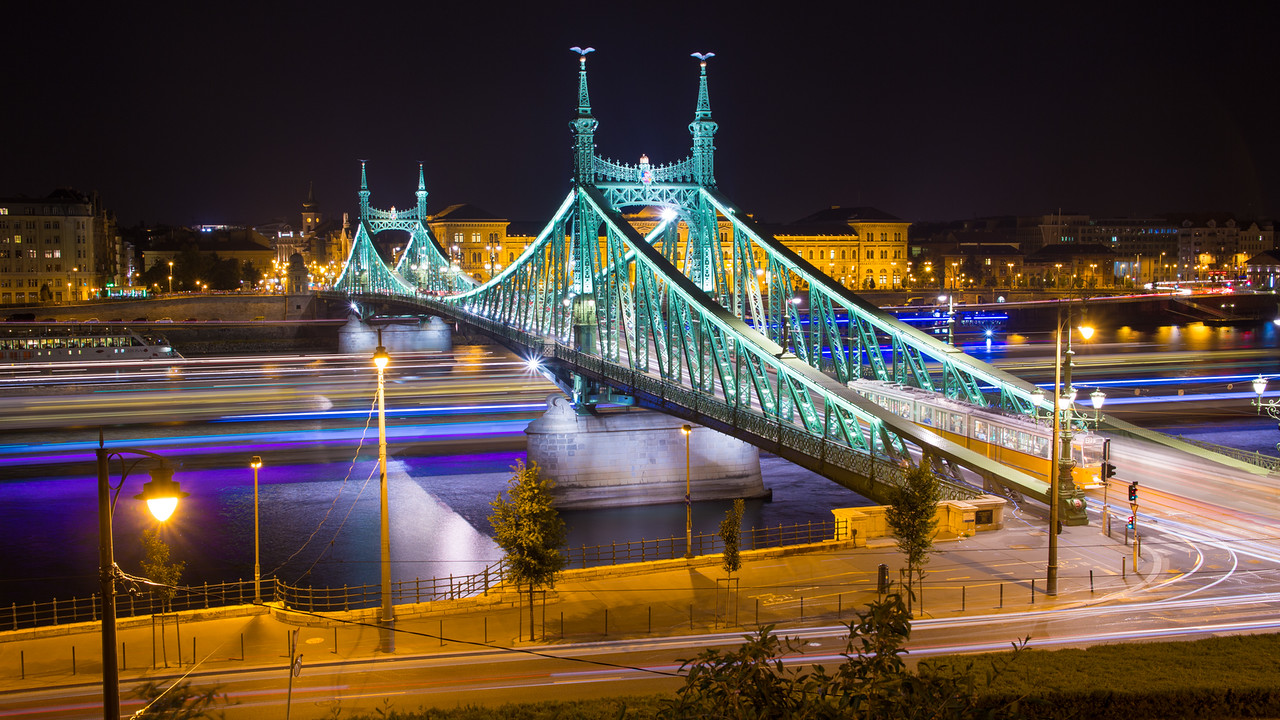
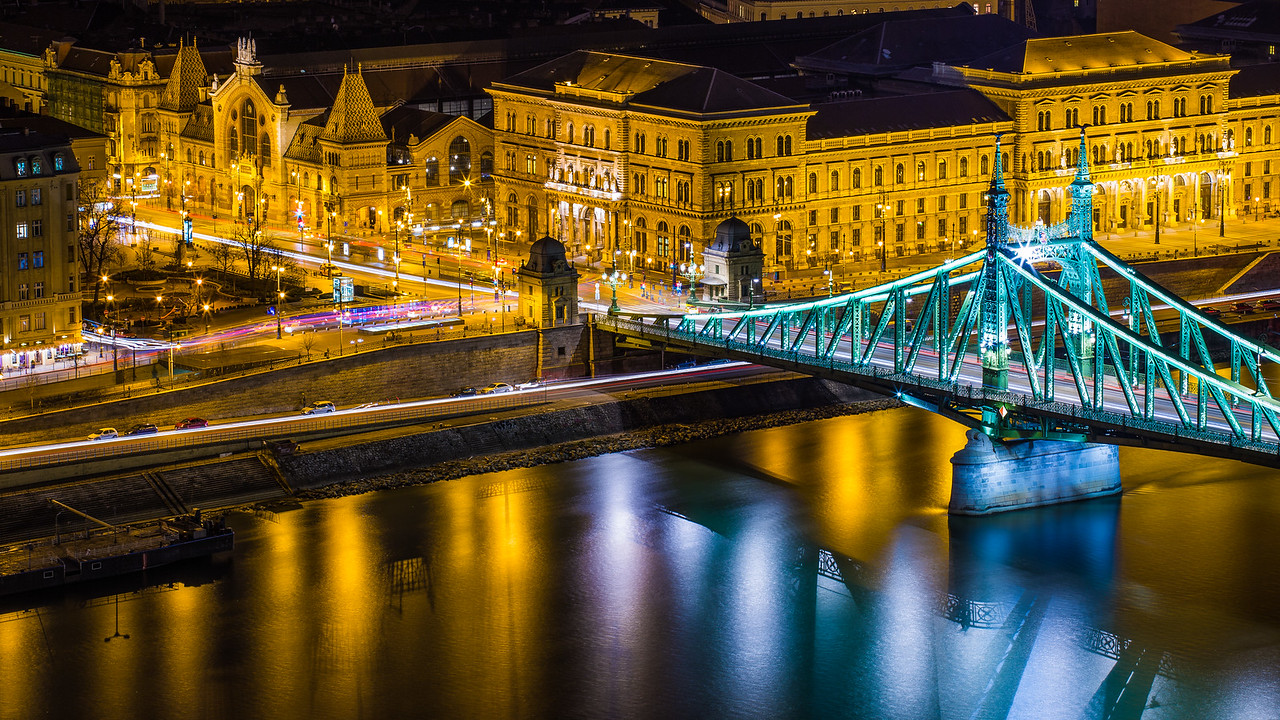
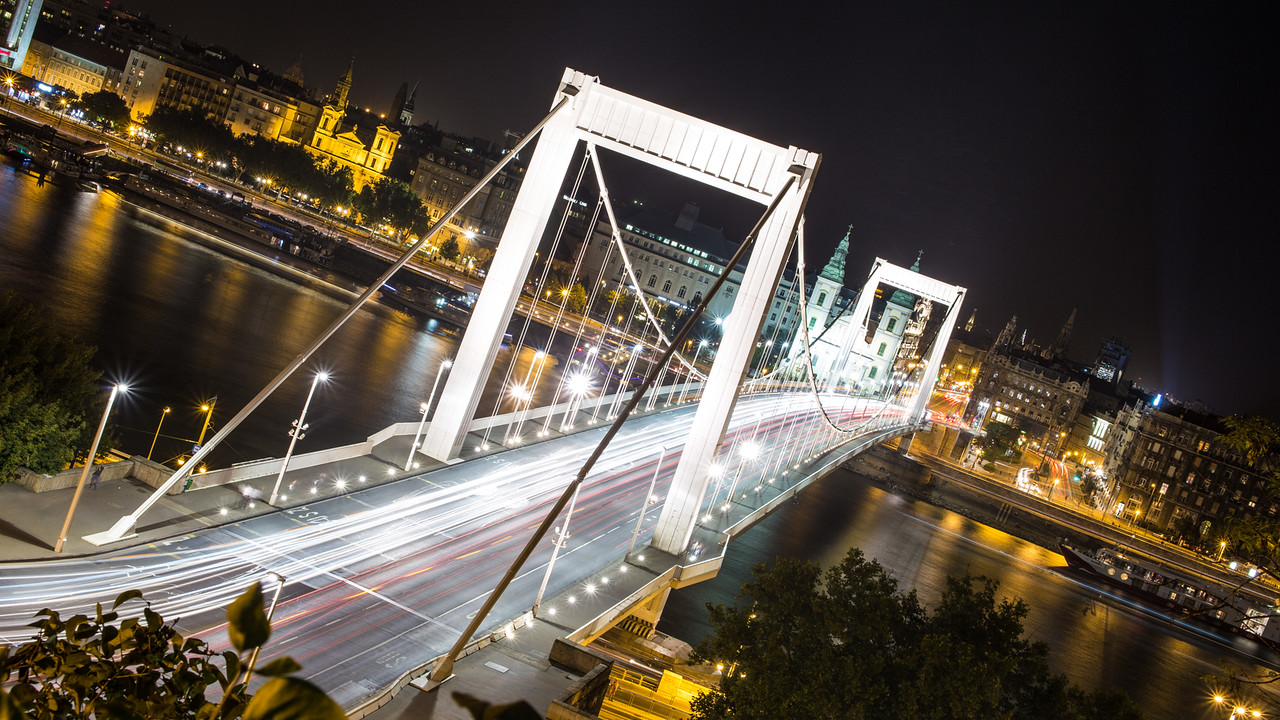
A few more images done with the same technique:

A good example video from Martien Janssen at Travel Imagez, with Mount Bromo. In this particular video he used Starstax to stack frames on top each other with Lighten mode.
You can see how the lighter parts are stacked onto each other, especially from 3:16.
Let me know in the comments how you liked the tutorial and make sure you link one of your stacked lighttrails picture as well!
 Welcome! I'm Miklós Mayer, a photo tour guide in Hungary. My job is to show fellow photographers around in my home city and teach them everything I know about photography.